

Introduction
In this article, we will learn how to apply custom fonts to Views in Android, such as Toolbar and MenuItem, separately from Views such as TextView and EditText.
FontUtils
FontUtils is a tiny font utility library used to apply custom fonts to Views. It supports the following Views.
- Toolbar
- NavigationView
- Menu
- Submenu
- Other Views like EditText, TextView, etc.
This library supports the following languages.
- Android – Java
- Android – Kotlin
- Android
Steps
I have split this part into 3 steps as in the following.
- Step 1 - Creating a New Project with Empty Activity.
- Step 2 - Setting up the Library for Android Views.
- Step 3 - Applying Custom fonts to Android Views.
Step 1
- Open Android Studio and select "Create a new project".
- Name the project as you wish and select an empty activity.
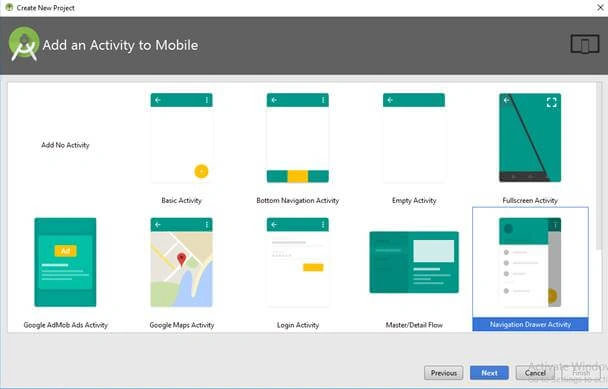
- Click “Finish” button to create a new project in Android Studio.
Step 2
In this part, we will see how to set up the library for the project.
- Open your app level build.gradle file and add the following lines to download the library.
- …
- implementation 'com.ajts.androidmads.fontutils:fontutils:1.0.1'
- …
- Then, click “Sync Now” to download the library.
- We need to use “compile” instead of “implementation” if we are using Android Studio version below 3.0.
Step 3
In this part, we will see how to apply custom fonts to Views. Here, we have to use “Typeface” and to learn more about “TypeFace” Click here.
- In this article, I am assigning the fonts from the Assets folder. To create an assets folder, in the app folder select New. Then, select Folder and click the Assets folder.
- Then, copy and paste the fonts you want to use with your application.
- The following lines show how to initialize the library.
- // Applying Custom Font
- Typeface typeface = Typeface.createFromAsset(getAssets(), "custom_font.ttf");
- // Init Library
- FontUtils fontUtils = new FontUtils();
- Then, initialize your Views and apply the fonts to the Views. The following example shows how to apply the fonts to Toolbar of your application.
- // Apply font to Toolbar
- fontUtils.applyFontToToolbar(toolbar, typeface);
- You can apply custom fonts to other Views like NavigationView, Menu, Submenu, TextView like in following example.
- // Apply font to NavigationView
- fontUtils.applyFontToNavigationView(navigationView, typeface);
- // Apply font to Menu
- fontUtils.applyFontToMenu(menu, typeface);
- // Apply font to Other Views like TextView...
- fontUtils.applyFontToView(textview, typeface);
- fontUtils.applyFontToView(editText, typeface);
- fontUtils.applyFontToView(radioButton, typeface);
- fontUtils.applyFontToView(checkBox, typeface);
For Kotlin
We need to do the same steps mentioned. But we need to include Kotlin support while creating the project. Apply font to Views in Kotlin as shown below.
- // Applying Custom Font
- val typeface = Typeface.createFromAsset(assets, "custom_font.ttf")
- // Init Library
- val fontUtils = FontUtils()
- // Apply font to Toolbar
- fontUtils.applyFontToToolbar(toolbar, typeface)
- // Apply font to NavigationView
- fontUtils.applyFontToNavigationView(navigationView, typeface)
- // Apply font to Menu
- fontUtils.applyFontToMenu(menu, typeface)
- // Apply font to Other Views like TextView...
- fontUtils.applyFontToView(textview, typeface)
- fontUtils.applyFontToView(editText, typeface)
- fontUtils.applyFontToView(radioButton, typeface)
- fontUtils.applyFontToView(checkBox, typeface)
For Xamarin.Android
We can apply the same with Xamarin.Android. To know more Click Here.
Download Code
I hope the article was informative for you. If so, please like and star the repo in GitHub. You can download the code here.
Note
- Java and Kotlin Android Support - https://github.com/androidmads/FontUtils
- Xamarin.Android Support - https://github.com/Xamarin-Gists/XAFontUtilsLibrary
Join the conversation! Your thoughts help the community grow.