

Introduction
Managing job queues in Dynamics 365 Business Central can be seamless, until one fails. Job queue failures can impact automated processes, reporting tasks, and system integrations. The earlier you’re notified, the faster you can act.
In this blog, we'll walk you through a Power Automate flow that automatically sends an email alert via Outlook when a job queue failure occurs in Business Central. This proactive approach minimizes downtime and ensures that the right people are informed instantly.
How to Automatically Notify in Outlook
Step 1. Trigger: When a Job Queue Failed Event Occurs (V3)
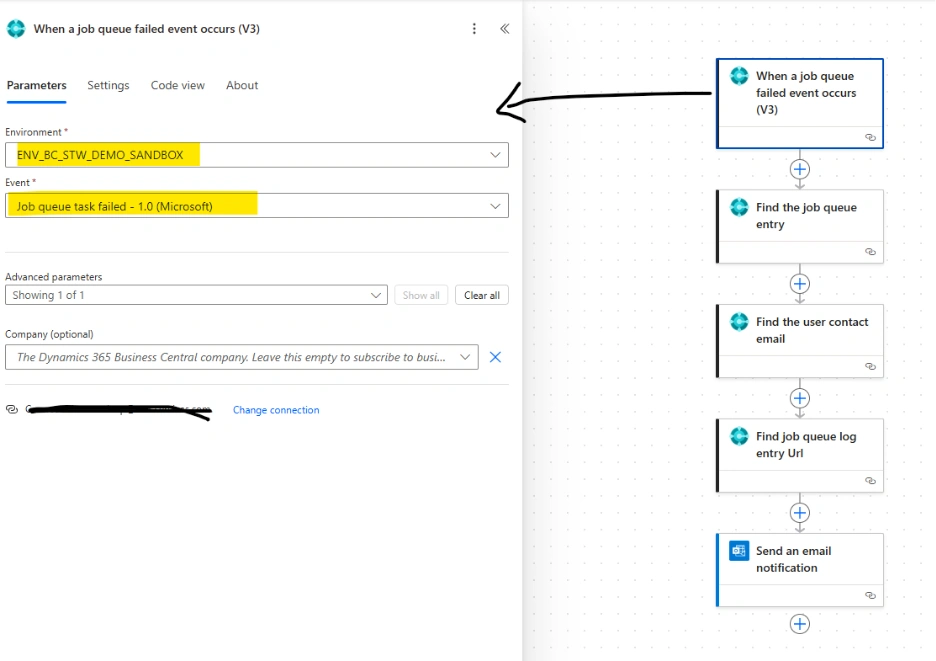
The Power Automate flow starts with the trigger “When a job queue failed event occurs (V3)”. This step listens for failure events within Business Central’s job queue system. It uses the Business Central connector to hook into the system and monitor the status of scheduled jobs. The moment a failure is logged, the flow is triggered automatically.
Parameters Section
- Environment: This dropdown lets you choose the Business Central environment where the job queues are running. In this case, the selected environment is ENV_BC_STW_DEMO_SANDBOX. That means the trigger will only listen for failures occurring in the sandbox environment of your Business Central system.
- Event: This specifies the type of event the trigger should listen for. Here, it's set to Job queue task failed - 1.0 (Microsoft), which means it will fire only when a scheduled job queue task fails.
- Advanced Parameters: This section is usually collapsed by default but may include filters or additional settings. In this case, it’s showing 1 option but doesn’t need to be adjusted unless you're filtering further.
- Company (optional): You can optionally specify the name of the Business Central company (e.g., “CRONUS India Ltd.”) if your environment has multiple companies. Leaving this field blank means it will trigger on any company within the selected environment.
Step 2. Action: Find the Job Queue Entry
Once the failure is detected, this action fetches the corresponding job queue entry, pulling relevant metadata such as job name, status, and related IDs.
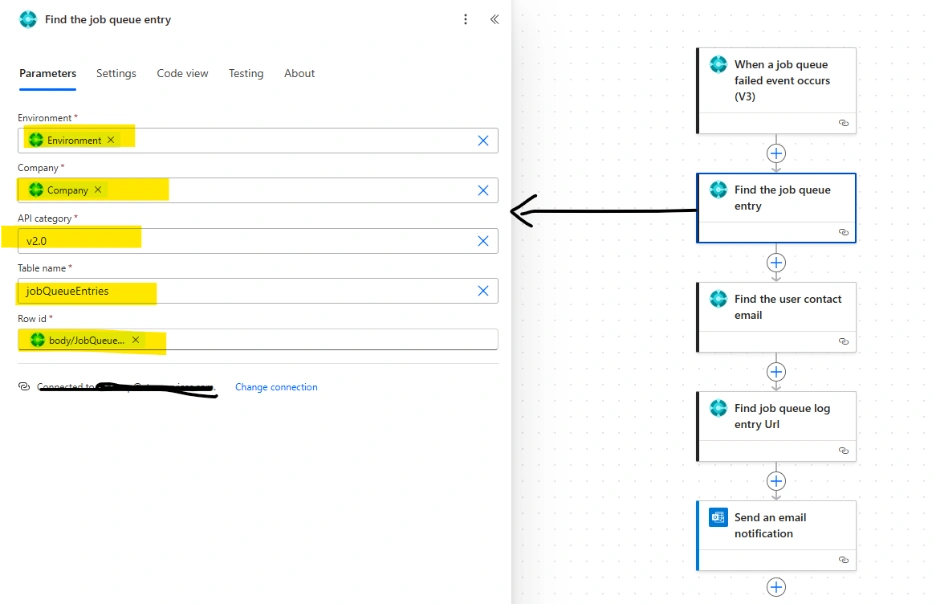
This screen shows the configuration for the “Find the job queue entry” step in your Power Automate flow. This step comes right after the trigger "When a job queue failed event occurs (V3)" and is responsible for fetching detailed information about the failed job queue entry from Dynamics 365 Business Central.
Parameters
- Environment: This field specifies the Business Central environment where the job queue failure occurred. It is dynamically filled using the value from the trigger, so the action will execute in the same environment where the job failure was detected. In your case, it appears to be something like ENV_BC_STW_DEMO_SANDBOX.
- Company: This is the name of the Business Central company (like CRONUS India Ltd.) where the job is registered. Again, this value is pulled dynamically from the trigger output to ensure the flow uses the correct company context.
- API Category: This specifies the version of the Business Central API you're using. It is set to v2.0, which is the most commonly used and stable API version as of now.
- Table Name: This tells Power Automate which Business Central API table to query. It's set to jobQueueEntries, which corresponds to the list of job queue tasks defined in your Business Central environment. This is where all job-related data—like job name, status, and frequency—resides.
- Row ID: This is a dynamic expression—most likely something like body('JobQueueFailedTrigger')?['JobQueueEntryId'] - that uniquely identifies the job queue entry that failed. Power Automate will use this ID to pull just the record for the failed job queue, rather than fetching the whole table.
Step 3. Action: Find the User Contact Email
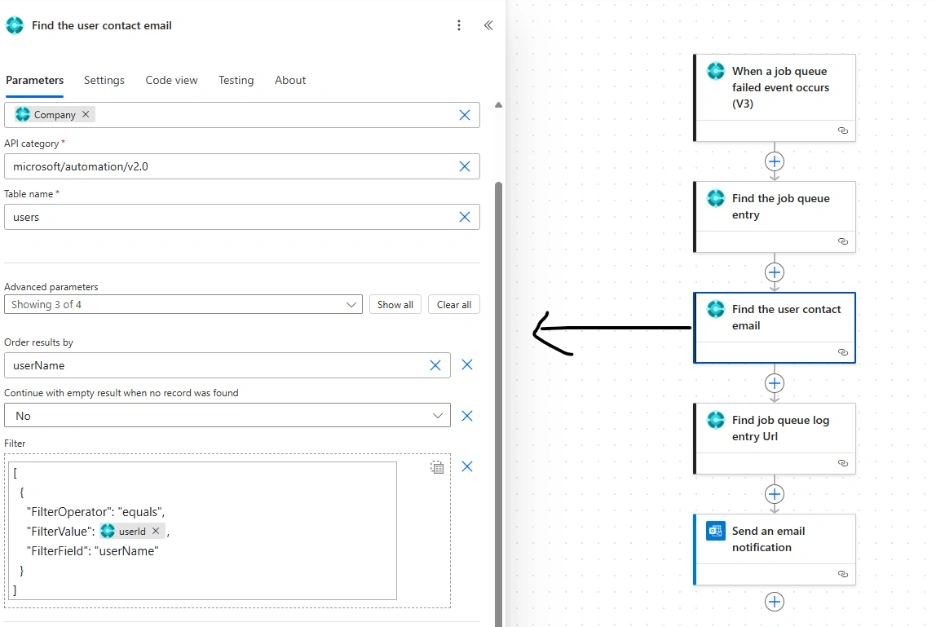
After identifying the failed job, the flow proceeds to “Find the user contact email”. This action locates the email address of the user who is responsible for the job. By doing so, we can ensure that the notification is sent directly to the person who can take the necessary corrective action, instead of broadcasting alerts to an entire team.
Step 4. Action: Find Job Queue Log Entry URL
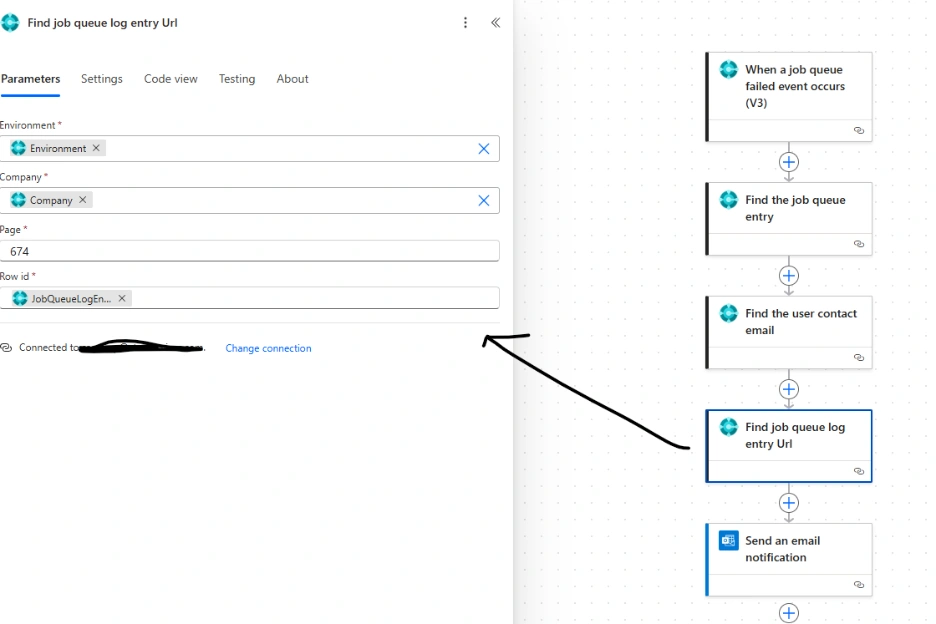
We extract the URL to the job queue’s log entry in Business Central. This allows the recipient to click the link and investigate the error immediately, saving time and guesswork.
Step 5. Action: Send an Email Notification
Finally, we send a professional email with the following contents:
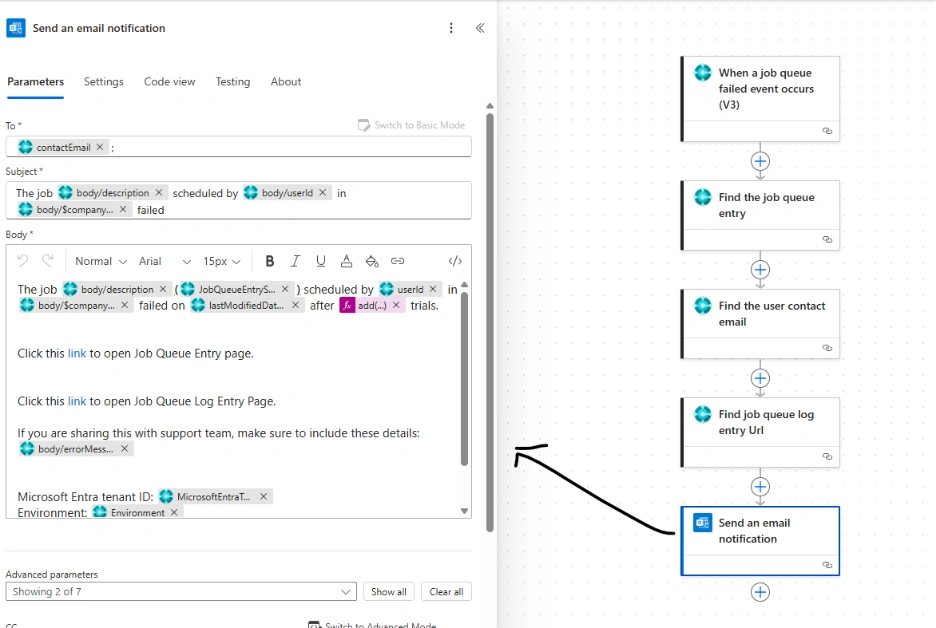
This screen shows the configuration for the “Send an email notification” action in your Power Automate flow. This is the final step of your flow, and it’s responsible for notifying the relevant user via Outlook when a job queue fails in Dynamics 365 Business Central.
Let’s walk through the setup in detail:
To (Recipient Email)
The To field is set to contactEmail, which was retrieved earlier in the flow using the action “Find the user contact email”. This ensures the email is sent directly to the user who scheduled or owns the failed job queue task.
Subject Line
The subject dynamically constructs a descriptive subject for the email. It reads something like:
“The job [Description] scheduled by [User] in [Company] failed”
Here’s how it's composed:
body/description: The name or description of the job from the failed queue entry.
body/userId: The user who scheduled or owns the job.
body/$company: The company in which the job was set up.
This makes it easy for the recipient to quickly understand what the email is about without opening the message.
Email Body
The body of the email provides a clear and actionable summary of the failure:
Failure Details
The first paragraph provides a detailed sentence like:
“The job [Description] scheduled by [User ID] in [Company] failed on [Date] after [X] trials.”
JobQueueEntrySystemId, userId, company, lastModifiedDateTime, and trial count (calculated via an expression) all help describe exactly what went wrong.
Quick Links
Two links are provided:
Job Queue Entry page – Takes the user to the record of the job queue task.
Job Queue Log Entry page – Takes the user directly to the error log entry for deeper troubleshooting.
These links are helpful for navigating directly to the source of the issue in Business Central.
Support Tip
There's a helpful note for users who might want to escalate this issue:
“If you are sharing this with the support team, make sure to include these details: [Error Message]”
This error message is dynamically pulled from the job queue log and will help support teams diagnose the problem faster.
Technical Context
At the bottom, it adds:
Microsoft Entra Tenant ID
Environment
These identifiers are particularly helpful in multi-environment or multi-tenant scenarios, allowing the IT team to know exactly where the failure occurred.
Advanced Parameters
There are more options available under advanced parameters, but only 2 of 7 are currently shown. You could use these to set CC/BCC addresses, importance, attachments, or custom headers if needed.
Conclusion
This Power Automate flow is simple but powerful. It bridges the gap between Business Central job queue monitoring and proactive team communication. With minimal effort, you can ensure that failures don’t go unnoticed, and that your team stays informed and empowered to act.
Join the conversation! Your thoughts help the community grow.