

In this article I will show you how to Bind GridView in 3 tier in ASP.Net using C# with Stored Procedure. We will also edit, delete and update the data in GridView.
Initial Chamber
Step 1: Open Visual Studio 2010 and create an Empty Website. Give it a suitable name [GridView_demo].
Step 2: In Solution Explorer you will get your empty website. Add a web form, SQL database and 3 class files. By going like this:
For Web Form
GridView_demo (Your Empty Website) -> Right Click -> Add New Item -> Web Form. Name it as -> gridview_demo.aspx.
For SQL Server Database
GridView_demo (Your Empty Website) -> Right Click -> Add New Item -> SQL Server Database. [Add Database inside the App_Data_folder].
For 3 Class Files
GridView_demo (Your Empty Website) -> Right Click -> Add New Item -> Class [Add 3 Class files - -> Add your class file in App_code Folder] - -> Give name as the following:
- Commonfunctions.cs
- BAL_user_operation.cs
- DAL_user_operation.cs
Database Chamber
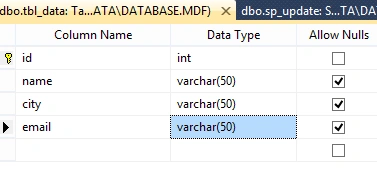
Step 3: In Server Explorer, Click on your Database [Database.mdf] - -> Tables - -> Add New Table -:- Make table like the following:
Table - -> tbl_data [Don’t Forget to make ID as IS Identity -- True]
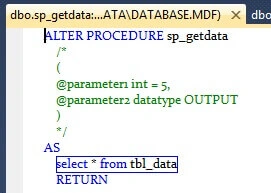
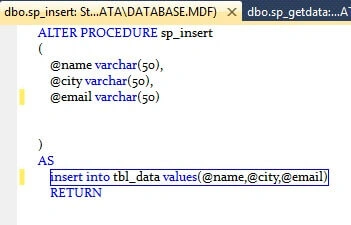
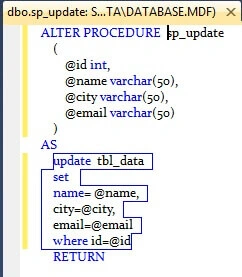
Add some Stored procedure for Update, Insert and Delete Data by going to Database [Database.mdf] - -> Stored Procedures - -> Right Click - -> Add New Stored Procedures.
- sp_getdata()
- sp_insert()
- sp_update()
- sp_delete()
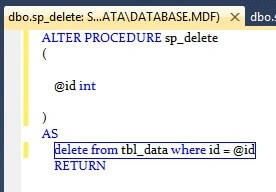
These all are the Stored Procedures that we will use for updating, deleting and editing data in GridView.
Design Code
Step 5: Now it’s time for serious design in GridView. Let’s begin by opening gridview_demo.aspx page and try the following code:
- <body>
- <form id="form1" runat="server">
- <table style="width:100%;">
- <caption class="style3">
- <strong>Bind Grid View Using 3Tier</strong></caption>
- <tr>
- <td align="center">
- <asp:GridView ID="GridView1" runat="server" AutoGenerateColumns="False"
- BackColor="LightGoldenrodYellow" BorderColor="Tan" BorderWidth="1px"
- CellPadding="2" DataKeyNames="id" ForeColor="Black" GridLines="None"
- AutoGenerateDeleteButton="True" AutoGenerateEditButton="True"
- onrowcancelingedit="GridView1_RowCancelingEdit"
- onrowdeleting="GridView1_RowDeleting" onrowediting="GridView1_RowEditing"
- onrowupdating="GridView1_RowUpdating">
- <AlternatingRowStyle BackColor="PaleGoldenrod" />
- <Columns>
- <asp:TemplateField HeaderText="Name" SortExpression="name">
- <EditItemTemplate>
- <asp:TextBox ID="TextBox1" runat="server" Text='<%# Bind("name") %>'></asp:TextBox>
- </EditItemTemplate>
- <ItemTemplate>
- <asp:Label ID="Label1" runat="server" Text='<%# Bind("name") %>'></asp:Label>
- </ItemTemplate>
- </asp:TemplateField>
- <asp:TemplateField HeaderText="Email" SortExpression="email">
- <EditItemTemplate>
- <asp:TextBox ID="TextBox3" runat="server" Text='<%# Bind("email") %>'></asp:TextBox>
- </EditItemTemplate>
- <ItemTemplate>
- <asp:Label ID="Label3" runat="server" Text='<%# Bind("email") %>'></asp:Label>
- </ItemTemplate>
- </asp:TemplateField>
- <asp:TemplateField HeaderText="City" SortExpression="city">
- <EditItemTemplate>
- <asp:TextBox ID="TextBox2" runat="server" Text='<%# Bind("city") %>'></asp:TextBox>
- </EditItemTemplate>
- <ItemTemplate>
- <asp:Label ID="Label2" runat="server" Text='<%# Bind("city") %>'></asp:Label>
- </ItemTemplate>
- </asp:TemplateField>
- </Columns>
- <FooterStyle BackColor="Tan" />
- <HeaderStyle BackColor="Tan" Font-Bold="True" />
- <PagerStyle BackColor="PaleGoldenrod" ForeColor="DarkSlateBlue"
- HorizontalAlign="Center" />
- <SelectedRowStyle BackColor="DarkSlateBlue" ForeColor="GhostWhite" />
- <SortedAscendingCellStyle BackColor="#FAFAE7" />
- <SortedAscendingHeaderStyle BackColor="#DAC09E" />
- <SortedDescendingCellStyle BackColor="#E1DB9C" />
- <SortedDescendingHeaderStyle BackColor="#C2A47B" />
- </asp:GridView>
- </td>
- </tr>
- </table>
- </form>
- </body>
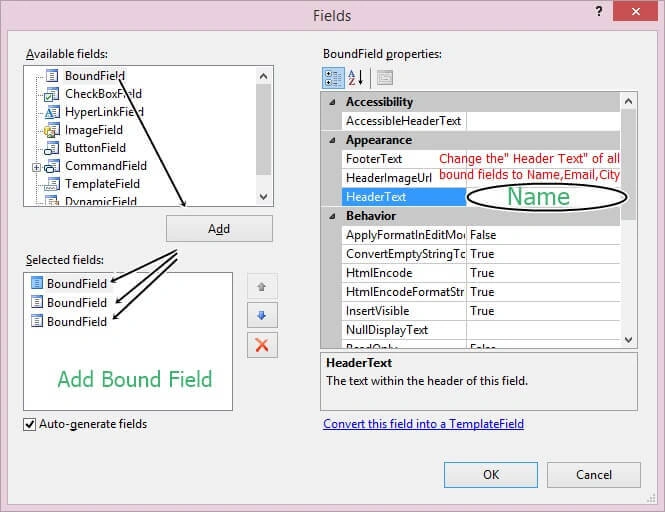
You can also manually create this design by dragging the GridView into .aspx page. Then click the arrow sign on GridView - -> GridView tasks will open - -> Edit Columns - -> A “Field” window will open (following image). Here you have to add three “BoundField” Button from - -> Available Fields. - -> Change the header text - -> Name, Email, City.
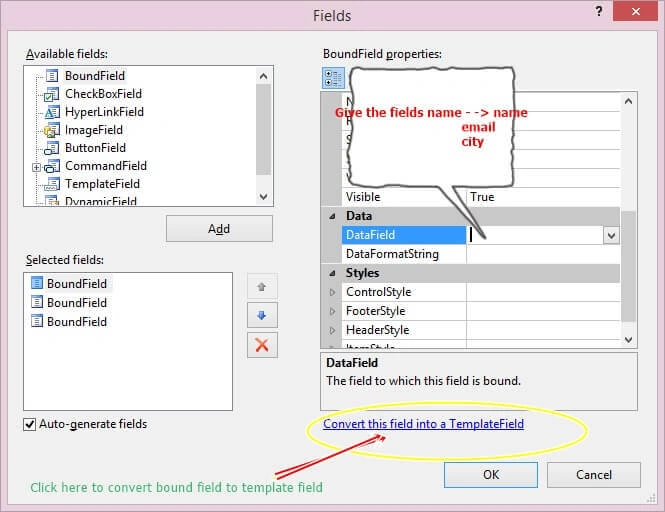
Get into Bound Field Properties - -> Data Fields - -> Change every Bound field’s Data field to - ->

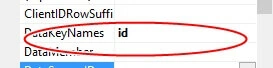
Go to GridView [In design mode] - -> press F4 to open Property window of GridView and find - -> Data Keys Name - -> and write – id.
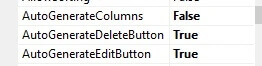
In Property Window find - -> Auto Generate Edit and Auto Generate Delete Button and make it - -> True.
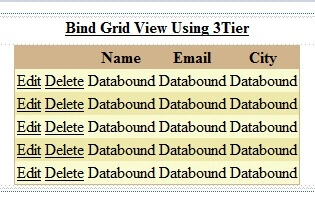
This is your actual Design.
Code Chamber
- Open Commonfunction.cs file and add this code:
The preceding code is written for SQL Connection String that we have to call again and again by going to the database property. This is a lengthy process, that’s why we made this class and now we will just call its method - ->getconstring() that will make our process shorter and comfortable.- using System;
- using System.Collections.Generic;
- using System.Linq;
- using System.Web;
- using System.Configuration;
- /// <summary>
- /// Summary description for Commonfunctions
- /// </summary>
- public class Commonfunctions
- {
- public Commonfunctions()
- {
- //
- // TODO: Add constructor logic here
- //
- }
- public static string getconstring()
- {
- return ConfigurationManager.ConnectionStrings["dbcon"].ToString();
- }
- }
- Open DAL_user_operation.cs file and code it as in the following code.
- using System;
- using System.Collections.Generic;
- using System.Linq;
- using System.Web;
- using System.Data;
- using System.Data.SqlClient;
- /// <summary>
- /// Summary description for DAL_user_operation
- /// </summary>
- public class DAL_user_operation
- {
- public DAL_user_operation()
- {
- //
- // TODO: Add constructor logic here
- //
- }
- public bool user_insert(string name, string email,string city)
- {
- SqlConnection con = new SqlConnection(Commonfunctions.getconstring());
- SqlCommand cmd = new SqlCommand("sp_insert", con);
- cmd.CommandType = CommandType.StoredProcedure;
- cmd.Parameters.AddWithValue("name", name);
- cmd.Parameters.AddWithValue("email",email);
- cmd.Parameters.AddWithValue("city", city);
- con.Open();
- int i = cmd.ExecuteNonQuery();
- con.Close();
- if (i != 0)
- {
- return true;
- }
- else
- {
- return false;
- }
- }
- public void user_delete(int id)
- {
- SqlConnection con = new SqlConnection(Commonfunctions.getconstring());
- SqlCommand cmd = new SqlCommand("sp_delete", con);
- cmd.CommandType = CommandType.StoredProcedure;
- cmd.Parameters.AddWithValue("id", id);
- con.Open();
- int i = cmd.ExecuteNonQuery();
- con.Close();
- }
- public void user_update(string name, string email,string city, int id)
- {
- SqlConnection con = new SqlConnection(Commonfunctions.getconstring());
- SqlCommand cmd = new SqlCommand("sp_update", con);
- cmd.CommandType = CommandType.StoredProcedure;
- cmd.Parameters.AddWithValue("name", name);
- cmd.Parameters.AddWithValue("email",email);
- cmd.Parameters.AddWithValue("city", city);
- cmd.Parameters.AddWithValue("id", id);
- con.Open();
- int i = cmd.ExecuteNonQuery();
- con.Close();
- }
- public DataTable getdata()
- {
- SqlConnection con = new SqlConnection(@"Data Source=.\SQLEXPRESS;AttachDbFilename=|DataDirectory|\Database.mdf;Integrated Security=True;User Instance=True");
- SqlCommand cmd = new SqlCommand("sp_getdata", con);
- cmd.CommandType = CommandType.StoredProcedure;
- SqlDataAdapter sda = new SqlDataAdapter(cmd);
- DataTable dt = new DataTable();
- sda.Fill(dt);
- return dt;
- }
- }
- Open your BAL_user_operation.cs File and code it like the following:
- using System;
- using System.Collections.Generic;
- using System.Linq;
- using System.Web;
- using System.Data;
- using System.Data.SqlClient;
- /// <summary>
- /// Summary description for BAL_user_operation
- /// </summary>
- public class BAL_user_operation
- {
- DAL_user_operation du = new DAL_user_operation();
- public BAL_user_operation()
- {
- //
- // TODO: Add constructor logic here
- //
- }
- public bool user_insert(string name, string email,string city)
- {
- return du.user_insert(name, email,city);
- }
- public void user_delete(int id)
- {
- du.user_delete(id);
- }
- public void user_update(string name, string email,string city, int id)
- {
- du.user_update(name, email, city, id);
- }
- public DataTable getdata()
- {
- return du.getdata();
- }
- }
- At last Open gridview_demo.aspx.cs file and code it like the following.
- using System;
- using System.Collections.Generic;
- using System.Linq;
- using System.Web;
- using System.Web.UI;
- using System.Web.UI.WebControls;
- public partial class _Default : System.Web.UI.Page
- {
- BAL_user_operation bu = new BAL_user_operation();
- protected void Page_Load(object sender, EventArgs e)
- {
- if (!Page.IsPostBack)
- {
- refreshdata();
- }
- }
- public void refreshdata()
- {
- GridView1.DataSource = bu.getdata();
- GridView1.DataBind();
- }
- protected void GridView1_RowDeleting(object sender, GridViewDeleteEventArgs e)
- {
- int id = Convert.ToInt16(GridView1.DataKeys[e.RowIndex].Values["id"].ToString());
- bu.user_delete(id);
- refreshdata();
- }
- protected void GridView1_RowEditing(object sender, GridViewEditEventArgs e)
- {
- GridView1.EditIndex = e.NewEditIndex;
- refreshdata();
- }
- protected void GridView1_RowUpdating(object sender, GridViewUpdateEventArgs e)
- {
- TextBox txtname = GridView1.Rows[e.RowIndex].FindControl("TextBox1") as TextBox;
- TextBox txtemail = GridView1.Rows[e.RowIndex].FindControl("TextBox3") as TextBox;
- TextBox txtcity = GridView1.Rows[e.RowIndex].FindControl("TextBox2") as TextBox;
- int id= Convert.ToInt16(GridView1.DataKeys[e.RowIndex].Values["id"].ToString());
- bu.user_update(txtname.Text, txtemail.Text, txtcity.Text, id);
- GridView1.EditIndex = -1;
- refreshdata();
- }
- protected void GridView1_RowCancelingEdit(object sender, GridViewCancelEditEventArgs e)
- {
- GridView1.EditIndex = -1;
- refreshdata();
- }
- }
web.config file code
- <configuration>
- <system.web>
- <compilation debug="true" targetFramework="4.0" />
- </system.web>
- <connectionStrings>
- <add name="dbcon" connectionString="Data Source=.\SQLEXPRESS;AttachDbFilename=|DataDirectory|\Database.mdf;Integrated Security=True;User Instance=True"/>
- </connectionStrings>
- </configuration>
Output Chamber

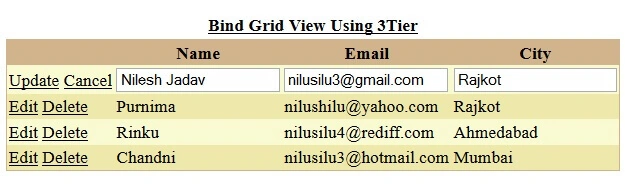
Hope you liked this!
Have a nice day and enjoy this tutorial.
Binita JaniPosted Jan 1, 2018, 10:37 PM
My program runs successfully , BT the problem is that I can't view grid view?what can I do sir?
Mohit SinghPosted Jun 19, 2017, 3:26 PM
What if i create a class and then using its object to insert update delete. then how will you perform operations creating object of class?
Michael GarthunePosted Mar 13, 2017, 1:25 PM
Added aspx:<FooterTemplate> <asp:TextBox ID="nameTextBox" runat="server" /> </FooterTemplate> for each col then in .cs Insert block read Add text as String txtname = (GridView1.FooterRow.FindControl("nameTextBox") as TextBox).Text; then call the existing bu.user_insert ... unless I missed something to add records, what is weird is I can name FindControl (<anyname>) and it works also and there is no reference to that in my code just the order for TAG nameTextBox was first for textbix search and it matched to first findcontrol tag that happened to be searching in same order name,email,city.
Hari ShankerPosted Feb 9, 2016, 11:47 PM
thanks for share
saba bukhariPosted Jan 11, 2016, 10:03 AM
it gives argument null exception
chetan dudhatPosted Dec 20, 2015, 1:02 PM
you can find easy solution here : http://www.dotnetcode2u.com/2015/08/insert-update-delete-edit-select-in-3.html
Arul RPosted Oct 28, 2015, 5:46 AM
Nice share!!!
AbedElHamid AlWahidyPosted Oct 20, 2015, 5:22 AM
good one Nilesh
Omar MohamedPosted Sep 18, 2015, 3:34 AM
Important topic
Vipul MalhotraPosted Aug 13, 2015, 10:10 AM
Nice
Shridhar SharmaPosted Jun 1, 2015, 5:11 PM
good one Nilesh .
RakeshPosted Jun 1, 2015, 11:59 AM
Good explain
Sibeesh VenuPosted Jun 1, 2015, 11:26 AM
Good one.
Santhakumar MunuswamyPosted May 26, 2015, 3:51 PM
Thanks for good work
Gowtham RajamanickamPosted May 26, 2015, 8:58 AM
Good one..