

Introduction
Every Power Automate flow starts with one important decision: When should the flow run?
That decision is controlled by the trigger.
A trigger is the starting point of a flow. It determines when the automation should execute and, depending on the trigger, what information is available to the flow.
Choosing the right trigger is important because an inefficient trigger can cause unnecessary flow runs, increase processing, consume API requests, and make an automation harder to maintain.
In this article, we will explore the major types of triggers in Power Automate, trigger properties, practical examples, and best practices for designing reliable flows.
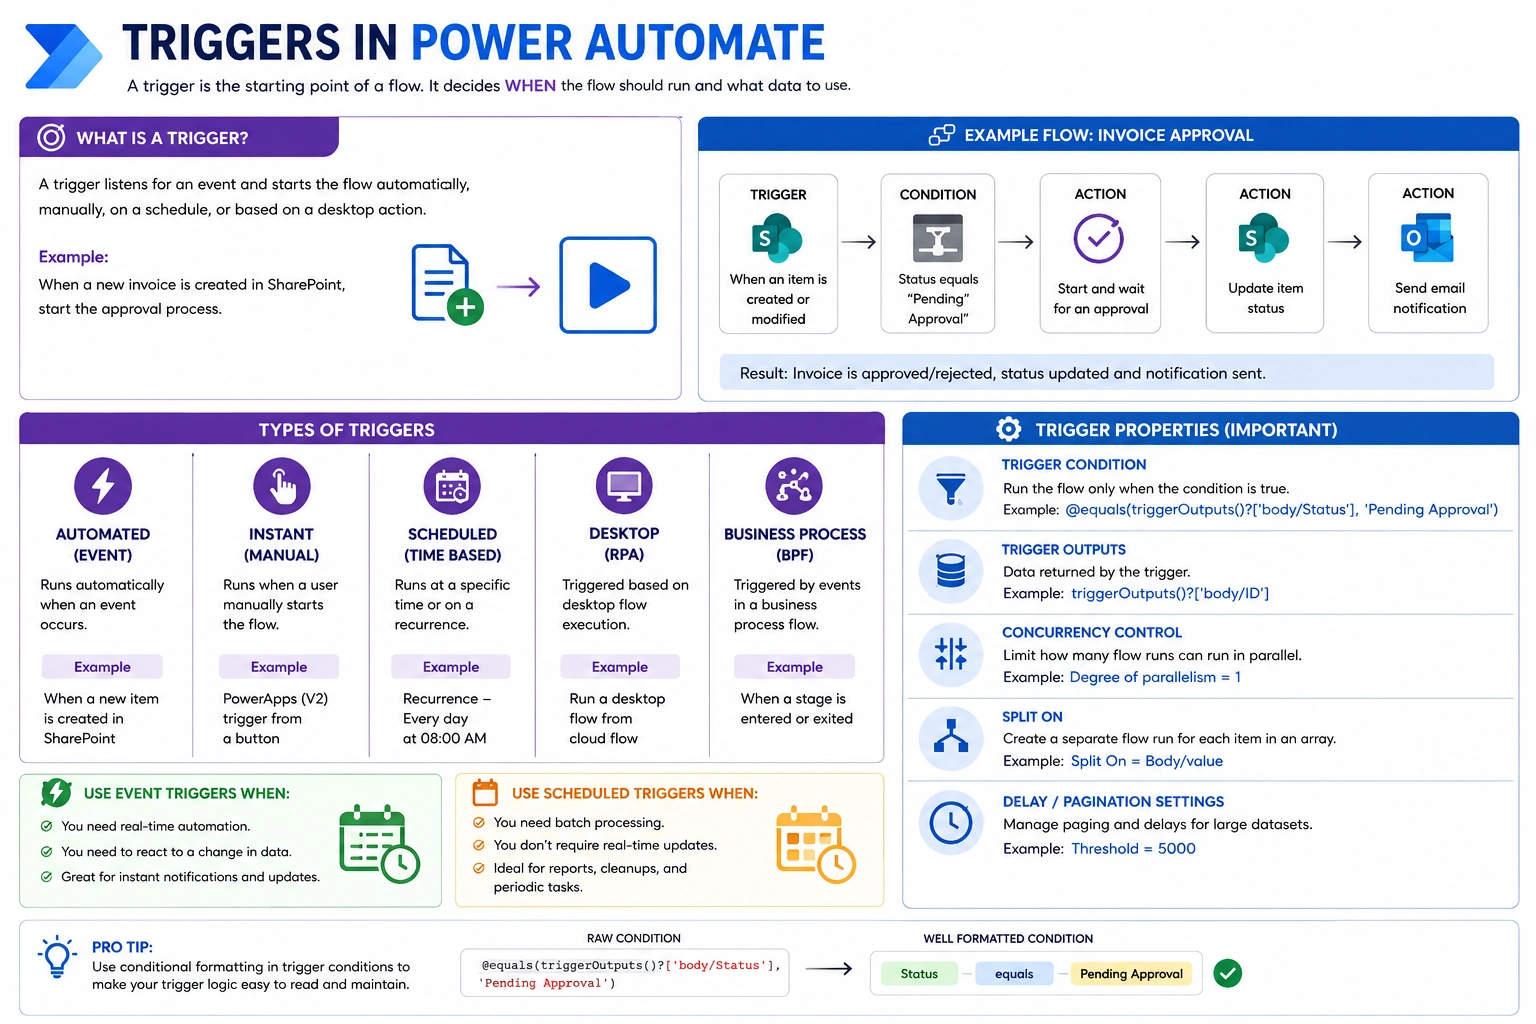
What Is a Trigger in Power Automate?
A trigger is the first step of a Power Automate flow.
For example:
When a new item is created in SharePoint → start the approval process.
The SharePoint event is the trigger, while the approval process, notifications, updates, and other operations are the actions.
A simple flow can be visualized as:
Trigger → Conditions → Actions → Result
For example:
When an invoice is created → Check Invoice Amount → Start Approval → Send Email
The trigger determines when Power Automate should begin processing the flow.
Why Is Choosing the Right Trigger Important?
A flow can be technically correct but still inefficient if the wrong trigger is selected.
For example, imagine a SharePoint list contains 50,000 items.
If you use:
When an item is created or modified
the flow can potentially run every time an item changes.
But perhaps your requirement is:
Start the approval process only when the Invoice Status changes to "Pending Approval."
In this situation, adding appropriate trigger conditions can prevent unnecessary executions.
Benefits of a well-designed trigger
Reduces unnecessary flow runs
Improves flow performance
Reduces API and connector consumption
Prevents duplicate processing
Makes automation easier to maintain
Ensures the flow runs only when required
Types of Triggers in Power Automate
Power Automate provides several types of triggers depending on how the automation should start.
1. Automated Cloud Flow Trigger
An automated trigger starts a flow automatically when an event occurs.
Example
Suppose you have a SharePoint list called InvoiceDetails.
You want to send an approval request whenever a new invoice is created.
You could use:
When an item is created — SharePoint
Flow:
New Invoice Created → Trigger → Validate Invoice → Start Approval
Other examples include:
When a new SharePoint item is created
When a Dataverse row is added
When an email arrives
When a file is created
When a record is modified
When should you use it?
Use an automated trigger when the flow should respond automatically to an event.
2. Instant Cloud Flow Trigger
An instant trigger starts the flow when a user manually initiates it.
For example, a user may click a button in Power Apps.
Example
Suppose an Invoice Approval application contains an Approve Invoice button.
When the user clicks the button:
Power Apps → Power Automate → Update Invoice → Create Audit Log → Send Notification
The flow can receive information such as:
Invoice ID
User email
Approval status
Comments
This is useful when the user needs to control exactly when the automation starts.
Common examples
Power Apps (V2) trigger
Manually trigger a flow
Trigger from a selected SharePoint item
Trigger from a selected file
3. Scheduled Cloud Flow Trigger
A scheduled trigger starts a flow at a specific time or on a recurring schedule.
For example:
Run every day at 8:00 AM.
Example
Imagine an organization wants to send a reminder for invoices that have been pending for more than three days.
The flow could run every morning:
Recurrence → Get Pending Invoices → Filter Invoices → Send Reminder
A scheduled trigger can be configured for:
Every few minutes
Hourly
Daily
Weekly
Monthly
A specific time
A specific time zone
When should you use it?
Scheduled triggers are useful for:
Daily reports
Reminder emails
Periodic data synchronization
Cleanup processes
Batch processing
Scheduled maintenance
4. Desktop Flow / RPA Trigger
Power Automate can also work with Power Automate for desktop.
A cloud flow can trigger a desktop flow to automate tasks on a computer.
Example
Consider an organization that receives data from an application that does not provide a suitable API.
A cloud flow could start a desktop automation:
Cloud Flow → Run Desktop Flow → Extract Data → Process Data → Update SharePoint
This can be useful when automation needs to interact with legacy applications or desktop software.
5. Business Process Flow Events
Business Process Flows provide guided stages for users working through business processes.
Depending on the solution, automation can respond to events associated with business process stages.
Example
A procurement process could have stages such as:
Request → Evaluation → Approval → Purchase → Completion
Automation can be designed around business process events and stage progression.
Important Trigger Properties
Selecting the trigger is only the first step. Understanding trigger properties is equally important.
1. Trigger Conditions
Trigger conditions allow a flow to run only when a specific condition is true.
For example, suppose a SharePoint item can have these statuses:
New
Pending Approval
Approved
Declined
Paid
You may want the flow to execute only when the status is Pending Approval.
Instead of allowing the flow to start for every change, you can use a trigger condition.
Example:
@equals(triggerOutputs()?['body/Status/Value'], 'Pending Approval')This helps prevent unnecessary flow executions.
Why use trigger conditions?
Without a trigger condition:
Item Modified → Flow Runs → Check Status → Stop
With a trigger condition:
Item Modified → Check Trigger Condition → Flow Runs only when required
This is generally more efficient.
2. Trigger Outputs
A trigger provides information that can be used by subsequent actions.
For example, when a SharePoint item is created, the trigger may provide:
Item ID
Title
Created By
Created Date
Modified Date
Status
Other column values
You can access trigger information using expressions such as:
triggerOutputs()or:
triggerBody()For example:
triggerBody()?['ID']This can be used to retrieve the ID of the item that caused the flow to start.
3. Concurrency Control
Concurrency control determines how many instances of a flow can run at the same time.
This becomes important when multiple events happen close together.
Example
Suppose a SharePoint list receives several updates:
Item 1 → Flow Run
Item 2 → Flow Run
Item 3 → Flow Run
Item 4 → Flow Run
If multiple runs process the same data simultaneously, you may encounter duplicate processing or data conflicts.
Concurrency control can be used to limit parallel executions.
For example:
Degree of Parallelism = 1This means flow runs are processed sequentially rather than simultaneously.
When is this useful?
Concurrency control can be helpful when:
Updating the same record
Processing sequential transactions
Generating sequential numbers
Avoiding duplicate processing
Working with shared resources
4. Split On
Some triggers return multiple records in a single response.
Split On allows Power Automate to create a separate flow run for each item.
For example, if a trigger returns:
[
  Invoice 1001,
  Invoice 1002,
  Invoice 1003
]
Split On can process them as individual flow runs:
Run 1 → Invoice 1001
Run 2 → Invoice 1002
Run 3 → Invoice 1003
This can simplify processing when the trigger returns an array of records.
Practical Example: Invoice Approval
Let's consider a real-world Power Automate scenario.
Requirement
Whenever an invoice is submitted for approval, the automation should start the approval process.
SharePoint List
InvoiceDetails
| Column | Example |
|---|---|
| Invoice ID | INV-10025 |
| Vendor Name | ABC Technologies |
| Invoice Amount | ₹125,000 |
| Status | Pending Approval |
| Submitted By | User |
| Submission Date | 27-Aug-2026 |
Flow Design
Trigger
   ↓
When an item is created or modified
   ↓
Trigger Condition
Status = "Pending Approval"
   ↓
Get Invoice Details
   ↓
Determine Approver
   ↓
Start Approval
   ↓
Update Invoice Status
   ↓
Create Audit Log
   ↓
Send Notification
The important part is the trigger condition.
Instead of allowing the flow to process every modification, the flow should start only when the invoice meets the required condition.
Event Trigger vs Scheduled Trigger
A common design decision is whether to use an event-based trigger or a scheduled trigger.
| Event-Based Trigger | Scheduled Trigger |
|---|---|
| Runs when an event occurs | Runs at a defined time |
| Near real-time processing | Periodic processing |
| Good for immediate actions | Good for batch processing |
| Example: New SharePoint item | Example: Daily invoice reminder |
| Reacts to changes | Checks data periodically |
Use an event trigger when:
You need the automation to respond immediately to an event.
Example:
When a new invoice is submitted, start approval.
Use a scheduled trigger when:
You do not need real-time processing.
Example:
Every morning, find pending invoices and send reminders.
Best Practices for Power Automate Triggers
1. Choose the Most Specific Trigger
Avoid selecting a broad trigger when a more specific trigger is available.
For example, if your requirement is to process newly created files, prefer a trigger specifically designed for file creation instead of triggering on every modification and filtering later.
2. Use Trigger Conditions
If a flow needs to respond only to specific records or statuses, use trigger conditions where appropriate.
This prevents unnecessary flow runs.
3. Avoid Unnecessary Polling
If a connector provides an event-based trigger, prefer it over repeatedly checking the same data with a scheduled flow when real-time processing is required.
4. Consider Concurrency
If multiple flow runs could update the same record or resource, review the concurrency settings.
Sequential processing may be safer for certain business processes.
5. Test the Trigger Separately
When developing a flow, first verify:
Does the trigger fire?
Does it fire at the correct time?
Does it receive the expected data?
Are the trigger outputs correct?
Is the flow running more often than expected?
Only after the trigger works correctly should you build the remaining actions.
Common Trigger Design Mistakes
Mistake 1: Using a broad trigger
A flow runs whenever an item is modified, even though only one specific status matters.
Better approach: Use an appropriate trigger condition.
Mistake 2: Ignoring duplicate executions
Multiple updates can cause multiple flow runs.
Better approach: Review concurrency and trigger logic.
Mistake 3: Using a scheduled flow for an event-based requirement
A flow checks every hour for a new record even though the connector provides an event trigger.
Better approach: Use an event-based trigger when immediate processing is required.
Mistake 4: Not validating trigger outputs
The trigger may provide a value as text, number, object, or array.
Better approach: Check the actual trigger output before building expressions around it.
A Simple Way to Think About Triggers
Before creating a flow, ask these five questions:
1. What event should start the flow?
Example:
A new invoice is submitted.
2. Should it run automatically or manually?
Example:
Automatically.
3. Should every event start the flow?
Example:
No, only invoices with Pending Approval status.
4. Should multiple runs execute simultaneously?
Example:
No, invoice processing should be sequential.
5. What data does the trigger provide?
Example:
Invoice ID, vendor, amount, status, and submitter.
These questions help you select the right trigger before building the rest of the flow.
Conclusion
Triggers are the foundation of every Power Automate flow. Choosing the right trigger ensures that your automation runs at the right time, with the right data, and only when required.
Whether you are building an invoice approval process, sending notifications, synchronizing data, or running scheduled reports, understanding automated, instant, scheduled, and other trigger types helps you design more efficient solutions.
The key takeaway is:
A good automation starts with a well-designed trigger.
Before building the actions, always ask: “When exactly should this flow run?”
Join the conversation! Your thoughts help the community grow.