

Introduction
An additional feature in the Windows family is to change the drive letter. You can also use this feature in Windows 10 to change the drive letter. The user can change the drive letter by using the built-in Disk Management Tool, by using the Command Prompt or Windows Powershell option. It is not a well-known feature among users.
If a user wants to organize his drive letter in a certain way, then he can change the drive letter as per his choice. But sometimes changing drive letters that has software installed may cause the software to stop working.
The user can assign his drive (hard disk drive, CD/DVD drive, or USB drive) a new letter with the help of various methods. Users cannot change the drive letter with the help of the "Rename" option.
This tutorial will show you various ways on how to change a drive letter in Windows 10.
Method 1. Using Command Prompt
With the help of Command Prompt (Cmd), users can change the drive letter. Follow the below instructions to proceed.
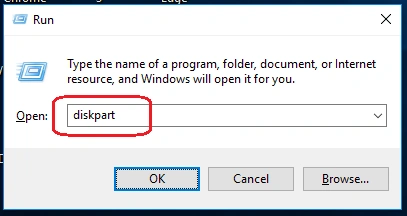
Step 1. From the Start menu, open the Run dialog box or you can Press the "Window + R" key to open the RUN window.
Step 2. Type "diskpart" and press enter key.
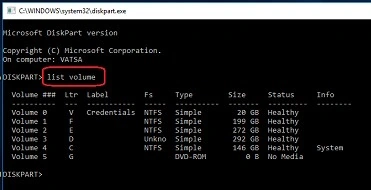
Step 3. Type "list volume" and press the enter button.
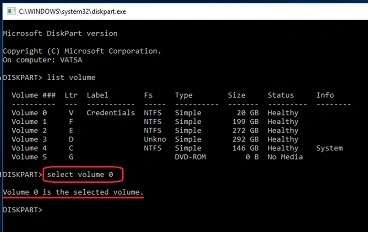
Step 4. Type "select volume <number>" and press the enter key.
For example, select volume 0.
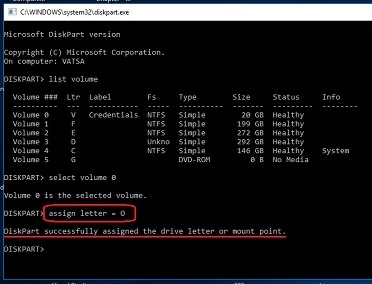
Step 5. Type "assign letter = <Drive Letter>" and press the enter key to proceed.
For example, assign letter = O.
Method 2. Using Windows Powershell
With the help of Windows Powershell (Admin), users can also change the drive letter. Follow the below instructions to proceed.
Step 1. Press the "Windows + X" key, and click on the "Windows PowerShell (Admin)" option.
Step 2. Type "diskpart" and press the enter key.

Step 3. Type "list volume" and press the enter button.

Step 4. Type "select volume <number>" and press the enter key.
For example, select volume 0.
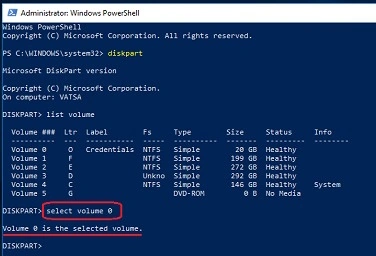
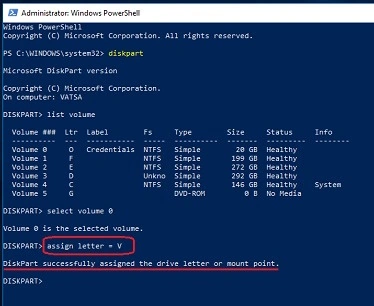
Step 5. Type "assign letter = <Drive Letter>" and press enter key.
For example, assign letter = V.
Method 3. Using the Disk Management Tool
With the help of the built-in disk management tool, users can also change the drive letter. Follow the instructions below to proceed.
Step 1. From the Start menu, open the Run dialog box or you can press the "Window + R" key to open the RUN window.
Step 2. Type "diskmgmt.msc" and press enter key to open Disk Management.
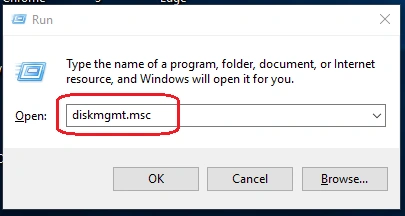
Alternatively, you can directly open the Disk Management by pressing the "Windows + X" key and clicking on the Disk Management option.
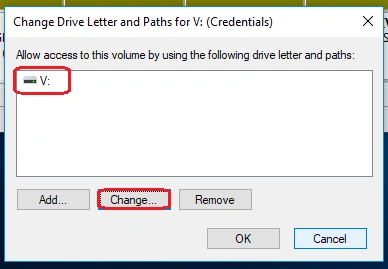
Step 3. Right-click on the drive or volume and click on the "Change Drive Letter and Paths" option.
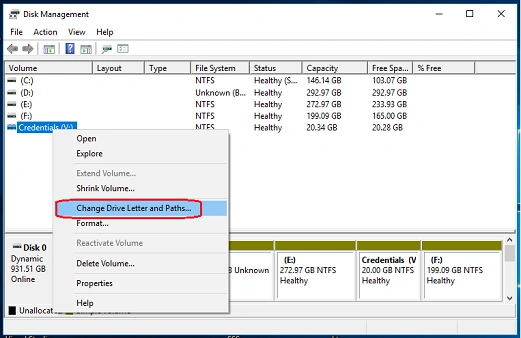
Step 4. Click on the "Change" button.
Step 5. "Change Drive Letter or Path" window will appear on the screen then, select the "Assign the following drive letter" option and choose the desired drive letter you want. Click on the "OK" button.
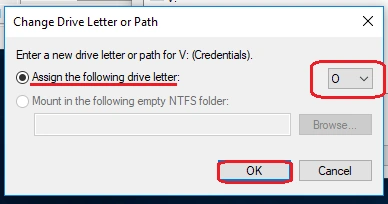
Note. You only have the option to choose the drive letter which is not assigned to another drive.
Conclusion
By following any of the above methods, you can assign a new letter or change the drive letter in Windows 10.
I hope you enjoyed this article. Follow C# Corner to learn more new and amazing things about Windows 10.
Thanks for reading this article.
Join the conversation! Your thoughts help the community grow.