

Introduction
When working with SharePoint Online Lists, there are many scenarios where you don't want every field to be visible all the time. Instead, you may want to display or hide fields based on user selections, status values, or other conditions. This improves the user experience by keeping forms clean and showing only the information that users actually need to enter.
In this article, you'll learn multiple ways to conditionally show or hide fields in SharePoint Online list forms using built-in capabilities.
Why Use Conditional Field Visibility?
Conditional field visibility helps you:
Create cleaner and user-friendly forms.
Reduce data entry errors.
Display only relevant fields.
Simplify complex forms.
Improve overall productivity.
Example Scenario
Suppose you have an Employee Request list with the following columns:
| Column Name | Type |
|---|---|
| Request Type | Choice |
| Laptop Model | Single line of text |
| Software Name | Single line of text |
| Reason | Multiple lines of text |
Requirement
If Request Type = Laptop, display Laptop Model.
If Request Type = Software, display Software Name.
Hide the other field accordingly.
Method : Using Column Conditional Formulas (Modern Lists)
SharePoint Online allows you to control column visibility using JSON formulas.
Step 1
Open your SharePoint List.
Step 2
Select New to open the form.
Step 3
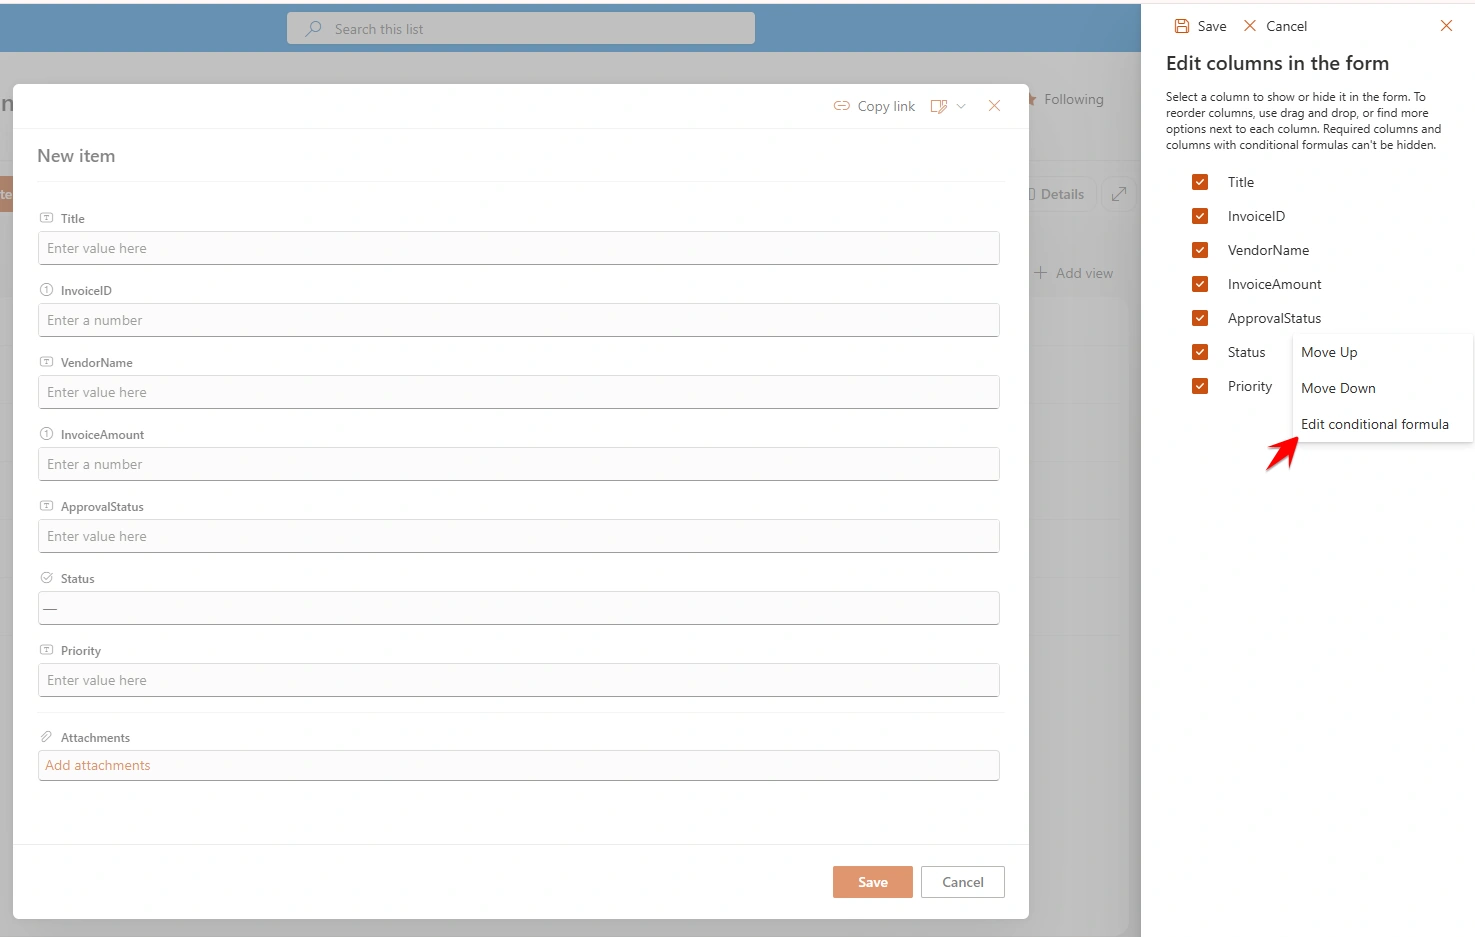
Click Edit Form → Edit Columns.
Step 4
Choose the field that should be conditionally displayed.
Step 5
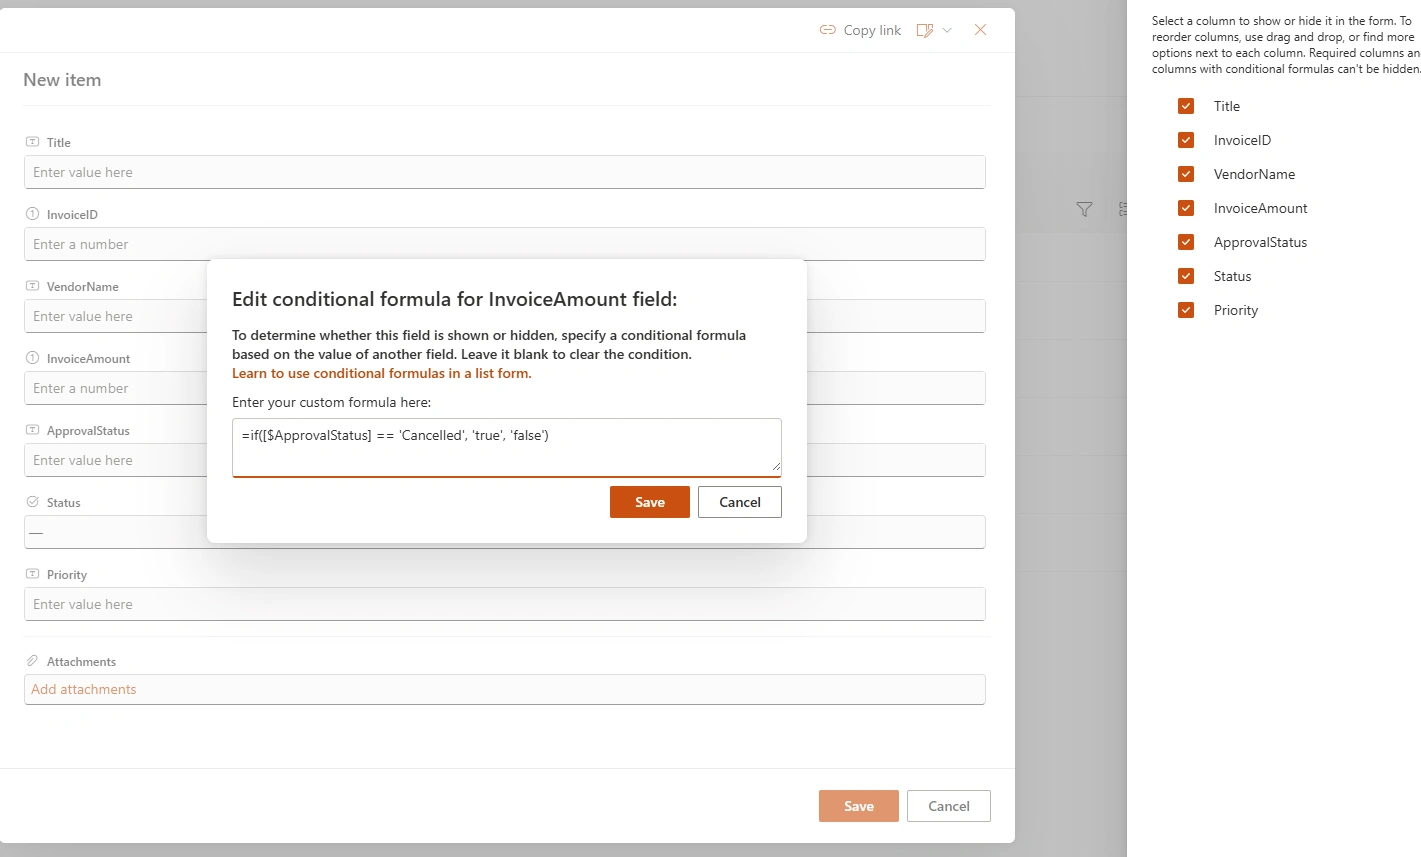
Apply conditional logic using the built-in options or JSON formatting where applicable.
Navigate to your SharePoint online site -> Select the list for which you want to configure conditions -> Click on New button to open up form window -> Click on Edit Form icon from right top corner -> Select Edit Column option as shown below
Examples of Conditional Visibility Formulas
The following examples demonstrate how to use conditional formulas with different SharePoint column types to dynamically show or hide fields in a list form.
1. Choice Column
Scenario: Display the Cancellation Reason field only when the Approval Status is Cancelled.
=if([$ApprovalStatus] == 'Cancelled', 'true', 'false')Explanation:
If the Approval Status choice column contains Cancelled, the field becomes visible. Otherwise, it remains hidden.
2. Number Column
Scenario: Show the Second Level Approver field only when the Rent amount is greater than 5000.
=if([$Rent] > 5000, 'true', 'false')Explanation:
When the rent exceeds 5000, the second-level approver field is displayed. For amounts of 5000 or less, the field stays hidden.
3. Person or Group Column
Example 1: Check for a Specific User
Scenario: If the selected Agent is the Department Head, approval is not required.
=if([$Agent.email] == '[email protected]', 'true', 'false')Explanation:
The field is shown only when the selected person's email matches the specified email address.
Example 2: Check the Current Logged-in User
Scenario: Display a field only when the selected Agent is the currently logged-in user.
=if([$Agent.email] == @me, 'true', 'false')Explanation:
The @me token represents the current user. The field is displayed only if the selected person's email matches the logged-in user's email.
4. Yes/No (Boolean) Column
Scenario: Display the Furniture Budget field only when Furniture Needed is set to Yes.
=if([$FurnitureNeeded] == true, 'true', 'false')Explanation:
If the Furniture Needed column is Yes (true), the Furniture Budget field becomes visible.
5. Check for Empty or Null Values
Scenario: Hide the field when the Approval Status is empty.
=if([$ApprovalStatus] == '', 'false', 'true')Explanation:
If the Approval Status column has no value, the field remains hidden. Once a value is selected, the field is displayed.
Advantages
Cleaner forms
Better user experience
Less confusion
Reduced incorrect data entry
Easier maintenance
Supports business rules
Limitations
Built-in SharePoint conditional visibility supports only basic scenarios.
Complex logic often requires Power Apps.
JSON formatting has some limitations depending on the form customization approach.
Existing list items may need testing to ensure visibility behaves as expected.
Best Practices
Keep form logic simple.
Use meaningful column names.
Test with different user scenarios.
Avoid excessive conditional rules.
Document your business logic for future maintenance.
Conclusion
Conditional field visibility is an excellent way to create smarter and more user-friendly SharePoint Online forms. For simple requirements, built-in SharePoint features may be sufficient. For more advanced business rules, customizing the form with Power Apps provides greater flexibility and control. Choosing the right approach based on your project's complexity helps improve usability, data accuracy, and the overall user experience.
Join the conversation! Your thoughts help the community grow.