

Article Overview
Background
Blog storage
Azure storage account
Create an Azure Storage account using Azure Cloud Shell
Use Azure Cloud Shell (Azure CLI)
Assign roles to Microsoft Entra (Azure AD) user name
Create containers and items using .NET console app
Console application set-up
Starter code
Complete code
Create a blob storage client
Create a container
Create a local file for upload to blob storage
Upload a file to blob storage
List all blobs in the container
Download a blob to local file
Sign in to Azure and Run application
Clean up resources
Summary
In this article let’s walk through the full process of create Azure Storage account and build .NET console application by using Azure Storage Blob client library. After that create a container, upload a file to created blob storage, list out the blobs, and download a file. Let's go step-by-step.
1. Background
1.1. Blog storage
It is used to store massive amounts of unstructured data, such as text or binary data. Blob storage has three types of resources:
Storage account
Container - in the storage account
Blob - in the container
Relationship between these resources (Blob storage architecture diagram):
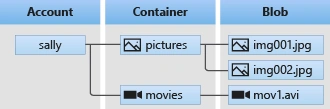
1.2. Azure storage account
Azure storage account contains all Azure Storage data objects such as blobs, files, queues, and tables. It provides a unique namespace of Azure Storage data which can be accessible from anywhere over HTTP and HTTPS.
2. Create an Azure Storage account using Azure Cloud Shell
One can create it from Portal, PowerShell, Azure CLI (Azure Cloud Shell), Bicep, Template, Azure Developer CLI, or Terraform. Initial step is to make ready required resources to Azure. Perform the below steps one by one to achieve this.
2.1. Use Azure Cloud Shell (Azure CLI)
It is a free Bash shell which can be run directly within the Azure portal. It is preinstalled and configured within an account.
Click Cloud Shell button on the menu bar at the top right side of the Azure portal.

It will launch an interactive shell which can be used to run the steps outlined in this article. Select a Bash environment.

Create resource group - Resource group is a logical container used to hold related resources. In it include the resources which you want to manage as a group. Azure storage account must belongs to a resource group. Create it using az group create command.
Syntax
az group create \
--name <resource-group> \
--location <location>
Example
az group create \
--name myResourceGroup \
--location eastus2
In above example, eastus2 is location code instead of it one can use their nearest region location. az account list-locations command gives complete list of available locations.
az account list-locations
az account list-locations --query "[*].name"
az account list-locations --query "[*].name" --out tsv | sort
Create storage account - Storage account contains all azure storage data objects, such as blobs, files, queues, and tables. It is an Azure Resource Manager resource. It provides unique namespace for Azure Storage data and can be accessible from anywhere through HTTP or HTTPS. Create it using az storage account create command. Using this storage account all the activities will be performed in below console application section.
Syntax
az storage account create \
--name <storage-account> \
--resource-group <resource-group> \
--location <location> \
--sku Standard_ZRS \
--encryption-services blob
Example
az storage account create \
--name storageacct1 \
--resource-group myResourceGroup \
--location eastus2 \
--sku Standard_ZRS \
--encryption-services blob
2.2. Assign roles to Microsoft Entra (Azure AD) user name
It is important to assign roles to Microsoft Entra (Azure AD) user name. Roles will define what access and permissions a user has within an organization’s Microsoft cloud environment. Roles determine what resources and actions a user can perform.
Let’s first assign Microsoft Entra user to Storage Blob Data Owner role. This will allow console application to create resources and items. One by one perform below steps in Cloud Shell.
Retrieve userPrincipalName using following command from your account. It will retrieve the information about currently authenticated user including their UPN.
userPrincipal=$(az rest
--method GET
--url https://graph.microsoft.com/v1.0/me \
--headers 'Content-Type=application/json' \
--query userPrincipalName
--output tsv)
Retrieve resource ID of the storage account using following command. It is used in next command to set scope for role assignment.
resourceID=$(az storage account show
--name storageacct1\
--resource-group myResourceGroup \
--query id
--output tsv)
Create and assign Storage Blob Data Owner role using following command. It gives permissions to manage containers and items.
az role assignment create
--assignee $userPrincipal \
--role "Storage Blob Data Owner" \
--scope $resourceID
Now, console application allows to create resources and items.
3. Create containers and items using .NET console app
Next step is to set-up the console application and create containers and items using it. Perform the following steps one by one in to Cloud Shell to achieve this.
3.1. Console application
Set up the console application to create containers and items.
Create project directory and change to that directory.
mkdir azstor1
cd azstor1
Create .NET console application to create containers and items through it.
dotnet new consoleAdd packages - add Blobs and Identity packages into the project using following commands.
dotnet add package Azure.Storage.Blobs
dotnet add package Azure.Identity
Data folder - create data1 folder to upload and download data into it.
mkdir data13.2. Starter code
Add following starter code into the application.
Application editing - open Program.cs file to edit it in the Cloud Shell.
code Program.csReplace code - replace existing code with the following code.
using Azure.Storage.Blobs;
using Azure.Storage.Blobs.Models;
using Azure.Identity;

Console.WriteLine("Azure Blob Storage\n");

// configure the DefaultAzureCredential using DefaultAzureCredentialOptions object
DefaultAzureCredentialOptions options = new()
{
    ExcludeEnvironmentCredential = true,
    ExcludeManagedIdentityCredential = true
};

// Run asynchronously and wait for results before proceeding
await ProcessAsync();

Console.WriteLine("\nPress any key to exit the application!");
Console.ReadLine();

async Task ProcessAsync()
{
    // CREATE - BLOB STORAGE CLIENT

    // CREATE - CONTAINER

    // CREATE - LOCAL FILE FOR UPLOAD TO BLOB STORAGE

    // UPLOAD - FILE TO BLOB STORAGE

    // LIST - BLOBS IN THE CONTAINER

    // DOWNLOAD - BLOB TO LOCAL FILE
}
Save & close - Press Ctrl + S to save changes and continue.
3.3. Complete code
Add following code to complete the application. Now let’s update the code fore commented lines for specific operations one by one with description.
3.3.1. Create a blob storage client
BlobServiceClient is a primary entry point to manage containers and blobs in a storage account. Client uses DefaultAzureCredential for authentication.
Locate // CREATE - BLOB STORAGE CLIENT comment, then add following code directly beneath comment.
// CREATE - BLOB STORAGE CLIENT

// Create credential using DefaultAzureCredential
string accountName = "YOUR_ACCOUNT_NAME"; // Replace with your storage account name

// Use DefaultAzureCredential with options configured at top of program
DefaultAzureCredential credential = new DefaultAzureCredential(options);

// Create BlobServiceClient using endpoint and DefaultAzureCredential
string blobServiceEndpoint = $"https://{accountName}.blob.core.windows.net";

BlobServiceClient blobServiceClient = new BlobServiceClient(new Uri(blobServiceEndpoint), credential);
3.3.2. Create a container
Create a container if it’s not exists.
Locate // CREATE - CONTAINER comment, then add following code directly beneath comment.
// CREATE - CONTAINER

// Container's unique name
string containerName = "textFiles";

// Create container and return container client object
Console.WriteLine("Create container : " + containerName);
//BlobContainerClient containerClient = await blobServiceClient.CreateBlobContainerAsync(containerName);

// Get BlobContainerClient for container name
BlobContainerClient containerClient = blobServiceClient.GetBlobContainerClient(containerName);

// Create container if it does not exist
// Method returns null if container already exists
var response = await containerClient.CreateIfNotExistsAsync(PublicAccessType.None);

// null if container already exists
if (response != null)
{
    Console.WriteLine("Container created successfully, press any key to continue!");
    Console.ReadLine();
}
else
{
    Console.WriteLine("Container already exists, No action taken, press any key to exiting program!");
    Console.ReadLine();
    return;
}
3.3.3. Create a local file for upload to blob storage
Let’s create a file in to data1 directory and later on it will be uploaded to the container.
Locate // CREATE - LOCAL FILE FOR UPLOAD TO BLOB STORAGE comment, then add following code directly beneath comment.
// CREATE - LOCAL FILE FOR UPLOAD TO BLOB STORAGE

// Create local file in ./data1/ directory for uploading and downloading
Console.WriteLine("Create local file for upload to Blob storage!");
string localPath = "./data1/";
string fileName = "FN" + Guid.NewGuid().ToString() + ".txt";
string localFilePath = Path.Combine(localPath, fileName);

// Write text in to file
await File.WriteAllTextAsync(localFilePath, "Hi, this is sample text!");
Console.WriteLine("Local file created successfully, press any key to continue!");
Console.ReadLine();
3.3.4. Upload a file to blob storage
GetBlobClient method gets a reference to a BlobClient object by container created previously. UploadAsync method. uploads a generated local file. It creates blob if it doesn't already exist else overwrites it.
Locate // UPLOAD - FILE TO BLOB STORAGE comment, then add following code directly beneath comment.
// UPLOAD - FILE TO BLOB STORAGE

// Get reference to blob and upload file
BlobClient blobClient = containerClient.GetBlobClient(fileName);

Console.WriteLine("Upload to Blob storage as blob :\n\t {0}", blobClient.Uri);

// Open file and upload it's data
using (FileStream uploadFileStream = File.OpenRead(localFilePath))
{
    await blobClient.UploadAsync(uploadFileStream);
    uploadFileStream.Close();
}

// Verify file uploaded successfully
bool blobExists = await blobClient.ExistsAsync();
if (blobExists)
{
    Console.WriteLine("File uploaded successfully, press any key to continue!");
    Console.ReadLine();
}
else
{
    Console.WriteLine("File upload failed, press any key to exiting program!");
    Console.ReadLine();
    return;
}
3.3.5. List all blobs in the container
GetBlobsAsync method list out all blobs in to the container.
Locate // LIST - BLOBS IN THE CONTAINER comment, then add following code directly beneath comment.
// LIST - BLOBS IN THE CONTAINER

Console.WriteLine("List of blobs in container");
await foreach (BlobItem blobItem in containerClient.GetBlobsAsync())
{
    Console.WriteLine("\t" + blobItem.Name);
}

Console.WriteLine("Press any key to continue!");
Console.ReadLine();
3.3.6. Download a blob to local file
DownloadStreamingAsync or DownloadAsync method downloads a blob created previously in to local file system. A suffix "downloadedFile" is added to differentiate the downloaded file in local file system.
Locate // DOWNLOAD - BLOB TO LOCAL FILE comment, then add following code directly beneath comment.
// DOWNLOAD - BLOB TO LOCAL FILE

// Adds the string "DOWNLOADED" before the .txt extension so it doesn't
// overwrite the original file

string downloadFilePath = localFilePath.Replace(".txt", "downloadedFile.txt");

Console.WriteLine("Downloading blob at : {0}", downloadFilePath);

// Download the blob's contents and save it to a file
BlobDownloadInfo download = await blobClient.DownloadStreamingAsync();// DownloadAsync();

using (FileStream downloadFileStream = File.OpenWrite(downloadFilePath))
{
    await download.Content.CopyToAsync(downloadFileStream);
}

Console.WriteLine("Blob downloaded successfully at : {0}", downloadFilePath);
Now it’s time to save and close the file by pressing Ctrl + s to save file and then Ctrl + q to exit the editor. Here, by with this article a complete code is attached in Program.cs file.
4. Sign in to Azure and Run application
Now one by one execute the following commands in Cloud Shell to run an application and perform the mentioned steps to verify the result outcomes.
Sign in using “az login” command. Sign into Azure is mandatory even though cloud shell session already authenticated.
az loginRun application using “dotnet run” command will start console application. Different output messages will be displayed in console as written in the code.
dotnet runView files - go to data1 directory to view the uploaded and downloaded file
cd data1
ls
Check Azure portal - one can view the created container, uploaded blob storage file, etc. from Azure portal using below steps:
Open Azure portal and navigate to Azure Storage account which is created.
Expand to “Data storage” in left navigation panel and select the Containers.
Select a container created through application and view a uploaded blob.
5. Clean up resources
Once finished the exercise it’s recommended to delete cloud resources are being created to avoid the unnecessary resource usage and any future costs. Deleting a resource group will delete all resources contained within it.
In Visual Studio Code, select the Azure icon to open the Azure explorer.
In the Resource Groups section, select resource group which are created in this exercise to deleted them.
Right-click to selected resource group and select Delete.
6. Summary
Here, first a complete process is described in detailed to create Azure Storage account and build .NET console application by using Azure Storage Blob client library. After that create a container, upload a file to created blob storage, list out the blobs, and download a file. At the end resources are being cleaned up. With this article a complete code is attached in Program.cs file.
Bhavik ChovatiyaPosted Nov 15, 2025, 6:24 AM
Great article! I really appreciate the step-by-step approach to creating Azure Blob Storage resources using the .NET client library. The explanation of setting up the console app, creating containers, and performing operations like upload, list, and download is clear and practical. Including details about authentication and resource cleanup makes it very beginner-friendly yet comprehensive. This is an excellent resource for developers looking to integrate Azure Blob Storage into their .NET applications!