

In this article we will be seeing how to create custom Document ID provider in
SharePoint 2010.
Here we are going to see how to create a custom Document ID provider in the
format "Site Name - List Name - List item ID".
Refer This two articles(first and second) for Document ID
Service feature in SharePoint 2010.
Steps Involved:
- Open Visual Studio 2010.
- Go to File => New => Project.
- Select Empty SharePoint Project template from the installed templates.
- Enter the Name and click Ok.
- Right click on the solution and click on Add a new item.
- Select the Class template from the installed template.
- Enter the Name as CustomIDProvider.cs and click Ok.
- Add the following references.
- Microsoft.SharePoint.dll
- Microsoft.Office.DocumentManagement.dll
- Add the following namespaces.
- Using Microsoft.SharePoint;
- Using Microsoft.Office.DocumentManagement;
- Replace the CustomIDProvider.cs with the following code.
using System;
using System.Collections.Generic;
using System.Linq;
using System.Text;
using Microsoft.SharePoint;
using Microsoft.Office.DocumentManagement;namespace DocumentIDProvider
{
public classCustomIDProvider : Microsoft.Office.DocumentManagement.DocumentIdProvider
{
private string idFormat = "{0} - {1}- {2}";public overridestring[] GetDocumentUrlsById(SPSite site,string documentId)
{
string itemUrl =string.Empty;
// Only proceed if we have the site and document id
if (site !=null && !string.IsNullOrEmpty(documentId))
{
string[] splits = documentId.Split('@',' ');
string webName = splits.Length > 0 ? splits[0] : null;
string itemId = splits.Length > 1 ? splits[1] : null;
try
{
SPWeb web = string.IsNullOrEmpty(webName) ? site.OpenWeb() : site.OpenWeb(webName);
SPListItem item = null;
Guid itemGuid =new Guid(itemId);
// Find the item among the lists on the specified web
foreach (SPList list in web.Lists)
{
try
{
item = list.Items[itemGuid];
}
catch
{
//if it's not in this list, go to the next one
continue;
}
if (item != null)
{
itemUrl = web.Url + "/";
itemUrl += item.Url;
}
}
}
catch (Exception) { /* item not found, return an empty array*/ }
}if (string.IsNullOrEmpty(itemUrl))
{
returnnull;
}
else
{
returnnew string[] { itemUrl };
}
}public overridestring GenerateDocumentId(SPListItem listItem)
{
if (listItem ==null)
{
thrownew ArgumentNullException("listItem");
}
return string.Format(this.idFormat, listItem.Web.Title, listItem.ParentList.Title, listItem.ID.ToString());
}public overridestring GetSampleDocumentIdText(SPSite site)
{
return string.Format(this.idFormat,"/", "0");
}public overridebool DoCustomSearchBeforeDefaultSearch
{
get { return false; }
}
}
}
- Right Click on the Feature and click on Add Feature.
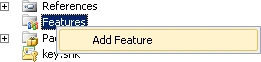
- Rename the feature as CustomIDProviderReciever.
- Right click on CustomIDProviderReciever and click on Add Event Receiver.
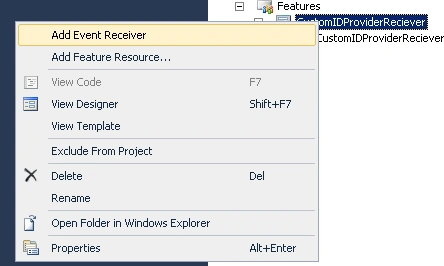
- Now the entire solution looks like following.
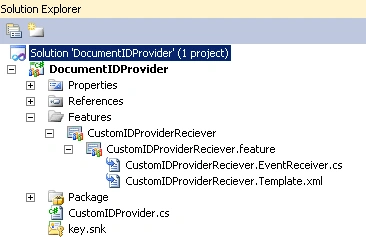
- Replace CustomIDProviderReciever.EventReceiver.cs with the following code.
using System;
using System.Runtime.InteropServices;
using System.Security.Permissions;
using Microsoft.SharePoint;
using Microsoft.SharePoint.Security;
using Microsoft.Office.DocumentManagement;namespace DocumentIDProvider.Features.CustomIDProviderReciever
{
[Guid("e806be7b-a8e1-40a9-ab9a-037e2eb522c9")]
public classCustomIDProviderRecieverEventReceiver : SPFeatureReceiver
{
public override void FeatureActivated(SPFeatureReceiverProperties properties)
{
DocumentId.SetProvider(properties.Feature.Parentas SPSite, new CustomIDProvider());
}public overridevoid FeatureDeactivating(SPFeatureReceiverProperties properties)
{
DocumentId.SetDefaultProvider(properties.Feature.Parentas SPSite);
}
}
}
- Build and deploy the solution.
- Go to the site where you have deployed the solution.
- Go to Site Actions => Site Collection Administration => Document ID settings.
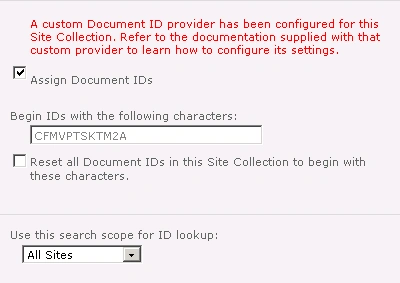
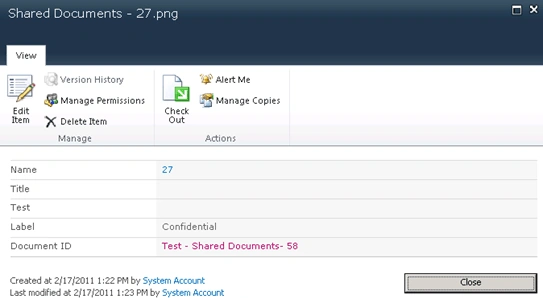
- Add a document and check the document ID.
Join the conversation! Your thoughts help the community grow.