

Introduction
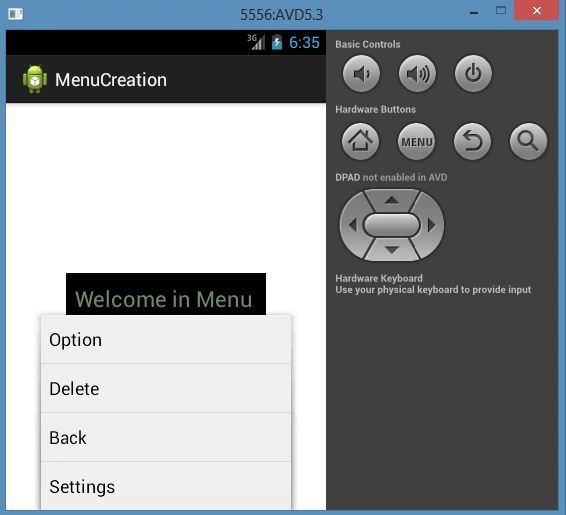
In this article I explain how to create a menu in Android. Menus are a very important user interface entity in Android that provides actions for a specific view such as shown in the following application.
In this application I will show how to code a menu in Android and how it works.
Step 1
First of all create a new Android application project as shown below:

Step 2
Now open the XML file as "res/layout/activity_main.xml" and update it as in the following code:
- <RelativeLayout xmlns:android="http://schemas.android.com/apk/res/android"
- xmlns:tools="http://schemas.android.com/tools"
- android:layout_width="match_parent"
- android:layout_height="match_parent"
- tools:context=".MainActivity" >
- <TextView
- android:id="@+id/textView1"
- android:layout_width="200dp"
- android:layout_height="50dp"
- android:layout_alignParentTop="true"
- android:layout_centerHorizontal="true"
- android:layout_marginTop="170dp"
- android:gravity="center"
- android:textColor="#778866"
- android:background="#020202"
- android:text="@string/menu"
- android:textAppearance="?android:attr/textAppearanceLarge" />
- </RelativeLayout>
Step 3
In this step create a new XML file named "menu.xml" using the following code:
- <menu xmlns:android="http://schemas.android.com/apk/res/android" >
- <item
- android:id="@+id/menu_settings"
- android:orderInCategory="100"
- android:showAsAction="never"
- android:title="@string/menu_settings"/>
- <item
- android:id="@+id/option"
- android:icon="@drawable/option_icon"
- android:title="Option"/>
- <item
- android:id="@+id/delete"
- android:icon="@drawable/delete_icon"
- android:title="Delete"/>
- <item
- android:id="@+id/back"
- android:icon="@drawable/back_icon"
- android:title="Back"/>
- </menu>
Step 4
Now open the "MainAcivity.java" file and update it with your logic.
- package com.example.menucreation;
- import android.app.Activity;
- import android.os.Bundle;
- import android.view.Menu;
- import android.view.MenuInflater;
- import android.view.MenuItem;
- import android.widget.Toast;
- public class MainActivity extends Activity {
- @Override
- public void onCreate(Bundle savedInstanceState) {
- super.onCreate(savedInstanceState);
- setContentView(R.layout.activity_main);
- }
- // Initiating Menu XML file (menu.xml)
- @Override
- public boolean onCreateOptionsMenu(Menu menu)
- {
- MenuInflater menuInflater = getMenuInflater();
- menuInflater.inflate(R.layout.menu, menu);
- return true;
- }
- @Override
- public boolean onOptionsItemSelected(MenuItem item)
- {
- switch (item.getItemId())
- {
- case R.id.menu_settings:
- Toast.makeText(this, "menu settings", Toast.LENGTH_SHORT).show();
- return true;
- case R.id.option:
- Toast.makeText(this, "Option is Selected", Toast.LENGTH_SHORT).show();
- return true;
- case R.id.delete:
- Toast.makeText(this, " deleted ", Toast.LENGTH_SHORT).show();
- return true;
- case R.id.back:
- Toast.makeText(this, "you are exit", Toast.LENGTH_SHORT).show();
- return true;
- default:
- return super.onOptionsItemSelected(item);
- }
- }
- }
Step 5
Open the "strings.xml" file and update it as given below.
- <?xml version="1.0" encoding="utf-8"?>
- <resources>
- <string name="app_name">MenuCreation</string>
- <string name="hello_world">Hello world!</string>
- <string name="menu_settings">Settings</string>
- <string name="option"></string>
- <string name="delete"></string>
- <string name="back"></string>
- <string name="menu">"Welcome in Menu "</string>
- </resources>
Step 6
Output
In the output you will see in the outer Linear Layout I defined a vertical text view, two edit texts, one button and one inner Linear Layout with two horizontal buttons inside it.
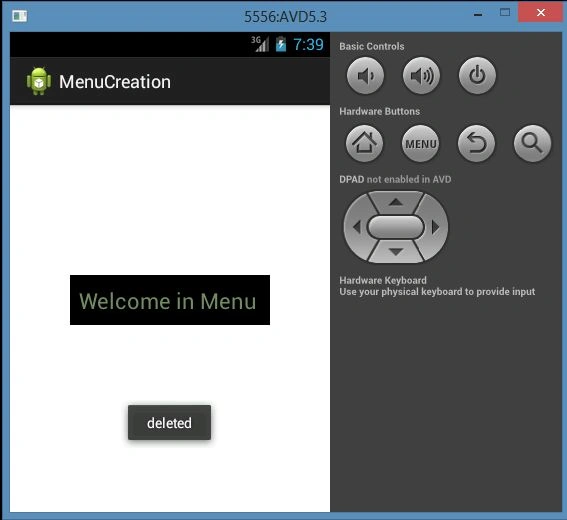
Selected option:
Sazid MauhammadPosted Feb 22, 2013, 11:52 AM
thnx prince
prince johnPosted Feb 22, 2013, 11:50 AM
nice article