
Introduction
This article is about how to create a simple ASP.NET Web API and implement keyboard navigation in Shield UI Grid.
Requirements
Basic knowledge of ASP.NET MVC, ASP.NET Web API, and Shield UI framework.
Process Outline
- Creating new ASP.NET Web API Project
- Creating Model class
- Creating the API Controller
- Testing the REST API using Postman
- Editing an existing View to implement the Shield UI Grid with the keyboard navigation using the REST API.
Open Visual Studio (in my case, I’m using VS 2015 Community) and select File -> New -> Project. In the popup window, select ASP.NET Web Application (.NET Framework), name it as you like, and click OK. I named it ShieldUIGridNavigation.

In the next window, select Web API.

When the Visual Studio is ready for creating the project, head to the Solution Explorer (if It’s not shown, navigate to the top left corner -> View -> Solution Explorer) -> Right click on the “Models” folder -> Add -> Class and name it Car.cs.
Car.cs
- public class Car
- {
- public Car(int id, string manufacturer, string model, string color, int yearmade)
- {
- this.Id = id;
- this.Manufacturer = manufacturer;
- this.Model = model;
- this.Color = color;
- this.YearMade = yearmade;
- }
- public int Id { get; set; }
- public string Manufacturer { get; set; }
- public string Model { get; set; }
- public string Color { get; set; }
- public int YearMade { get; set; }
- }
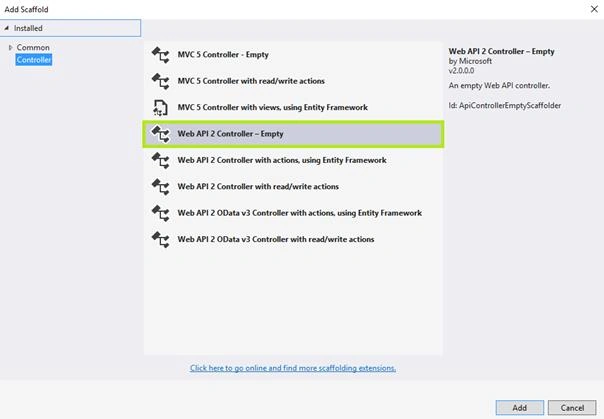
Head to the Solution Explorer -> Right click on the “Controller” folder -> Add -> Controller and select Web API 2 Controller – Empty as shown in the figure. Name it CarsController.cs.
CarsController.cs
- public class CarsController : ApiController
- {
- [HttpGet]
- public IHttpActionResult GetCars()
- {
- var carList = new List<Car>();
- carList.Add(new Car(1, "BMW", "M4", "Red", 2016));
- carList.Add(new Car(2, "Audi", "RS6", "Blue", 2015));
- carList.Add(new Car(3, "Mercedes", "GLE", "White", 2016));
- carList.Add(new Car(4, "Honda", "Civic", "Black", 2004));
- carList.Add(new Car(5, "Volkswagen", "Touareg", "Chameleon", 2008));
- carList.Add(new Car(6, "Koenigsegg", "Agera R", "Gray", 2007));
- carList.Add(new Car(7, "Ford", "Mustang", "Black", 2011));
- carList.Add(new Car(8, "Dodge", "Challenger", "Brown", 2017));
- return Ok(carList);
- }
- }
The GetCars() action returns a list of cars which will be filled in the Grid.
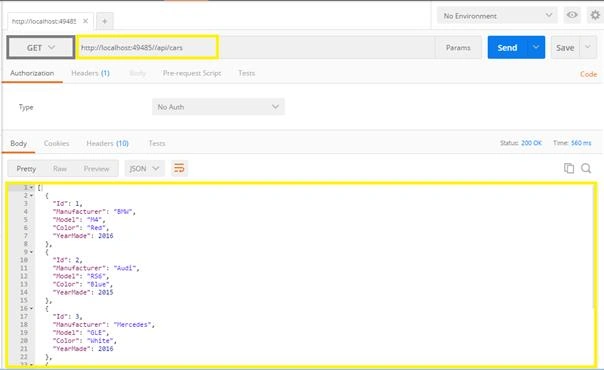
Testing the REST API using PostmanUsing Postman, we will test if the API is returning the list without any errors by making an request of type GET to api/cars, as shown in the figure. If everything is fine, we should get the list in JSON format.
Now that we got a working REST API, we need to include the Shield UI Javascript and CSS files in our _Layout.cshtml. The files are already included in the project so we simply need to add
- @Styles.Render("~/Content/shieldui.1.7.29-Trial/css/light/all.min.css")
- @Scripts.Render("~/Content/shieldui.1.7.29-Trial/js/jquery-1.11.1.min.js")
- @Scripts.Render("~/Content/shieldui.1.7.29-Trial/js/shieldui-all.min.js")
Now, we are good to go!
Index.cshtml
- <div id="grid"></div>
- @section scripts {
- <script>
- jQuery(function ($) {
- $("#grid").shieldGrid({
- dataSource: {
- remote: {
- read: {
- url: "/api/cars",
- dataType: "json"
- }
- }
- },
- schema: {
- fields: {
- id: { path: "Id", type: Number },
- manufacturer: { path: "Manufacturer", type: String },
- model: { path: "Model", type: String },
- color: { path: "Color", type: String },
- yearmade: { path: "YearMade", type: Number }
- }
- },
- navigation: true,
- paging: {
- pageSize: 6,
- pageLinksCount: 8
- },
- editing: {
- enabled: true,
- type: "row"
- },
- selection: {
- type: "row",
- multiple: true,
- toggle: false
- },
- columns: [
- { field: "Id", width: "70px", title: "ID" },
- { field: "Manufacturer", title: "Manufacturer", width: "280px" },
- { field: "Model", width: "200px", title: "Car model" },
- { field: "Color", title: "Car Color", width: "100px" },
- { field: "YearMade", title: "Year Made" },
- {
- width: 150,
- title: " ",
- buttons: [
- { commandName: "edit", caption: "Edit" },
- { commandName: "delete", caption: "Delete" }
- ]
- }
- ],
- });
- });
- </script>
- }
By default, the keyboard navigation in the Grid is false (turned off); so we need to add the property navigation in the Grid code.
Result
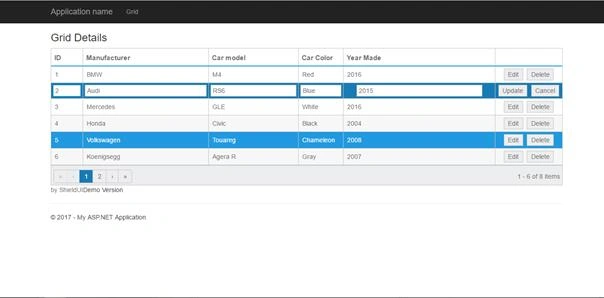
There are different built-in key combinations to work with the Shield UI Grid.
- Arrow keys - move the focus between cells
- Page up – navigates to the previous page if pagination is turned on
- Page Down – navigates to the next page if pagination is turned on
- Home – moves the focus to the first cell in the row that contains focus
- End – moves the focus to the last cell in the row that contains focus
- Ctrl + Home – moves focus to the first cell in the first visible row
- Ctrl + End – moves focus to the last cell in the last visible row
- Enter – when pressed on a header cell, invokes sorting for that column
- Space – selects the current cell/row if selection is disabled
- Tab – moves focus to next widget in the grid
- Shift + Tab – moves focus to previous widget in the grid
- Enter – when pressed on an editable cell, disables grid navigation and puts this cell/row in edit mode
- Escape – If grid navigation is disabled, cancels any edits and restores grid navigation
- Enter – If grid navigation is disabled, saves all changes and restores grid navigation
The Grid also supports non built-in functionality. Just for example, the code below focuses the grid in the example by pressing Ctrl + G.
- $(document).keydown(function (e) {
- if (e.ctrlKey && e.keyCode == 71) {
- // focus the Grid by calling its focus() method
- // this should focus the first cell inside it
- $("#grid").swidget().focus();
- // do not propagate the event
- e.preventDefault();
- e.stopPropagation();
- return false;
- }
- });
References
- https://www.shieldui.com/documentation/grid
- https://demos.shieldui.com/web/grid-general/keyboard-navigation
Conclusion
We’ve seen how easy it is to implement the Shield UI Grid with Keyboard navigation with REST API. I hope you enjoyed this article. Feel free to give feedback, comment or question about this article anytime!
ccvvcc ccvvcccPosted Mar 17, 2017, 3:15 AM
Nice article. But what happens if user clicks on Edit or Update on grid?