

Introduction
Consider a scenario where the drives in SQL Server are running out of space and the SQL Server is heavily used. So you decided to move some of the content databases to another SQL Server and attach it back to SharePoint. This can be done manually, but consider a case where you want to move hundreds of content databases. This article explains how to do it with a PowerShell script.
Planning to move Content databases
Before moving the content databases you must plan how to execute it. Find the activities at the following high level:
- Capture content database details (the content databases to be moved)
- Detach the content database from the SharePoint web application
- Inform SQL admin to move the content database to the new SQL Server
- Attach the content database to the SharePoint web application
Please use the following procedure to do the successful movement of content databases to another SQL Server and attaching them back to a SharePoint web app.
Step 1
Before the actual move of the content database, you must capture the details of the content database first. The following piece of code will help in capturing details like:
- Content database name
- Web application URL with which it is attached
- Content database ID
- Content database status
- Database server
- Total site count on the content database
- Warning site count
- Maximum site count
- $Output = $scriptBase + "\" + "CDBDetails.csv";
- "CDBName" + "," + "WebAppURL" + "," + "CDBID" + "," + "CDBStatus" + "," + "DatabaseServer" + "," + "TotalSiteCount" + "," + "WarningSiteCount" + "," + "MaximumSiteCount" | Out-File -Encoding Default -FilePath $Output;
- foreach($DB in get-content "$scriptbase\DBDetails.csv")
- {
- $CDB = get-spcontentdatabase $DB
- $DB + "," + $CDB.webapplication.url + "," + $CDB.ID + "," + $CDB.Status + "," + $CDB.server + "," + $CDB.currentsitecount + "," + $CDB.WarningSiteCount + "," + $CDB.MaximumSiteCount | Out-File -Encoding Default -Append -FilePath $Output;
- }
The preceding code requires an input file (DBDetails.csv) placed under the same location where the PowerShell script exists. The input file should have names of the content databases that need to be moved to a new SQL Server.
The script captures the preceding said information and export it to a CSV file (CDBDetails.csv). This output file will be used as an input file for another function.
Step 2
Now you have successfully captured the content databases info. The next step would be to detach the content databases from SharePoint.
The following piece of code helps in detaching the content databases from SharePoint:
- $ans = read-host "Do you want to continue with dismounting the CDB's ?(y/n) "
- if($ans -eq 'y')
- {
- Write-host "!!!INFORMATION ------ GOING TO DISMOUNT THE CDB'S!!!"
- $csvfile1 = $scriptbase + "\" + "CDBDetails.csv"
- import-csv $csvfile1 | where {
- write-host "Dismounting CDB" $_.CDBName " under SQL instance " $_.DatabaseServer -fore yellow
- Dismount-spcontentdatabase $_.CDBID
- write-host "Dismount completed" -fore green
- }
- }
- else
- {
- write-host "User choose to exit the script" -fore cyan
- exit;
- }
The preceding code uses the output file (CDBDetails.csv) that was generated in Step 1 as an input file. It uses the content database name to detach from SharePoint.
Step 3
Now the content databases are successfully detached from SharePoint. Inform the SQL DBA to move the content databases to the new SQL Server.
Step 4
Attach the content databases back to SharePoint once you get confirmation from the SQL DBA that Step 3 is completed.
The following piece of code helps you to attach the content database to SharePoint with the new SQL Server information:
- Function MountCDB([string]$CDBName, [string]$WebAppURL, [string]$MaximumSiteCount, [string]$WarningSiteCount)
- {
- Mount-SPContentDatabase $CDBName -DatabaseServer $SQLInstance -WebApplication $WebAppURL -MaxSiteCount $MaximumSiteCount -WarningSiteCount $WarningSiteCount
- }
- $global:SQLInstance = read-host "Specify the New SQL instance "
- $objSQLConnection = New-Object System.Data.SqlClient.SqlConnection
- $objSQLCommand = New-Object System.Data.SqlClient.SqlCommand
- $objSQLConnection.ConnectionString = "Server=$SQLInstance;Integrated Security=SSPI;"
- Write-Host "Trying to connect to SQL Server instance on $sqlinstance..." -NoNewline
- $OpenConnection = $objSQLConnection.Open()
- if($objSQLConnection.state -eq "open")
- {
- Write-host "!!!SUCCESSFULLY CONNECTED TO SQL SERVER!!!"
- write-host "Mount CDB operation is under process" -fore yellow
- $csvfile = $scriptbase + "\" + "CDBDetails.csv"
- import-csv $csvfile | where {
- MountCDB $_.CDBName $_.WebAppURL $_.MaximumSiteCount $_.WarningSiteCount
- }
- write-host "Mount CDB operation completed successfully" -fore green
- }
- else
- {
- Write-host "!!!SQL CONNECTION FAILED OR YOU MUST HAVE ENTERED WRONG SQL SERVER DETAILS!!!"
- }
The preceding code gets input from the user of the new SQL Server name and it uses the output file from Step 1 as an input file to set the same settings for the content databases when adding it back to SharePoint.
Complete Code
- $LogTime = Get-Date -Format yyyy-MM-dd_hh-mm
- $LogFile = ".\DBDismountAndMountPatch-$LogTime.rtf"
- # Add SharePoint PowerShell Snapin
- if ( (Get-PSSnapin -Name Microsoft.SharePoint.PowerShell -ErrorAction SilentlyContinue) -eq $null ) {
- Add-PSSnapin Microsoft.SharePoint.Powershell
- }
- $scriptBase = split-path $SCRIPT:MyInvocation.MyCommand.Path -parent
- Set-Location $scriptBase
- #Deleting any .rtf files in the scriptbase location
- $FindRTFFile = Get-ChildItem $scriptBase\*.* -include *.rtf
- if($FindRTFFile)
- {
- foreach($file in $FindRTFFile)
- {
- remove-item $file
- }
- }
- start-transcript $logfile
- function Blink-Message
- {
- param([String]$Message,[int]$Delay,[int]$Count,[ConsoleColor[]]$Colors)
- $startColor = [Console]::ForegroundColor
- $startLeft = [Console]::CursorLeft
- $startTop = [Console]::CursorTop
- $colorCount = $Colors.Length
- for($i = 0; $i -lt $Count; $i++)
- {
- [Console]::CursorLeft = $startLeft
- [Console]::CursorTop = $startTop
- [Console]::ForegroundColor = $Colors[$($i % $colorCount)]
- [Console]::WriteLine($Message)
- Start-Sleep -Milliseconds $Delay
- }
- [Console]::ForegroundColor = $startColor
- }
- Function MountCDB([string]$CDBName, [string]$WebAppURL, [string]$MaximumSiteCount, [string]$WarningSiteCount)
- {
- Mount-SPContentDatabase $CDBName -DatabaseServer $SQLInstance -WebApplication $WebAppURL -MaxSiteCount $MaximumSiteCount -WarningSiteCount $WarningSiteCount
- }
- write-host "########################################################################################################" -fore cyan
- write-host "Enter 1 to get the details of each and every CDB in the list" -fore green
- write-host "Enter 2 to dismount the CDB's from sharepoint" -fore green
- write-host "Enter 3 to mount the CDB's back to SharePoint" -fore green
- write-host "########################################################################################################" -fore cyan
- $option = read-host "Enter the option "
- switch($option)
- {
- 1{
- $Output = $scriptBase + "\" + "CDBDetails.csv";
- "CDBName" + "," + "WebAppURL" + "," + "CDBID" + "," + "CDBStatus" + "," + "DatabaseServer" + "," + "TotalSiteCount" + "," + "WarningSiteCount" + "," + "MaximumSiteCount" | Out-File -Encoding Default -FilePath $Output;
- foreach($DB in get-content "$scriptbase\DBDetails.csv")
- {
- $CDB = get-spcontentdatabase $DB
- $DB + "," + $CDB.webapplication.url + "," + $CDB.ID + "," + $CDB.Status + "," + $CDB.server + "," + $CDB.currentsitecount + "," + $CDB.WarningSiteCount + "," + $CDB.MaximumSiteCount | Out-File -Encoding Default -Append -FilePath $Output;
- }
- }
- 2{
- $ans = read-host "Do you want to continue with dismounting the CDB's ?(y/n) "
- if($ans -eq 'y')
- {
- blink-message "!!!INFORMATION ------ GOING TO DISMOUNT THE CDB'S!!!" 250 20 Red, White, DarkRed, Green
- $csvfile1 = $scriptbase + "\" + "CDBDetails.csv"
- import-csv $csvfile1 | where {
- write-host "Dismounting CDB" $_.CDBName " under SQL instance " $_.DatabaseServer -fore yellow
- Dismount-spcontentdatabase $_.CDBID
- write-host "Dismount completed" -fore green
- }
- }
- else
- {
- write-host "User choose to exit the script" -fore cyan
- exit;
- }
- }
- 3{
- $global:SQLInstance = read-host "Specify the New SQL instance "
- $objSQLConnection = New-Object System.Data.SqlClient.SqlConnection
- $objSQLCommand = New-Object System.Data.SqlClient.SqlCommand
- $objSQLConnection.ConnectionString = "Server=$SQLInstance;Integrated Security=SSPI;"
- Write-Host "Trying to connect to SQL Server instance on $sqlinstance..." -NoNewline
- $OpenConnection = $objSQLConnection.Open()
- if($objSQLConnection.state -eq "open")
- {
- blink-message "!!!SUCCESSFULLY CONNECTED TO SQL SERVER!!!" 250 20 yellow, White, green, cyan
- write-host "Mount CDB operation is under process" -fore yellow
- $csvfile = $scriptbase + "\" + "CDBDetails.csv"
- import-csv $csvfile | where {
- MountCDB $_.CDBName $_.WebAppURL $_.MaximumSiteCount $_.WarningSiteCount
- }
- write-host "Mount CDB operation completed successfully" -fore green
- }
- else
- {
- blink-message "!!!SQL CONNECTION FAILED OR YOU MUST HAVE ENTERED WRONG SQL SERVER DETAILS!!!" 250 20 yellow, White, green, cyan
- }
- }
- }
- stop-transcript
Execution Procedure
Step 1
The first step is to populate the input file (DBDetails.csv) with the list of content database to work with. Place the input file under the same location where the PowerShell script is placed. The input file should look as in the following: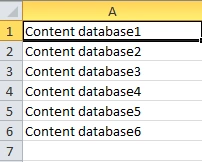
Step 2
Launch the SharePoint management shell.
Step 3
Navigate to the path where the script is placed.
Step 4
Execute the PowerShell script.
The script gives you the following 3 options to choose from.
“1”: Capture the content database details before detaching it. The following details are captured:
“2”: Detach the content database from SharePoint.
“3”: Attach the content database back to SharePoint after the SQL Server move.
First you need to enter “1” to capture the details for the content database. This information will be used to attach the content database back to SharePoint with the same settings.
Second enter “2” to actually dismount the content databases from SharePoint.
Third enter “3” to attach the dismounted content database back to SharePoint once the SQL Server move is completed. This option prompts you to enter the new SQL Server details.
Conclusion
Thus in this article I have explained how to dismount and mount SharePoint content databases for a SQL Server move using a PowerShell script.
Karthik Muthu KaruppanPosted Apr 30, 2015, 11:11 AM
thanks
Vijay SPosted Apr 30, 2015, 3:44 AM
nice