

Introduction
In this article, we are going to discuss Azure Functions and how you can easily create your first Azure function app using Azure Portal. This is the first article of my new series called Azure Functions for Beginners. So let's grab a cup of coffee and start learning.
What are Azure Functions?
Function As A Service (FaaS) is a category of cloud computing services that provides a platform in which you just need to think about writing business logic without thinking about the infrastructure required for its execution. Microsoft Azure provides two types of FaaS i.e. Azure Logic Apps and Azure Functions. So in this article, we are going to discuss Azure functions only.
According to Microsoft Docs.
Azure Functions allows you to run small pieces of code (called "functions") without worrying about application infrastructure. With Azure Functions, the cloud infrastructure provides all the up-to-date servers you need to keep your application running at scale.
Azure functions are event-driven which means that you can run your function code when some event is triggered from either an existing on-premise service or any other Azure service or third-party service. The Azure function can be scaled and you need to pay only for the resources you consume. Azure functions support lots of trigger points such as Http trigger, queue trigger, etc.
Some of the features of Azure functions are.
- Azure Functions has great language support such as C#, Java, JavaScript, Python, and PowerShell.
- Supports lots of triggers such as Service bus triggers, HTTP triggers, Queue triggers, etc.
- We need to pay only for the resources as you consume i.e.Pay-per-use pricing model
- We can install any of the libraries of your choice using NuGet or NPM
- We can easily implement CI/CD using Github, Azure DevOps Service
- We can also add integrated security on HTTP-triggered-based Azure functions using OAuth providers such as Azure Active Directory, Facebook, Google, Twitter, and Microsoft Account.
Below are several templates available for creating Azure functions for performing different operations.
- HTTP trigger
- Blob storage trigger
- Queue storage trigger
- Service Bus Queuetrigger
- Service Bus Topictrigger
- Timer trigger
- Event Gridtrigger
- Event Hubtrigger
- Azure Cosmos DBtrigger
You can get more information about Azure Functions here. So in this article, we are going to create an HTTP trigger-based Azure function using C# from Azure Portal. I will cover all other types of templates in my next article.
Create Azure function using Azure Portal
Prerequisites
Azure account (If you don't have an Azure subscription, create a free trial account)
Step 1. Creating a Function App
While creating a function you must have a function app to host the execution of your functions. You can group multiple functions into one function app which helps with deployment, scaling, ease of development & sharing of resources One function app can have multiple functions.
Log in to the Azure portal.
In the Search bar, search "function app" and then select the Function app.
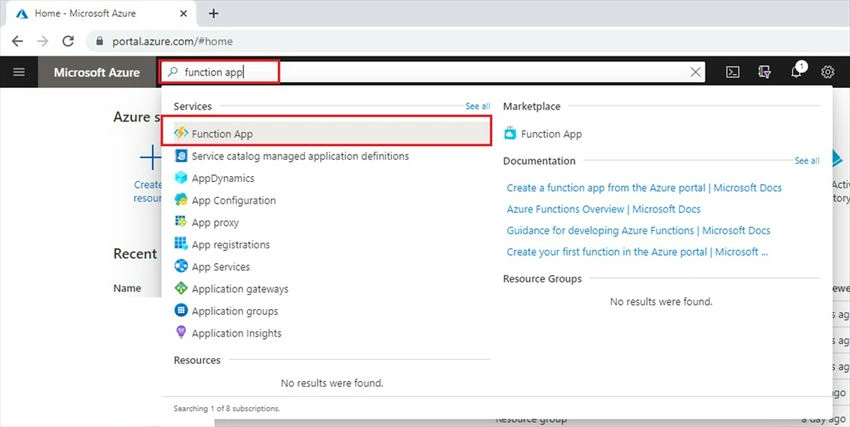

After that click on the "Add" button to add a new function app. Fill out the basic details.
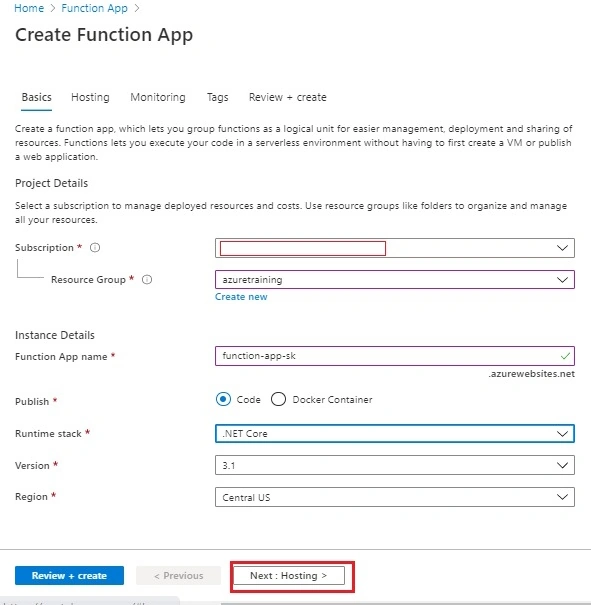
- Azure has Resource Groups(RG) which acts as a container for your resources. So now we are going to create a function app resource then first we need to create a Resource Group. If you have already created RG then you can use the same here. Under the Resource group click on the Create New button and give a unique RG name. I have selected an existing resource group.
- You need to provide a unique name for your function app.
- Select an appropriate run time for your app. Since we are going to create a function using C# I have used .net core as runtime.
- Select a version and region.
Once we fill out the basic details, then click on the Next "Hosting button".

- You need to provide a storage account while creating a function app. If you have already created a Storage account then you can use the same here. Or you can create new ones as well.
- You have to select an operating system on which your app needs to be run.
- Finally, you have to select a pricing plan for your app. You can see more details about Pricing here
Once we filled out hosting details then click on the Next: Monitoring button.
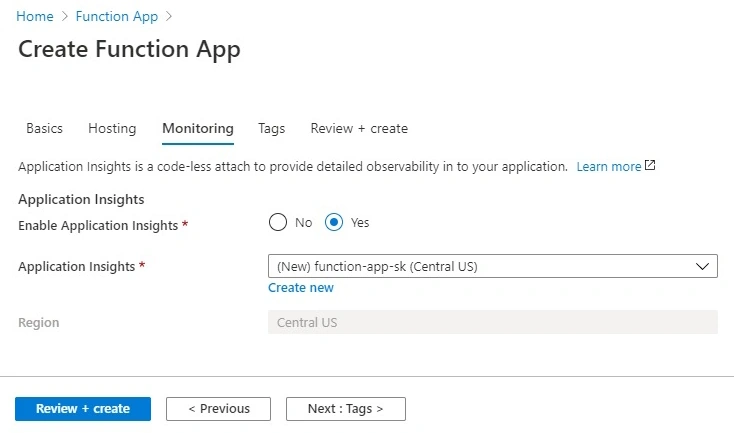
Application Insights, a feature of Azure Monitor, which is an extensible Application Performance Management (APM) service for developers and DevOps professionals. It is used to monitor your live applications. So if you want to integrate it into your function app the select Enable Application Insights flag to Yes.
Now click on the Review, Create button review all the details and click on the Create button. Wait for a few minutes to create the resources.
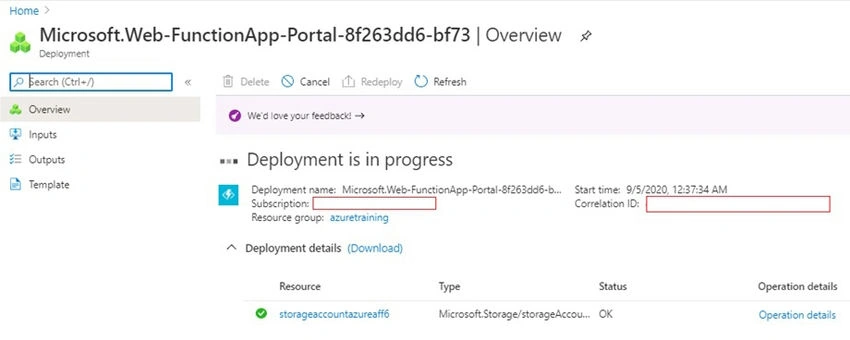
Once deployment is complete click on the Go to Resource button to see our new function app.


Step 2. Creating an HTTP-triggered-based Azure Function
Once you navigate to the Function app click on Functions in the left panel and then click on the Add button.
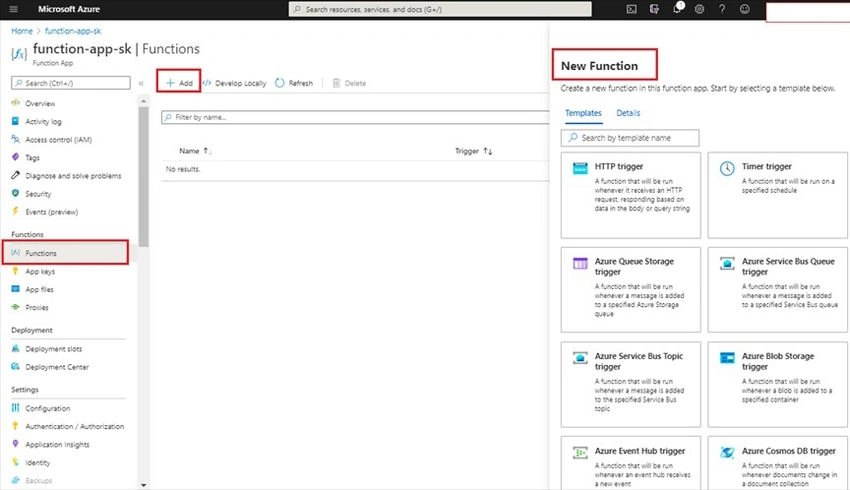
Now select the HTTP trigger from the right panel. Now set the Name and Authorization level for your new function.

- Provide a name for your new function.
- To restrict the use of your function we can set the Authorization level. There are three types of levels available: 1] When we set levels as Function, then we have to provide a function key to call our function. 2] When we set it as Admin, then you need to provide the master key. Both the function key and admin keys are found in the 'keys' management panel on the portal when your function is selected. 3] When we don't want any authorization then we can simply set the level as Anonymous.
Now click on the Create Function button. You then automatically redirect to the function once the function is successfully created.
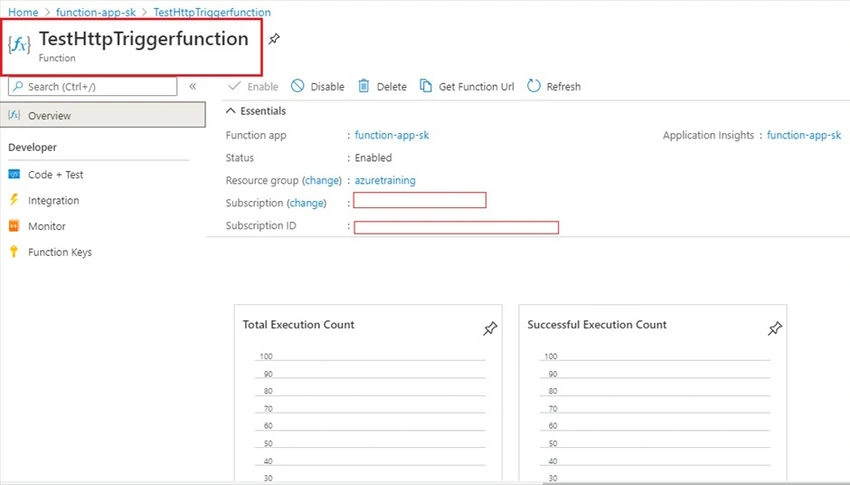
Click on the "Code + Test" button under the Developer section from the left sidebar panel.

So you can see the basic function code written which accepts a name from the query string or from the request body append to name to the Hello string and return the output.
Step 3. Testing of HTTP triggered based on Azure Function
Now click on the "Test/Run" button. For this default function, you can provide the input property name from either the body or either from the query string.
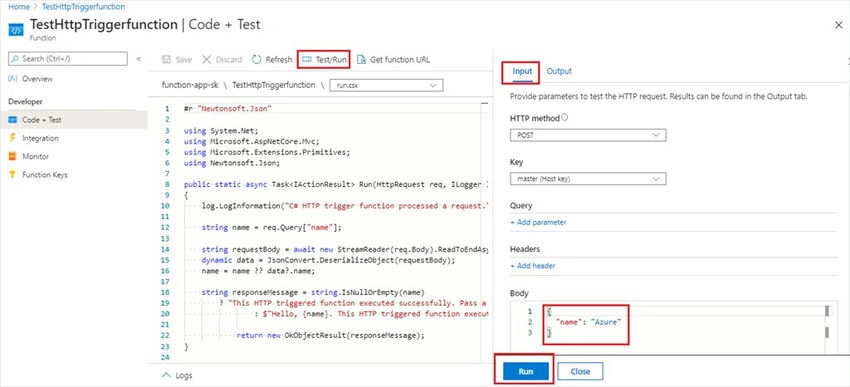
Click on the Run button from the right panel. So you can see the output in the "Output" tab in the right panel.
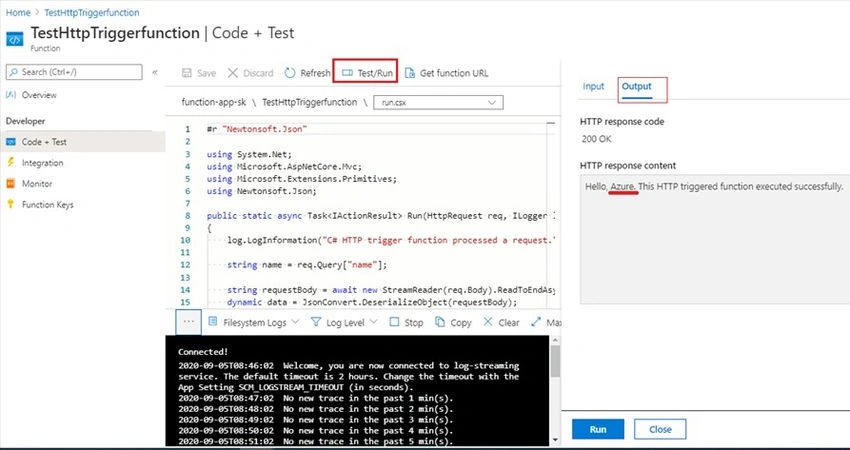
This is all about running it from Portal. You can run this function from the browser or from the Postman as well. To get the function URL click on the "Get Function URL" button.

Copy the URL.
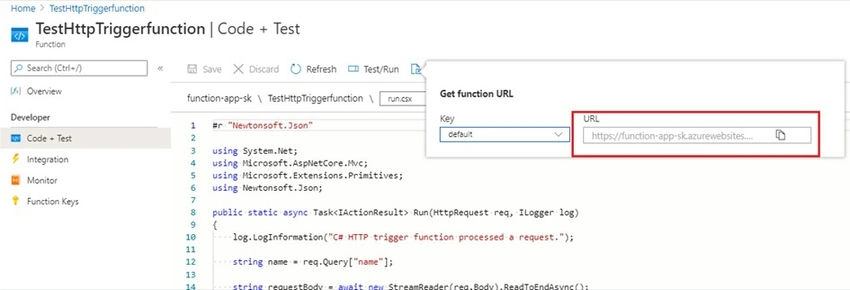
Since our function accepts input property name from the query string then paste the URL into the browser and append `?name=AzFunction` and hit the URL. You will see the output in the browser.

Since this is the HTTP Trigger function we can run it from Postman as well. So paste the URL in Postman pass input and see the output.
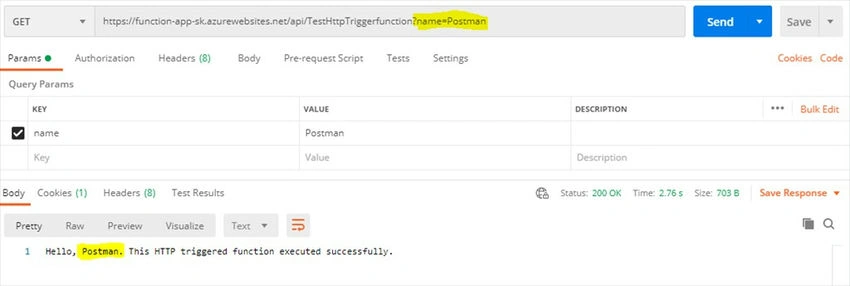
That's it. You have created your Azure function using Azure Portal.
Conclusion
In this article, I have explained Azure Functions and how to create a function using the Azure Portal. Also, I demonstrated how to test function from portal, browser, and postman. I really hope that you enjoyed this article, share it with friends, and please do not hesitate to send me your thoughts or comments. Stay tuned for more Azure Functions articles.
You can follow me on Twitter @sumitkharche01
Happy Coding!
ankitPosted Sep 12, 2020, 2:17 PM
Very helpful. Thanks much