

This chapter is taken from book "Programming Windows Phone 7" by Charles Petzold published by Microsoft press. http://www.charlespetzold.com/phone/index.html
Handling Manipulation Events: Transforms are also a good way to handle manipulation events. Here's a ball sitting in the middle of the content grid:
<Grid
x:Name="ContentPanel"
Grid.Row="1"
Margin="12,0,12,0">
<Ellipse
Width="200"
Height="200"
RenderTransformOrigin="0.5
0.5"
ManipulationDelta="OnEllipseManipulationDelta">
<Ellipse.Fill>
<RadialGradientBrush
Center="0.4
0.4"
GradientOrigin="0.4
0.4">
<GradientStop
Offset="0"
Color="White"
/>
<GradientStop
Offset="1"
Color="{StaticResource
PhoneAccentColor}"
/>
</RadialGradientBrush>
</Ellipse.Fill>
<Ellipse.RenderTransform>
<CompositeTransform
/>
</Ellipse.RenderTransform>
</Ellipse>
</Grid>
Notice the CompositeTransform. It has no name so the code will have to reference it through the Ellipse element. (This is a good strategy to use if you're handling more than one element in a single event handler.)
The code-behind file just handles the ManipulationDelta event from the Ellipse:
For handling anything other than taps, the ManipulationDelta event is crucial. This is the event that consolidates one or more fingers on an element into translation and scaling information.namespace DragAndScale
{
public partialclass MainPage : PhoneApplicationPage
{
public MainPage()
{
InitializeComponent();
}
void OnEllipseManipulationDelta(object sender,ManipulationDeltaEventArgs args)
{
Ellipse ellipse = senderas Ellipse;
CompositeTransform xform = ellipse.RenderTransform asCompositeTransform;
if (args.DeltaManipulation.Scale.X > 0 || args.DeltaManipulation.Scale.Y > 0)
{
double maxScale =Math.Max(args.DeltaManipulation.Scale.X,
args.DeltaManipulation.Scale.Y);
xform.ScaleX *= maxScale;
xform.ScaleY *= maxScale;
}
xform.TranslateX += args.DeltaManipulation.Translation.X;
xform.TranslateY += args.DeltaManipulation.Translation.Y;
args.Handled = true;
}
}
}
The Border Element
The TextBlockdoesn't include any kind of border that you can draw around the text. Fortunately Silverlight has a Border element that you can use to enclose a TextBlock or any other type of element. The Border has a property named Child of type UIElement, which means you can only put one element in a Border; however, the element you put in the Border can be a panel, and you can then add multiple elements to that panel.
You can center the TextBlock within
the Border:
<Grid
x:Name="ContentPanel"
Grid.Row="1"
Margin="12,0,12,0">
<Border
Background="Navy"
BorderBrush="Blue"
BorderThickness="16"
CornerRadius="25">
<TextBlock
Text="Hello,
Windows Phone 7!"
HorizontalAlignment="Center"
VerticalAlignment="Center"
/>
</Border>
</Grid>
Or, you can center the Border within the Grid:
<Grid
x:Name="ContentPanel"
Grid.Row="1"
Margin="12,0,12,0">
<Border
Background="Navy"
BorderBrush="Blue"
BorderThickness="16"
CornerRadius="25"
HorizontalAlignment="Center"
VerticalAlignment="Center">
<TextBlock
Text="Hello,
Windows Phone 7!" />
</Border>
</Grid>
At this point, the Border contracts in size to become only large enough to fit the TextBlock. You can also set the HorizontalAlignment and VerticalAlignment properties of the TextBlock but they would now have no effect. You can give the TextBlock a little breathing room inside the border by either setting the Margin or Padding property of the TextBlock, or the Padding property of the Border:
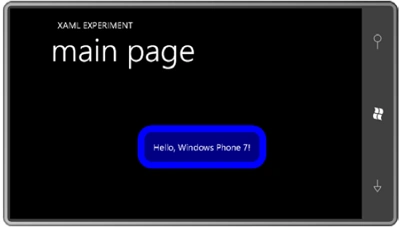
And now we have an attractive Border surrounding the TextBlock. The BorderThickness property is of type Thickness, the same structure used for Margin or Padding, so you can potentially have four different thicknesses for the four sides. The CornerRadius property is of type CornerRadius, a structure that also lets you specify four different values for the four corners. The Background and BorderBrush properties are of type Brush, so you can use gradient brushes.
If you want a Border with a "normal" thickness, you can use one of the pre-defined resources:
<Border BorderThickness="{StaticResource PhoneBorderThickness}"
This is 3 pixels in width. The PhoneStrokeThickness resource also provides that same value.
What happens if you set a
RenderTransform on the TextBlock? Try this:
<Grid
x:Name="ContentPanel"
Grid.Row="1"
Margin="12,0,12,0">
<Border
Background="Navy"
BorderBrush="Blue"
BorderThickness="16"
CornerRadius="25"
HorizontalAlignment="Center"
VerticalAlignment="Center"
Padding="20">
<TextBlock
Text="Hello,
Windows Phone 7!"
RenderTransformOrigin="0.5
0.5">
<TextBlock.RenderTransform>
<RotateTransform
Angle="45"
/>
</TextBlock.RenderTransform>
</TextBlock>
</Border>
</Grid>
Here's what you get:
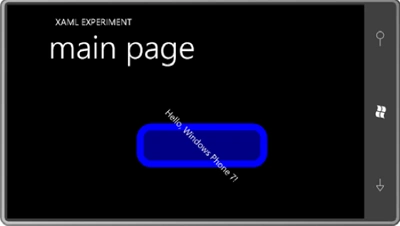
The RenderTransform property is called a render transform for a reason: It
only affects rendering. It does not affect how the element is perceived in the
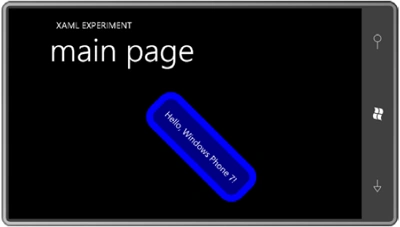
layout system. Your spirits might perk up, however, when you try moving the
RenderTransform (and RenderTransformOrigin) from the TextBlock to the Border,
like this:
<Grid
x:Name="ContentPanel"
Grid.Row="1"
Margin="12,0,12,0">
<Border
Background="Navy"
BorderBrush="Blue"
BorderThickness="16"
CornerRadius="25"
HorizontalAlignment="Center"
VerticalAlignment="Center"
Padding="20"
RenderTransformOrigin="0.5
0.5">
<Border.RenderTransform>
<RotateTransform
Angle="45"
/>
</Border.RenderTransform>
<TextBlock
Text="Hello,
Windows Phone 7!" />
</Border>
</Grid>



Join the conversation! Your thoughts help the community grow.