

Introduction
In this article, we will learn How to Handle ngClass and ngStyle in Angular.
Step 1
Create an Angular project setup using the below commands or however you create your Angular app
ng new sample
Step 2 - NgClass & NgStyle
- NgClass & NgStyle are Angular Directives.
- It allow us to conditionally apply one-to-many classes/styles to an element.
- This provides a way to work with multiple classes or styles at once and apply them conditionally; compared to their alternatives:
- Angular’s class and style bindings only allow a single class or style to be conditionally applied at a time.
- Native style and class attributes apply one-to-many classes/styles statically
NgClass Types
It can receive input are inline declarations, or a property/method from our TypeScript class.
NgClass support for,
- Arrays,
- strings of classes,
- configuration objects
Syntax
- [ngClass]="['is- flag', 'is- list '"]
- [ngClass]="is-flag is- list"
- [ngClass]="{'is-flag': true, 'is-list': true}
NgStyle Syntax
[ngStyle]="{font-size.px: 14}"
Step 3 - Install NgBootstrap
// Installation for Angular CLI
ng add @ng-bootstrap/ng-bootstrap
App.module.ts
Now we will declare form in app.module.ts,
- import { NgModule } from '@angular/core';
- import { BrowserModule } from '@angular/platform-browser';
- import { FormsModule } from '@angular/forms';
- import { AppComponent } from './app.component';
- import { NgbModule } from '@ng-bootstrap/ng-bootstrap'
- @NgModule({
- imports: [ BrowserModule, FormsModule, NgbModule.forRoot()],
- declarations: [ AppComponent],
- bootstrap: [ AppComponent ]
- })
- export class AppModule { }
Step 4
Now, we will write integration on App.component.html
- <h4>NgStyle</h4>
- <ul *ngFor="let person of people">
- <li [ngStyle]="{'color':getColor(person.country)}"> {{ person.name }} ({{ person.country }})
- </li>
- </ul>
- <hr>
- <h4>Alternative Syntax: </h4>
- <ul *ngFor="let person of people">
- <li [style.color]="getColor(person.country)">{{ person.name }} ({{ person.country }})
- </li>
- </ul>
- <hr>
- <h4>Points and pixels</h4>
- <ul *ngFor="let person of people">
- <li [ngStyle]="{'font-size.px':14}" [style.color]="getColor(person.country)">{{ person.name }} ({{ person.country }})
- </li>
- </ul>
- <hr>
- <h4>Alternative of Points and pixels</h4>
- <ul *ngFor="let person of people">
- <li [style.font-size.px]="14" [style.color]="getColor(person.country)">{{ person.name }} ({{ person.country }})
- </li>
- </ul>
- <hr>
- <h4>NgClass</h4>
- <ul *ngFor="let person of people">
- <li [ngClass]="{
- 'text-success':person.country === 'UK',
- 'text-primary':person.country === 'USA',
- 'text-danger':person.country === 'HK'
- }">{{ person.name }} ({{ person.country }})
- </li>
- </ul>
- <hr>
- <h4>Alternative of NgClass</h4>
- <ul *ngFor="let person of people">
- <li [class.text-success]="person.country === 'UK'" [class.text-primary]="person.country === 'USA'" [class.text-danger]="person.country === 'HK'">{{ person.name }} ({{ person.country }})
- </li>
- </ul>
Step 5
Next, we can open the app.component.ts and write some code.
- import { Component } from '@angular/core';
- @Component({
- selector: 'my-app',
- templateUrl: './app.component.html',
- styleUrls: ['./app.component.css']
- })
- export class AppComponent {
- getColor(country) {
- switch (country) {
- case 'UK':
- return 'green';
- case 'USA':
- return 'blue';
- case 'HK':
- return 'red';
- }
- }
- people: any[] = [
- {
- "name": "Douglas Pace",
- "country": 'UK'
- },
- {
- "name": "Mcleod Mueller",
- "country": 'USA'
- },
- {
- "name": "Day Meyers",
- "country": 'HK'
- },
- {
- "name": "Aguirre Ellis",
- "country": 'UK'
- },
- {
- "name": "Cook Tyson",
- "country": 'USA'
- }
- ];
- }
Step 6
Now we will run the application
ng serve
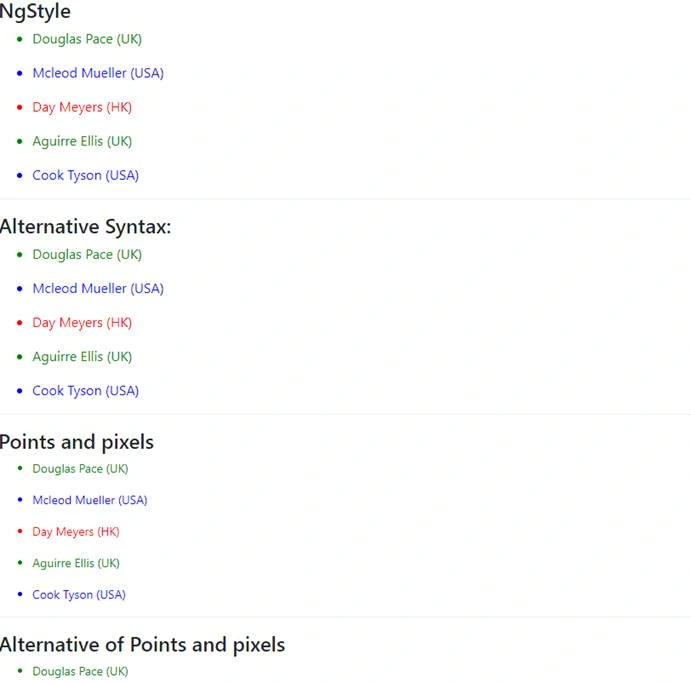
On successful execution of the above command, it will show the browser,
Join the conversation! Your thoughts help the community grow.