

Prologue:
In this article we shall discuss about how to create an auto increment field in a LightSwitch Entity. In LightSwitch, we can add SQL Database as External storage. But whenever we add a table which contains the identity column from external database, the LightSwitch ignores the identity column setting from SQL table.
One of my readers asked me how to create an auto increment field [identity
column] in a LightSwitch Entity. I replied that in LightSwitch Entity the
LightSwitch runtime automatically generates a field called Id when you create
the Entity which is of identity column. But the problem is that he used SQL as
backend with a simple Data Entry windows application. He needs to continue with
the same serial number which is in the SQL table and he needs to use the LightSwitch
Entity. The custom auto increment field [identity column] is resettable.
Whenever the rows in the entity is EMPTY then the auto increment field reset to
ZERO. For this situation, i tried to create a auto increment field and is works
fine. This is simple concept for the Experts but not for me. So i am going to
explain with an example application.
Preparing the Solution:
Fire up Visual studio LightSwitch 2011 or LightSwitch Beta version. Create a LightSwitch Project as shown in the below figure.
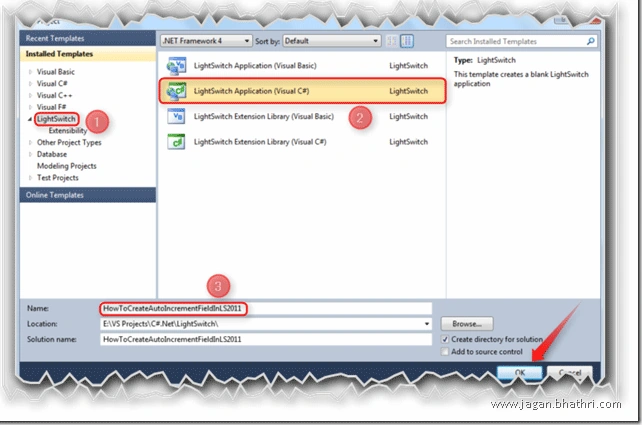
Follow the number pointed in the figure to create the LightSwitch Application
with the name "HowToCreateAutoIncrementFieldInLS2011".
Creating LightSwitch Entity:
To show that how to implement the auto
increment field i.a. custom identity column in LightSwitch Entity, we need to
create an sample entity.
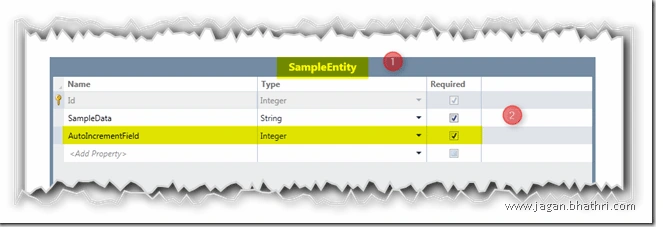
Here, we can the see the LightSwitch generated Identity column 'Id' which is
primary key for the table and the custom identity field called "AutoIncrementField".
So create an entity called "SampleEntity" as shown in the above figure.
Designing the Screen:
Designing the screen in LightSwitch is pretty simple. Just follow the figure shown below.
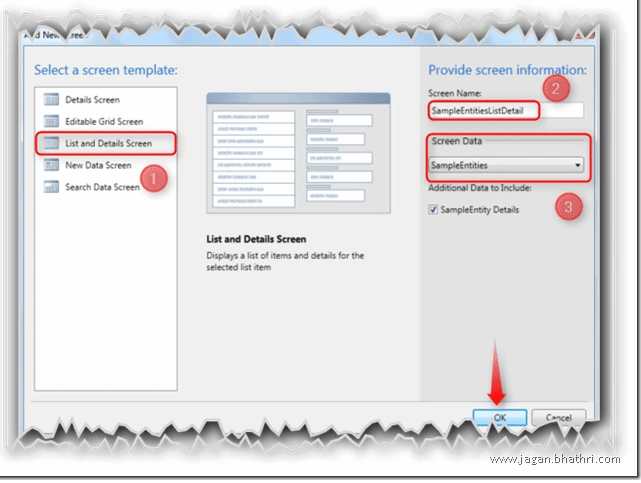
Here,
- First you need to select the screen template. for our sample application we have selected List and Details Screen
- Give the name for Screen
- Select the Entity to be bond with the Screen template
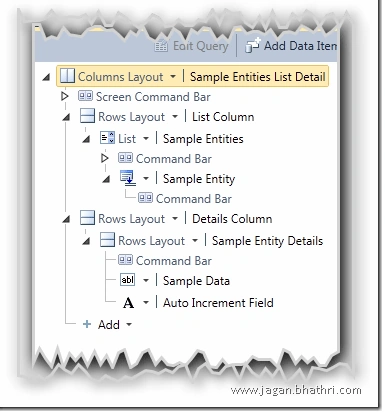
The figure shown in the right side shows the screen tree structure for the LightSwitch List and Details Screen. In this screen template, we have two panels in which the first one is List panel and the other one is the Details panel.
Implementing Custom Identity Column:
To implement the Custom identity column, unfortunately we need to go the Code-Behind i.e. we need to add a bit of lines into the .cs file. The logic behind the custom identity column implementation is that get the value of the AutoIncrementField column value from the last record of the entity and increment by 1 else if there is no records then assign 0 to the AutoIncrementField. To add the implementation code, just edit the SampleEntity_Created method as shown in the figure.
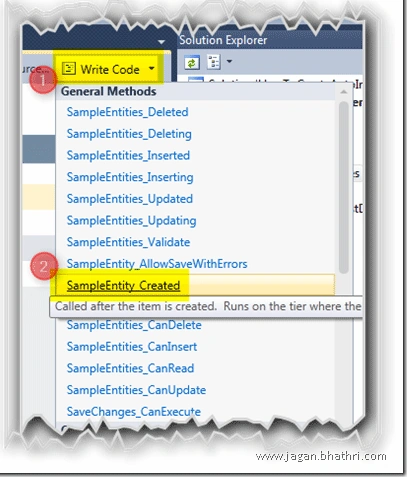
The below snippet shows the logic we have implemented for custom identity
column.
public partial class SampleEntity
{
partial void SampleEntity_Created()
{
Dispatchers.Current.BeginInvoke(() =>
{
Andrzej StanislawskiPosted Jul 17, 2012, 3:00 AM
Thanks for the sample code. I used your code, but I can not deal with the error The name 'dispatchers' does not exist in the current context. I'm new here, could you give some tips thanks
bhuvenPosted Nov 27, 2011, 7:32 AM
Thanks you Jagan for this. Bhuven