

Introduction
Installing Python and pip
- python --version
- python -V
In order to install Python 3.6, we are required to run the following commands and when asked for, input the sudo password.
- sudo add-apt-repository ppa:jonathonf/python-3.6
- sudo apt-get update
- sudo apt-get install python3.6
If you don't get any errors, you can now run the following commands to ensure that both the versions of Python are now available.
- python --version
- python3 --version
Now that we have multiple versions of Python available, it's time to install pip, the package management system used to install and manage software packages written in Python. In order to install pip, run the following commands. The first command installs pip, and the later one upgrades pip to its latest version.
- sudo apt install python-pip
- sudo pip install --upgrade pip
The Virtual Environment
- pip install virtualenv --user
Alright! Now, we have all the tools to create our virtual environments for different projects as needed. The following commands let us create our first virtual environment. I have put comments in front of each command to explain what it does.
- // brings you to your desktop, no matter where you currently are
- cd ~/Desktop
- // creates a directory 'project-one' on your desktop
- mkdir project-one
- // change current directory from ~/Desktop to ~/Desktop/project-one
- cd project-one
- // creates a virtual environment named 'venv', you can name it whatever you want
- virtualenv venv
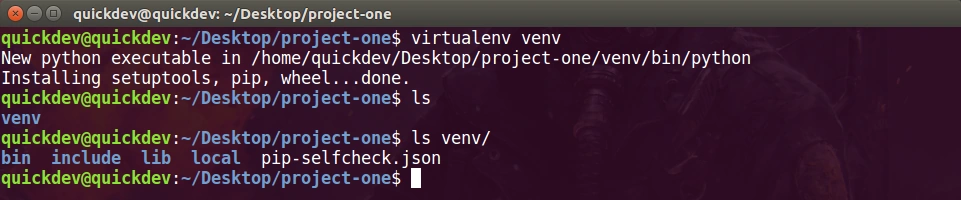
After you run the last command, you should see something similar to the below screenshot. The command creates a directory as venv inside project-one, and installs the packages pip, setuptools, and wheel.
 Now that we have our virtual environment created, it's time to activate it and see what we have got here. In order to activate a virtual environment, we use the following command.
- source venv/bin/activate
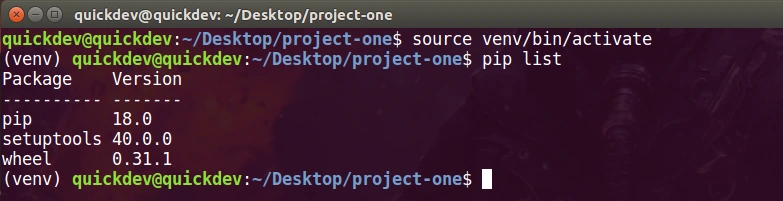
The venv command shows that our virtual environment is now active. If you gave your environment a different name than mine, then you should see your environment there as (<your_environment_name>) in your console, right before the hostname. We can then run the pip list command to see packages installed along with their current version.
If we now run the python --version in the terminal, we see that our environment uses the system Python version, which should be Python 2.7 (if you have not updated it). However, we have installed another version of Python in our previous steps. So, the question is how do we make our virtual environment use the latest version.
Python Version
We can do so by specifying the Python that we want our environment to use it at the time of its creation using the following commands.
- // brings you to your desktop, no matter where you currently are
- cd ~/Desktop
- // creates a directory 'project-two' on your desktop
- mkdir project-two
- // change current directory from ~/Desktop to ~/Desktop/project-two
- cd project-two
- // creates a virtual environment named 'venv', with Python 3.6
- virtualenv venv -p /usr/bin/python3.
- // activates the virtual environment
- source venv/bin/activate
- // verify the Python version
- python --version
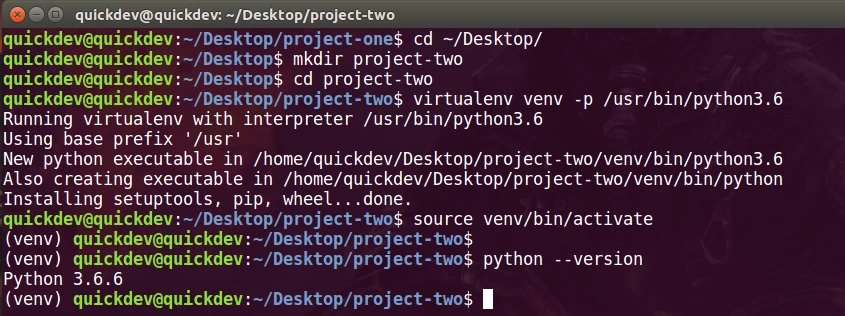
If nothing goes wrong, you too should see a similar output as in the above image.
Summary
In this article, we saw how we can work with different versions of Python for different projects using virtual environments. But I must tell you that we have barely scratched the surface with pip and virtual environments because there is much more to it. I will soon write another article that will cover pip in more details.
luis mediavillaPosted Aug 18, 2018, 1:36 PM
Why don't you make the same article including windows?
Upendra Pratap ShahiPosted Aug 13, 2018, 9:29 AM
Nice one information shared..