

INITIAL CHAMBER
Open your Visual Studio 2010. Create an Empty Website under Visual C#. Provide a suitable name to your application such as "validation_demo".
Step 2
In Solution Explorer right-click the project and select Add New Item (or use Ctrl + Shift + A) the select Web Form (validation_demo.aspx). Again get back to Add New Item then select SQL Server Database. (Put your database inside App_Data_Folder).
Step 3
I think everyone has installed the Ajaxtoolkit inside the Toolbox in VS10. If not then go to my tutorial “How to add AjaxToolkit in VS10” and add it, we need that later.
Step 4
DATABASE CHAMBER
In Server Explorer, under your database (Database.mdf) do something to table then select Add New Table.
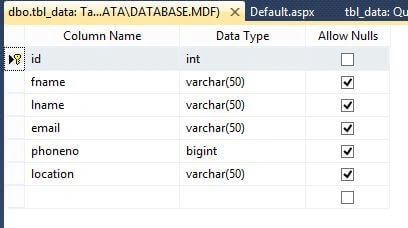
Table -> tbl_data
Don't forget to set Is Identity == True for “ID”.
 Step 5
Figure 1 Database
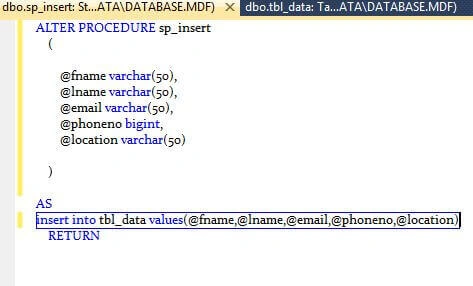
Create a Stored Procedure by going to Database.mdf -> Stored Procedure -> Add New Stored Procedure.
Stored Procedure – sp_insert:
 Step 6
Figure 2 Stored Procedure
DESIGN CHAMBER
Now get back to your validation.aspx page, where we will design our application. Here is the design code:
Validation.aspx
- <%@ Page Language="C#" AutoEventWireup="true" CodeFile="Default.aspx.cs" Inherits="_Default" %>
- <%@ Register Assembly="AjaxControlToolkit" Namespace="AjaxControlToolkit" TagPrefix="asp" %>
- <!DOCTYPE html PUBLIC "-//W3C//DTD XHTML 1.0 Transitional//EN" "http://www.w3.org/TR/xhtml1/DTD/xhtml1-transitional.dtd">
- <html xmlns="http://www.w3.org/1999/xhtml">
- <head runat="server">
- <title></title>
- <style type="text/css">
- .style1 {
- width: 122px;
- }
- .style2 {
- width: 239px;
- }
- .style3 {
- text-align: left;
- text-decoration: underline;
- font-family: Arial, Helvetica, sans-serif;
- font-size: large;
- }
- </style>
- </head>
- <body>
- <form id="form1" runat="server">
- <asp:ToolkitScriptManager ID="ToolkitScriptManager1" runat="server"></asp:ToolkitScriptManager>
- <div>
- <table style="width:100%;">
- <caption class="style3">
- <strong>Registration Form with Validation</strong>
- </caption>
- <tr>
- <td class="style1">
- </td>
- <td class="style2">
- </td>
- <td>
- </td>
- </tr>
- <tr>
- <td class="style1">
- <asp:Label ID="Label1" runat="server" Text="FirstName:"></asp:Label>
- </td>
- <td class="style2">
- <asp:TextBox ID="TextBox1" runat="server" Height="22px" MaxLength="20" Width="158px"></asp:TextBox>
- </td>
- <td>
- <asp:RequiredFieldValidator ID="RequiredFieldValidator6" runat="server" ControlToValidate="TextBox1" ErrorMessage="Please Enter your First Name" ForeColor="#CC0000"></asp:RequiredFieldValidator>
- </td>
- <td>
- <asp:FilteredTextBoxExtender ID="FilteredTextBoxExtender1" TargetControlID="TextBox1" FilterType="LowercaseLetters,UppercaseLetters,Custom" runat="server"></asp:FilteredTextBoxExtender>
- </td>
- </tr>
- <tr>
- <td class="style1">
- <asp:Label ID="Label2" runat="server" Text="LastName:"></asp:Label>
- </td>
- <td class="style2">
- <asp:TextBox ID="TextBox2" runat="server" Height="22px" MaxLength="10" Width="158px"></asp:TextBox>
- </td>
- <td>
- <asp:RequiredFieldValidator ID="RequiredFieldValidator2" runat="server" ControlToValidate="TextBox2" ErrorMessage="Please Enter your Last Name" ForeColor="#CC0000"></asp:RequiredFieldValidator>
- </td>
- <td>
- <asp:FilteredTextBoxExtender ID="FilteredTextBoxExtender2" TargetControlID="TextBox2" FilterType="LowercaseLetters,UppercaseLetters,Custom" runat="server"></asp:FilteredTextBoxExtender>
- </td>
- </tr>
- <tr>
- <td class="style1">
- <asp:Label ID="Label3" runat="server" Text="Email:"></asp:Label>
- </td>
- <td class="style2">
- <asp:TextBox ID="TextBox3" runat="server" Height="22px" MaxLength="15" Width="158px"></asp:TextBox>
- </td>
- <td>
- <asp:RequiredFieldValidator ID="RequiredFieldValidator3" runat="server" ControlToValidate="TextBox3" ErrorMessage="Please Enter your Email ID" ForeColor="#CC0000"></asp:RequiredFieldValidator>
- </td>
- <td>
- <asp:RegularExpressionValidator ID="RegularExpressionValidator1" runat="server" ControlToValidate="TextBox3" ValidationExpression="\w+([-+.']\w+)*@\w+([-.]\w+)*\.\w+([-.]\w+)*" ErrorMessage="Invalid Email Id"></asp:RegularExpressionValidator>
- <td>
- </td>
- </td>
- </tr>
- <tr>
- <td class="style1">
- <asp:Label ID="Label4" runat="server" Text="Phone No. :"></asp:Label>
- </td>
- <td class="style2">
- <asp:TextBox ID="TextBox4" runat="server" Height="22px" MaxLength="10" Width="158px"></asp:TextBox>
- </td>
- <td>
- <asp:RequiredFieldValidator ID="RequiredFieldValidator4" runat="server" ControlToValidate="TextBox4" ErrorMessage="Please Enter your Phone No" ForeColor="#CC0000"></asp:RequiredFieldValidator>
- </td>
- <td>
- <asp:FilteredTextBoxExtender ID="FilteredTextBoxExtender3" TargetControlID="TextBox4" FilterType="Numbers" runat="server"></asp:FilteredTextBoxExtender>
- </td>
- </tr>
- <tr>
- <td class="style1">
- <asp:Label ID="Label5" runat="server" Text="Location:"></asp:Label>
- </td>
- <td class="style2">
- <asp:TextBox ID="TextBox5" runat="server" Height="22px" MaxLength="15" Width="158px"></asp:TextBox>
- </td>
- <td>
- <asp:RequiredFieldValidator ID="RequiredFieldValidator5" runat="server" ControlToValidate="TextBox5" ErrorMessage="Please Enter your Location" ForeColor="#CC0000"></asp:RequiredFieldValidator>
- </td>
- <td>
- <asp:FilteredTextBoxExtender ID="FilteredTextBoxExtender4" TargetControlID="TextBox5" FilterType="Numbers,LowercaseLetters,UppercaseLetters" runat="server"></asp:FilteredTextBoxExtender>
- </td>
- </tr>
- <tr>
- <td class="style1">
- </td>
- <td class="style2">
- </td>
- <td>
- </td>
- </tr>
- <tr>
- <td class="style1">
- </td>
- <td class="style2">
- <asp:Button ID="Button1" runat="server" onclick="Button1_Click" Text="Submit" />
- </td>
- <td>
- </td>
- </tr>
- </table>
- </div>
- </form>
- </body>
- </html>
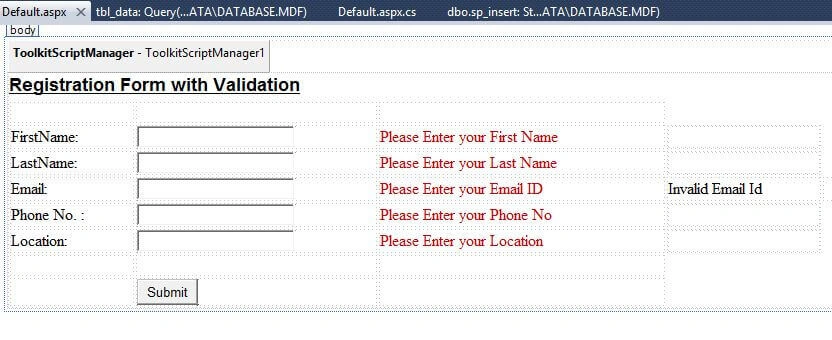
Figure 3 Design Chamber
Step 7
CODE CHAMBER
In Solution Explorer under validation.aspx the validation.aspx.cs file is there. We will try our code in this file.
Figure 4 Namespace
- using System;
- using System.Collections.Generic;
- using System.Linq;
- using System.Web;
- using System.Web.UI;
- using System.Web.UI.WebControls;
- using System.Data.SqlClient;
- using System.Data;
- public partial class _Default: System.Web.UI.Page
- {
- protected void Page_Load(object sender, EventArgs e)
- {
- }
- protected void Button1_Click(object sender, EventArgs e)
- {
- SqlConnection con = new SqlConnection(@
- "Data Source=.\SQLEXPRESS;AttachDbFilename=|DataDirectory|\Database.mdf;Integrated Security=True;User Instance=True");
- SqlCommand cmd = new SqlCommand("sp_insert", con);
- cmd.CommandType = CommandType.StoredProcedure;
- cmd.Parameters.AddWithValue("fname", TextBox1.Text);
- cmd.Parameters.AddWithValue("lname", TextBox2.Text);
- cmd.Parameters.AddWithValue("email", TextBox3.Text);
- cmd.Parameters.AddWithValue("phoneno", TextBox4.Text);
- cmd.Parameters.AddWithValue("location", TextBox5.Text);
- con.Open();
- int i = cmd.ExecuteNonQuery();
- con.Close();
- }
- }
Sreelatha BoinibalPosted Mar 28, 2018, 12:22 AM
Could you please put the code for password field and confirm password field as soon as possible
yazad dumasiaPosted Apr 8, 2017, 1:36 AM
PLEASE TEACH ME HOW CREATE Procedure
yazad dumasiaPosted Apr 8, 2017, 1:36 AM
I am not able how to create Procedure in MS SQL 2014 MANAGEMENT STUDIO
Arul RPosted Oct 28, 2015, 5:46 AM
Nice share!!!
Rupali ShindePosted Oct 13, 2015, 5:22 AM
nice
Santhakumar MunuswamyPosted May 26, 2015, 3:57 PM
Thanks for good one
Gowtham RajamanickamPosted May 26, 2015, 8:57 AM
Good one..
Sibeesh VenuPosted May 26, 2015, 7:08 AM
Good one.
NitinPosted May 23, 2015, 8:52 AM
good one