

Introduction
In this article, we will explain how we can create multiple views and navigate between multiple views (quick views and card views), or render/replace views based on conditions.
ACE Navigations:
- Every ACE has below navigation props:
- cardNavigator
- quickViewNavigator
- Thesee can be used in CardView and QuickView:
- Register
- Push
- Pop
- Replace
- Read the current itemID
Scenario
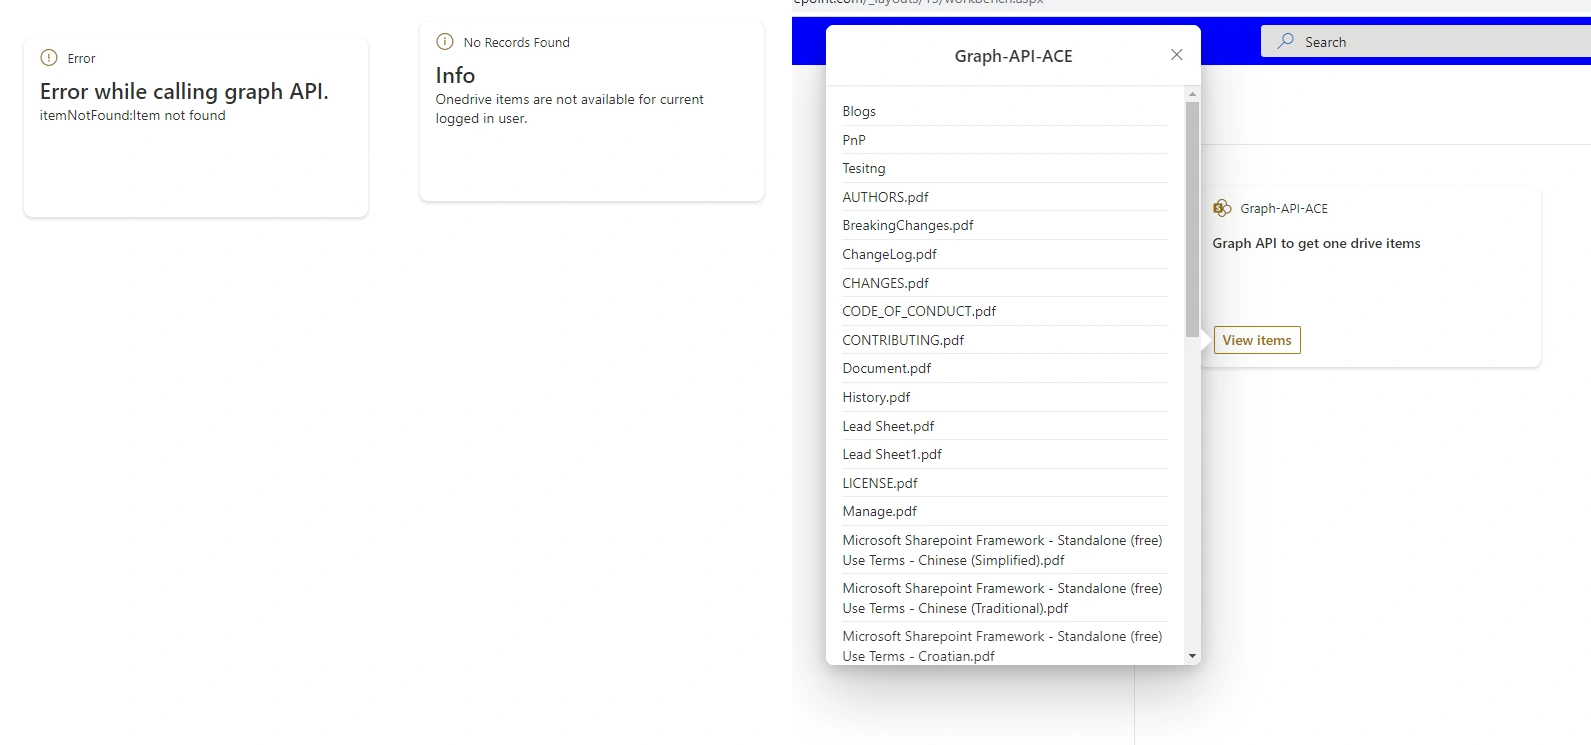
In this example, we will call a graph API to fetch onedrive items. And, based on the result, we will create three card views. Based on the condition, we will render them.
So when we are calling any APIs there are multiple outcomes like records (number of records and no records found) and any error. So for this, we will create three card views. Based on that, we will render different card views.
In the end, our output will look like this:
For getting started with an Adaptive card extension in SPFx then refer to this.
Implementation
Open a command prompt.
Move to the path where you want to create a project.
Create a project directory using:
md folder-name
Move to the above-created directory using:
cd folder-name
Now execute the below command to create an SPFx solution:
yo @microsoft/sharepoint
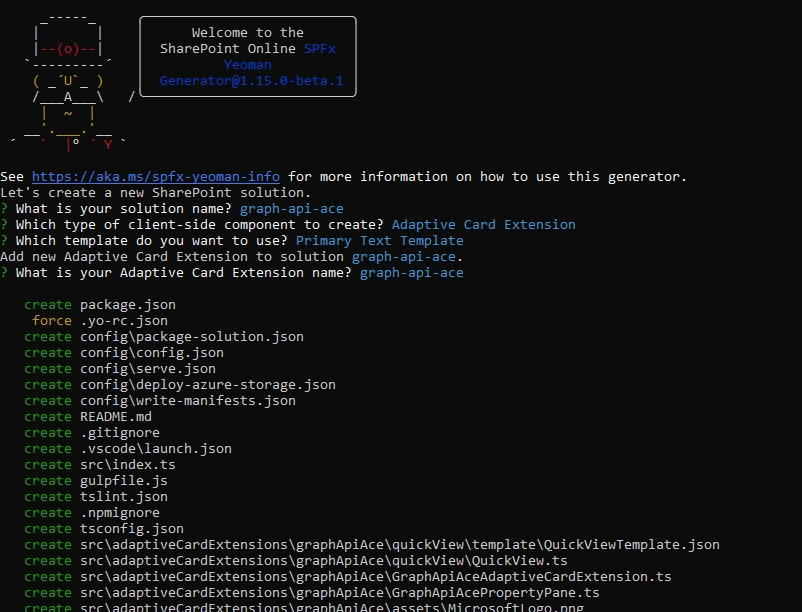
It will ask some questions, as shown below:
After a successful installation, we can open a project in any source code tool. Here, I am using the VS code, so I will execute the command:
code .
Now we will create a service, model, and typescript and JSON files for different views. So in the end, our project structure will look like this (here my solution name is graphApiAce):

Create a models folder inside ACE and create a file called IOnedriveItems.ts.
export interface IOnedriveItems {
  value: {
    webUrl: string;
    displayName: string;
    id: string;
  }
}
Now let’s create a service to get Onedrive Items using graph API. So for that, create the below files:
GraphService.ts
import { MSGraphClient } from "@microsoft/sp-http";
import { IOnedriveItems } from "../models/IOnedriveItems";
import { IGraphService } from "./IGraphService";

export class GraphService implements IGraphService {
    private _graphClient: MSGraphClient;
    private _GraphVersion = "v1.0";
    public init(graphClient: MSGraphClient): void {
        this._graphClient = graphClient;
    }
    public getOnedriveItems = async (): Promise < IOnedriveItems[] > => {
        if (this._graphClient === undefined) {
            throw new Error("Service is not initialized");
        }
        const apiUrl = "/me/drive/root/children";
        const itemsResponse = await this._graphClient.api(apiUrl).version(this._GraphVersion).get();
        const onedriveItems: IOnedriveItems[] = itemsResponse.value as IOnedriveItems[];
        return onedriveItems;
    }
}
export const graphService = new GraphService();
IGraphService.ts
import { MSGraphClient } from '@microsoft/sp-http';
import { IOnedriveItems } from '../models/IOnedriveItems';

export interface IGraphService {
    init(graphClient: MSGraphClient): void;
    getOnedriveItems():Promise<IOnedriveItems[]>;
}
Move to the GraphApiAceAdaptiveCardExtension.ts file.
Update states in onInit() as below,
public async onInit(): Promise < void > {
    this.state = {
        onedriveItms: undefined,
        noRecordsFoundMessage: undefined,
        errorMessage: undefined
    };
}
Move to the ./quickView folder and create the below files.
ErrorMessageCardView.ts
In this, we will use an Error icon and text. The description will be based on our requirements.
import {
    BasePrimaryTextCardView,
    IPrimaryTextCardParameters
} from '@microsoft/sp-adaptive-card-extension-base';
import {
    IGraphApiAceAdaptiveCardExtensionProps,
    IGraphApiAceAdaptiveCardExtensionState
} from '../GraphApiAceAdaptiveCardExtension';
export class ErrorMessageCardView extends BasePrimaryTextCardView < IGraphApiAceAdaptiveCardExtensionProps,
    IGraphApiAceAdaptiveCardExtensionState > {
        public get data(): IPrimaryTextCardParameters {
            return {
                title: "Error",
                primaryText: "Error while calling graph API.",
                description: this.state.errorMessage,
                iconProperty: "Error"
            };
        }
    }
NoRecordsCardView.ts
In this, we will use an Info icon and text. The description will be based on our requirements.
import {
    BasePrimaryTextCardView,
    IPrimaryTextCardParameters
} from '@microsoft/sp-adaptive-card-extension-base';
import {
    IGraphApiAceAdaptiveCardExtensionProps,
    IGraphApiAceAdaptiveCardExtensionState
} from '../GraphApiAceAdaptiveCardExtension';
export class NoRecordsView extends BasePrimaryTextCardView < IGraphApiAceAdaptiveCardExtensionProps,
    IGraphApiAceAdaptiveCardExtensionState > {
        public get data(): IPrimaryTextCardParameters {
            return {
                title: "No Records Found",
                primaryText: "Info",
                description: "Onedrive items are not available for current logged in user.",
                iconProperty: "Info"
            };
        }
    }
QuickView.ts
Update data() to set state values to render in JSON.
import { ISPFxAdaptiveCard, BaseAdaptiveCardView } from '@microsoft/sp-adaptive-card-extension-base';
import * as strings from 'GraphApiAceAdaptiveCardExtensionStrings';
import { IGraphApiAceAdaptiveCardExtensionProps, IGraphApiAceAdaptiveCardExtensionState } from '../GraphApiAceAdaptiveCardExtension';

export interface IQuickViewData {
    subTitle: string;
    title: string;
    onedriveItms: any[];
    errorMessage: string;
}
export class QuickView extends BaseAdaptiveCardView < IGraphApiAceAdaptiveCardExtensionProps,
    IGraphApiAceAdaptiveCardExtensionState,
    IQuickViewData > {
        public get data(): IQuickViewData {
            return {
                subTitle: strings.SubTitle,
                title: strings.Title,
                onedriveItms: this.state.onedriveItms,
                errorMessage: this.state.errorMessage
            };
        }
        public get template(): ISPFxAdaptiveCard {
            return require('./template/QuickViewTemplate.json');
        }
    }
Move to the ./quickView/template folder.
Update QuickViewTemplate.json
- Update the data key with onedrive items state.
- We will render the name property with webUrl so it will update items and selectAction based on this.
{
  "schema": "http://adaptivecards.io/schemas/adaptive-card.json",
  "type": "AdaptiveCard",
  "version": "1.2",
  "body": [
    {
      "type": "Container",
      "separator": "true",
      "$data": "${onedriveItms}",
      "items": [
        {
          "type": "TextBlock",
          "text": "${name}",
          "wrap": true
        }
      ],
      "selectAction": {
        "type": "Action.OpenUrl",
        "url": "${webUrl}"
      }
    }
  ]
}
Create ErrorMessageTemplate.json
{
  "schema": "http://adaptivecards.io/schemas/adaptive-card.json",
  "type": "AdaptiveCard",
  "version": "1.2",
  "body": [
    {
      "type": "Container",
      "separator": "true",
      "items": [
        {
          "type": "ColumnSet",
          "separator": true,
          "columns": [
            {
              "type": "Column",
              "width": "auto",
              "items": [
                {
                  "type": "TextBlock",
                  "text": "${description}",
                  "wrap": true
                }
              ]
            }
          ]
        }
      ]
    }
  ]
}
Create NoRecordsTemplate.json
{
  "schema": "http://adaptivecards.io/schemas/adaptive-card.json",
  "type": "AdaptiveCard",
  "version": "1.2",
  "body": [
    {
      "type": "Container",
      "separator": "true",
      "items": [
        {
          "type": "ColumnSet",
          "separator": true,
          "columns": [
            {
              "type": "Column",
              "width": "auto",
              "items": [
                {
                  "type": "TextBlock",
                  "text": "No Records found",
                  "wrap": true
                }
              ]
            }
          ]
        }
      ]
    }
  ]
}
Now, again, move to the GraphApiAceAdaptiveCardExtension.ts file.
1. Register views
- Here we have to register the views that we are creating.
2. Call services
- Call API which we have created in graph service to get one drive items.
3. Replace views and update states
- While calling an API, if an item's length is greater than zero, then render records in quick view.
- If the record length is zero, then we will render the no records found view.
- If there is any error, show an error card with an error message.
public async onInit(): Promise < void > {
    this.state = {
        onedriveItms: undefined,
        noRecordsFoundMessage: undefined,
        errorMessage: undefined
    };
    this.cardNavigator.register(CARD_VIEW_REGISTRY_ID, () => new CardView());
    this.cardNavigator.register(NO_RECORDS_CARD_VIEW_REGISTRY_ID, () => new NoRecordsView());
    this.cardNavigator.register(ERROR_MESSAGE_CARD_VIEW_REGISTRY_ID, () => new ErrorMessageCardView());
    this.quickViewNavigator.register(QUICK_VIEW_REGISTRY_ID, () => new QuickView());
    const graphClient = await this.context.msGraphClientFactory.getClient();
    graphService.init(graphClient);
    setTimeout(async () => {
        await graphService.getOnedriveItems().then(items => {
            console.log("one drive items:", items);
            if (items.length) {
                this.setState({
                    onedriveItms: items
                });
            } else {
                this.cardNavigator.replace(NO_RECORDS_CARD_VIEW_REGISTRY_ID);
                return;
            }
        }).catch(error => {
            this.setState({
                errorMessage: error.code + ":" + error.message
            });
            this.cardNavigator.replace(ERROR_MESSAGE_CARD_VIEW_REGISTRY_ID);
            return;
        });
    }, 500);
    return Promise.resolve();
}
Find the full source code here.
Summary
In this article, we have explained how to manage navigations and render/replace views based on conditions with ACE in SPFx.
I hope this helps.
Sharing is caring!
Join the conversation! Your thoughts help the community grow.