Introduction
Microsoft Power Automate provides several SharePoint connector actions that help automate permissions for individual list items, folders, and files. These actions allow you to control who can access specific SharePoint content and whether they can view or edit it.
In this article, we will explore three important SharePoint actions: Grant access to an item or a folder, Create sharing link for a file or folder, and Stop sharing an item or a file. We will also look at their configuration, permission roles, and practical examples.
1. Grant Access to an Item or a Folder
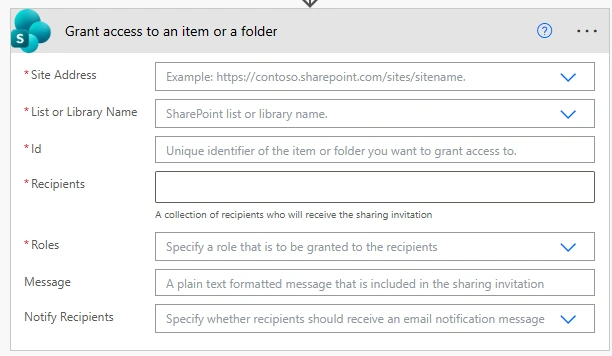
The Grant access to an item or a folder action allows you to provide specific users with permission to access a SharePoint list item, folder, or document.
Required fields
Site Address: The SharePoint site where the item or file is stored.
List or Library: The name of the SharePoint list or document library.
Id: The unique identifier of the list item or file.
Recipients: The email addresses of the users who should receive access.
Roles: The permission level to assign, such as Can View or Can Edit.
You can also include a message and enable notifications to inform recipients when access is granted.
Example
Suppose an organization maintains an Invoice Approval SharePoint list. When an invoice is assigned to an approver, a Power Automate flow can grant that approver access to the corresponding invoice document.
The flow can retrieve the invoice details, identify the approver's email address, and use the Grant access action to provide the required permissions.
Important: This action does not support granting access to external users. The flow connection must use an account with the required list or library owner permissions.
2. Choose the Appropriate Permission Role
When granting access, selecting the correct permission level is important.
Common options include:
Can View: Users can open and read the item or file without editing it.
Can Edit: Users can view and modify the item or file, subject to the permissions granted.
For example, an invoice approver may need editing access to update invoice information, while an auditor may only need read access.
Using custom permission roles
Permission level | Role ID | Custom value |
|---|
Limited Access | 1073741825
| role:1073741825
|
Read | 1073741826
| role:1073741826
|
Contribute | 1073741827
| role:1073741827
|
Design | 1073741828
| role:1073741828
|
Full Control | 1073741829
| role:1073741829
|
Edit | 1073741830
| role:1073741830
|
View Only | 1073741924
| role:1073741924
|
Approve | 1073741927
| role:1073741927
|
These are commonly reported built-in SharePoint role IDs. Availability can vary by site and permission configuration.
Which role should you use?
Read (1073741826) — users can view and download documents.
Contribute (1073741827) — users can view, add, edit, and delete items.
Edit (1073741830) — users can modify items and manage lists.
Full Control (1073741829) — users have full control over the relevant SharePoint scope.
View Only (1073741924) — users can view content without editing it.
Power Automate also supports custom-defined SharePoint permission roles. Instead of selecting a standard role, enter a custom value in the following format:
role:<role-id>
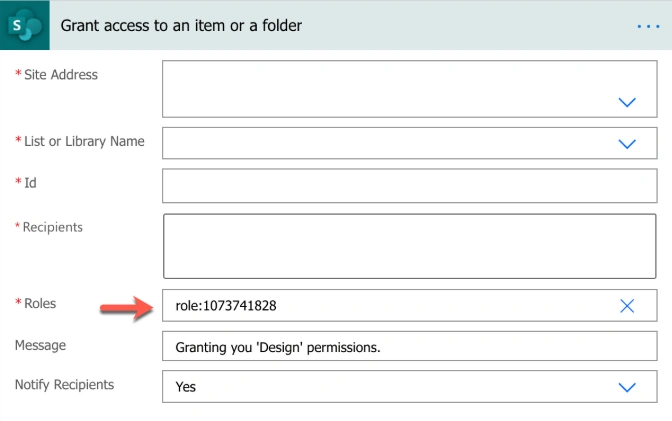
To find the role ID, open the following REST API endpoint in a browser while signed in to SharePoint:
https://<your-sharepoint-site>/_api/web/roledefinitions
Replace the placeholder with your SharePoint site URL. Review the returned role definitions to identify the appropriate role ID.
Use custom roles only when your business requirements cannot be met by the standard permission options.
3. Create a Sharing Link for a File or Folder
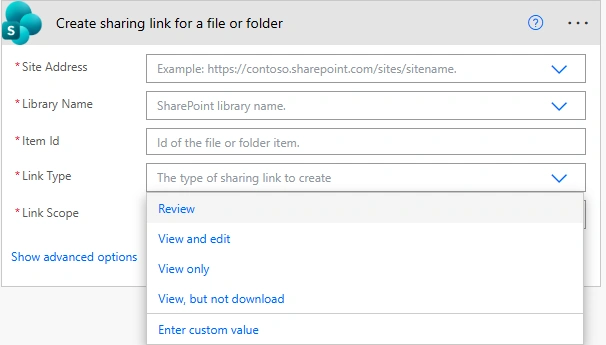
The Create sharing link for a file or folder action generates a link that users can use to access a file or folder in a SharePoint document library.
This is useful when you want to share a document without directly adding each recipient's permissions through the Grant access action.
Configuration options
Link type:
Link scope:
Anyone: Anyone who has the link can access the content, subject to the link's settings and organizational policies.
People in your organization: Access is limited to eligible users within your organization.
The availability of these options depends on your organization's SharePoint sharing policies.
Example
Suppose a vendor proposal document needs to be reviewed by internal team members. A Power Automate flow can create a view-only sharing link and include it in an email notification.
The recipients can then open the document using the generated link.
Important: This action supports files and folders in document libraries, but not individual SharePoint list items. Be careful when creating links with broad access, especially when the document contains confidential information.
4. Stop Sharing an Item or a File
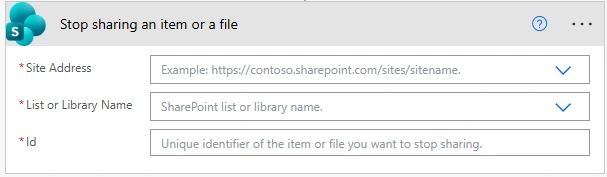
The Stop sharing an item or a file action removes sharing permissions from a SharePoint list item or file.
It is useful when access is no longer required, such as when an approval process is completed or a document should no longer be shared with specific users.
Required fields
Site Address: The SharePoint site containing the content.
List or Library: The relevant list or document library.
Id: The identifier of the item or file whose sharing permissions should be removed.
Example
Imagine that an invoice document was shared with a temporary reviewer. After the review is completed, a Power Automate flow can use the Stop sharing action to remove the item's existing sharing permissions.
Important: This action removes sharing permissions while retaining access for site owners. Review the item's existing permission configuration before using it, because the action can affect multiple users who previously received access.
5. Practical Power Automate Flow Example
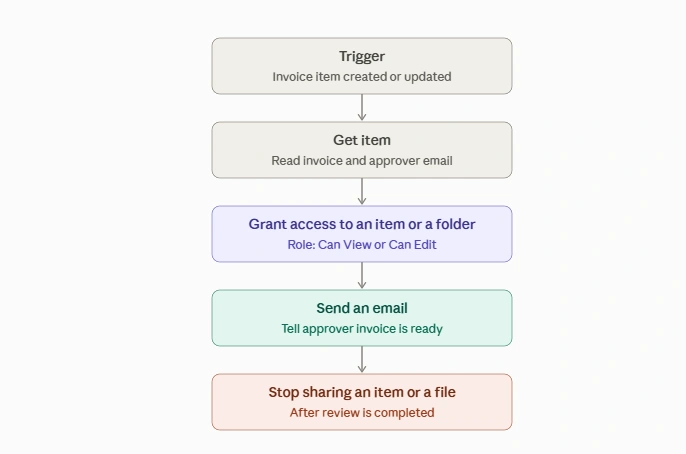
Consider an automated Invoice Approval process in which an invoice document must be shared with an approver.
A basic flow can follow these steps:
Trigger: When an invoice item is created or updated in SharePoint.
Get item: Retrieve the invoice details and approver information.
Grant access: Provide the approver with the required view or edit permission.
Send an email: Notify the approver that the invoice is ready for review.
Stop sharing: When appropriate, remove the item's sharing permissions after the review process is completed.
You can configure additional conditions to grant access only when the invoice reaches a particular approval status.
For example, if the invoice status is Pending Approval, the flow grants access to the assigned approver. Once the process is completed, a separate flow or subsequent step can remove the sharing permissions when required by the business rules.
Here’s an example diagram of the Invoice Approval flow from the article.
Conclusion
Power Automate makes it easier to manage SharePoint permissions without manually sharing or unsharing every item and document. The Grant access action provides specific users with permissions, Create sharing link generates a link for files and folders, and Stop sharing removes existing sharing permissions.
By combining these actions with SharePoint triggers and conditions, you can build automated permission management workflows for invoice approvals, document reviews, vendor proposals, and other business processes. Following the principle of least privilege helps ensure that users receive only the access they need.


Join the conversation! Your thoughts help the community grow.