

Introduction
In this article, we are going to discuss how we can post data to controller in asp.net core using Ajax with form serialize and without form serialize. With form serialize we also going to implement validation in form. We are not going to save or retrieve data from database we just post data to the controller. In this article, we are going to discuss following topics
- What is Ajax?
- How to use Ajax?
- Create Asp.Net Core Project
- Post Data without Form Serialize
- Add Validation in Form and Post Data with Form Serialize

What Is Ajax?
AJAX stand for Asynchronous JavaScript and XML. AJAX allows you to send and receive data asynchronously without reloading the web page. So it is fast. A user can continue to use the application while the client program requests information from the server in the background. It is used to communicate with the server without refreshing the web page and thus increasing the user experience and better performance.
How to use Ajax?
Making request using Ajax is very simple. Syntax of Ajax in JavaScript is as follows.
$.ajax({
    //properties
})
Basic Properties of Ajax
- url: In this property you have to pass URL of your endpoint means when you want to post data.
- type: Specify the type of request POST, Get, Put, Delete etc.
- data: Data that you want to pass to a given endpoint.
- success: This property is a callback function called when request return with OK or 200 code means your request is successful. This callback function also returns response data that pass from controller side.
- error: This property is also a callback function that return when any error occurs while calling endpoint like endpoint not exist or bad request etc. This callback also have parameters which are request, status, and error.
- async: This is a Boolean property that is by default false. If you pass true in this property it will call this request asynchronously means when sending this request other request also be called at the same time. If this is false, other request are only be called after this request is complete.
Create Asp.Net Core Project
Step 1
Open Visual Studio and click on create a new project.
Step 2
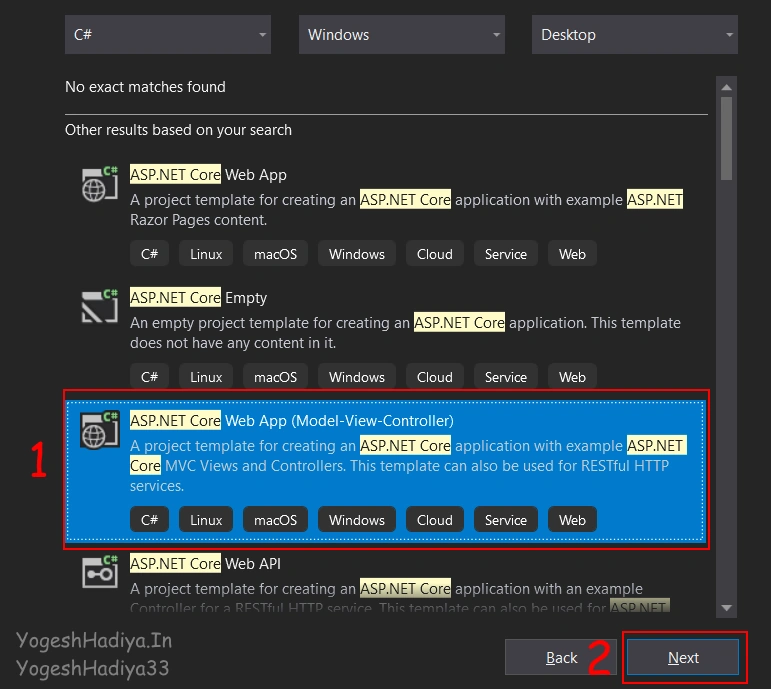
Select Asp.net Core Web App with Model View Controller and click on next button. You can also select Asp.net core without MVC or empty project but you have to add libraries and layout yourself. But in this template model, view and controller folder are already created with the required libraries and layout file.
Step 3
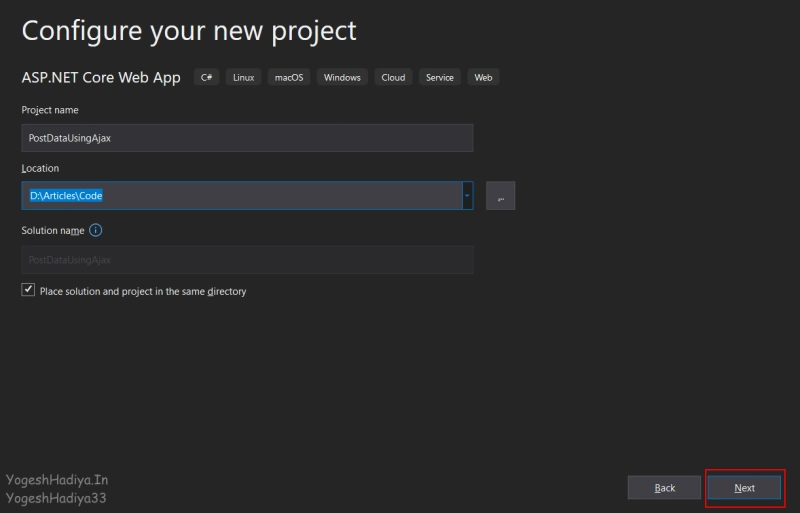
Enter your project name, location, and solution name and click on next button.
Step 4
Select targeted framework and other information like authentication if required etc. and click on Create button.

Step 5
Here I remove already created model, controller and its view. If you delete the existing controller, create new controller by right click on controller folder then Add>Controller.

Gave controller name and click on Add button.

Post Data without Form Serialize
Step 1
Create an action method in controller.
public IActionResult Index() {
    return View();
}
Step 2
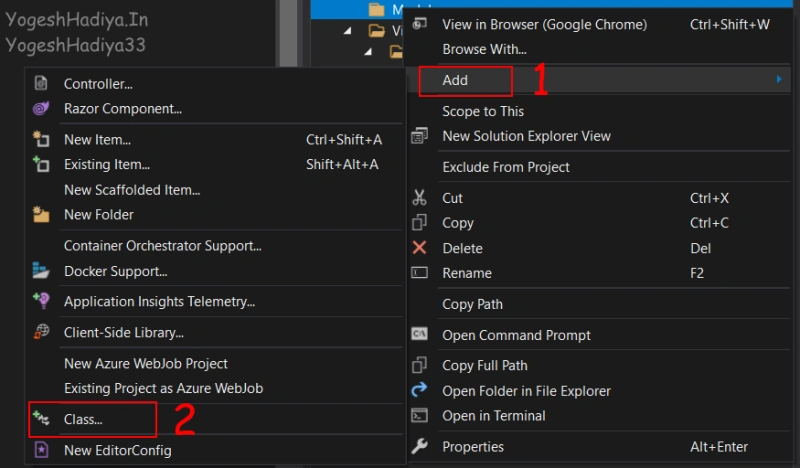
Create a model class. To add a model class, right-click on Model folder, click on Add > Class.
Step 3
Give an appropriate name to your model. Here I gave name as student to my model class.

Step 4
Create properties in your model class.
public class Student {
    public int StudentId {
        get;
        set;
    }
    public string StudentName {
        get;
        set;
    }
    public string Gender {
        get;
        set;
    }
    public int Standard {
        get;
        set;
    }
    public string City {
        get;
        set;
    }
    public bool IsRegular {
        get;
        set;
    }
}
Step 5
Create a new action method which will be called from Ajax. As you see in below code, I create Post method named SaveStudentWithoutSerialize which takes Student model class as a parameter and return type is JSON.
[HttpPost]
public JsonResult SaveStudentWithoutSerialize(Student student) {
    return Json("student saved successfully");
}
Step 6
Create view for appropriate to your requirement and model.
@model Student
    <div class="row mt-2">
        <div class="col-6">
            <label>Student Id</label>
            <input class="form-control" id="StudentId" type="number" autocomplete="off" />
        </div>
    </div>
    <div class="row mt-2">
        <div class="col-6">
            <label>Student Name</label>
            <input class="form-control" id="StudentName" autocomplete="off" />
        </div>
    </div>
    <div class="row mt-2">
        <div class="col-6">
            <label>Student Gender</label>
            <input type="radio" name="Gender" id="GenderMale" value="Male" checked>
            <label for="GenderMale">Male</label>

            <input type="radio" name="Gender" id="GenderFemale" value="Female">
            <label for="GenderFemale">Female</label>
        </div>
    </div>
    <div class="row mt-2">
        <div class="col-6">
            <label>Student Standard</label>
            <select class="form-control" id="StudentStd">
                <option value="">Select Standard</option>
                <option value="1">1st</option>
                <option value="2">2nd</option>
                <option value="3">3rd</option>
                <option value="4">4th</option>
                <option value="5">5th</option>
                <option value="6">6th</option>
                <option value="7">7th</option>
                <option value="8">8th</option>
                <option value="9">9th</option>
                <option value="10">10th</option>
            </select>
        </div>
    </div>
    <div class="row mt-2">
        <div class="col-6">
            <label>Student City</label>
            <input class="form-control" id="StudentCity" autocomplete="off" />
        </div>
    </div>
    <div class="row mt-2">
        <div class="col-6">
            <div class="form-check">
                <input class="form-check-input" type="checkbox" id="IsRegular">
                <label class="form-check-label" for="IsRegular">
                    Is Student Is Regular
                </label>
            </div>
        </div>
    </div>
    <div class="row mt-2">
        <div class="col-6">
            <button class="btn btn-primary" type="button" onclick="SaveStudent()"> Save </button>
        </div>
    </div>
Explanation of View
- Here, I create fields according to my model class properties. For better understanding I added highly used component like textbox, radio button, drop down and checkbox.
- Point to be noted here I also gave unique ID to each component which will be used when we code in JavaScript for getting data from these fields.
- On button click event we will call SaveStudent function, in this function we will post data using Ajax
function SaveStudent() {
    //get all selected radio button. In our case we gave same name to radio button
    //so only one radio button will be selected either Male or Female
    var selected = $("input[type='radio'][name='Gender']:checked");
    let formData = {
        studentId: $("#StudentId").val(),
        studentName: $("#StudentName").val(),
        standard: $("#StudentStd").val(),
        city: $("#StudentCity").val(),
        isRegular: $("#IsRegular").is(":checked"),
        gender: selected.length > 0 ? selected.val() : 0,
    }
    console.log(formData)
    $.ajax({
        url: "/Home/SaveStudentWithoutSerialize",
        type: "POST",
        data: formData,
        success: function(response) {
            alert(response);
        },
        error: function(request, status, error) {
            alert(request.responseText);
        }
    });
}
Explanation of JavaScript
- In JavaScript, I create a function named SaveStudent.
- As you see in above JavaScript code, first we create an object which contains our data properties which we want to pass to controller and pass this object to data property of Ajax’s data as we discussed above.
- You can see in below image how value stored in this object
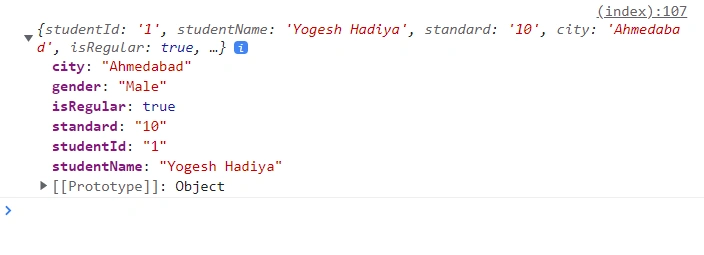
- The point to remember here is that give the same name of property that you gave to your model class.
- On success and error callback, we show alert to user.
- Click on Save button and will go to controller side and data is bound to student model and shown in below image. And message is returned to Ajax side which will show in alert.


Add Validation in Form and Post Data with Form Serialize
For showing validation in Asp.Net core we have to add data annotation to properties of our model class. For this section of article we are going to create new model class, action methods and also new view.
Step 1
Create new model class with data annotation attributes. I’m going to make same properties as shown in above section. Here I gave Student1 name to my new class. With following properties. Here I used Required and Range data annotation. You can use as per your requirements.
public class Student1 {
    [Required(ErrorMessage = "Please enter student id")]
    [Range(1, int.MaxValue, ErrorMessage = "Please enter valid id greater than 0")]
    public int StudentId {
        get;
        set;
    }
    [Required(ErrorMessage = "Please enter student name")]
    public string StudentName {
        get;
        set;
    }
    [Required(ErrorMessage = "Please select student gender")]
    public string Gender {
        get;
        set;
    }
    [Required(ErrorMessage = "Please select student standard")]
    public int Standard {
        get;
        set;
    }
    [Required(ErrorMessage = "Please enter student city")]
    public string City {
        get;
        set;
    }
    public bool IsRegular {
        get;
        set;
    }
}
Step 2
Create new action method. Here I create a new action method called WithValidation as you can see in below code.
public IActionResult WithValidation() {
    return View();
}
Step 3
Create new post method which takes new class Student1 as parameter. As you see in the below code, I create a new method named SaveStudentWithSerialize. Return type is same as old method.
[HttpPost]
public JsonResult SaveStudentWithSerialize(Student1 student1) {
    return Json("student saved successfully");
}
Step 4
Create view as per your requirements.
@model Student1
<form id="studentForm">
    <div class="row mt-2">
        <div class="col-6">
            <label>Student Id</label>
            <input asp-for="StudentId" class="form-control" id="StudentId" type="number" autocomplete="off" />
            <span class="text-danger" asp-validation-for="StudentId"></span>
        </div>
    </div>
    <div class="row mt-2">
        <div class="col-6">
            <label>Student Name</label>
            <input asp-for="StudentName" class="form-control" id="StudentName" autocomplete="off" />
            <span class="text-danger" asp-validation-for="StudentName"></span>
        </div>
    </div>
    <div class="row mt-2">
        <div class="col-6">
            <label>Student Gender</label>
            <input asp-for="Gender" type="radio" id="GenderMale" value="Male">
            <label for="GenderMale">Male</label>

            <input asp-for="Gender" type="radio" id="GenderFemale" value="Female">
            <label for="GenderFemale">Female</label>

            <span class="text-danger" asp-validation-for="Gender"></span>
        </div>
    </div>
    <div class="row mt-2">
        <div class="col-6">
            <label>Student Standard</label>
            <select asp-for="Standard" class="form-control" id="StudentStd">
                <option value="">Select Standard</option>
                <option value="1">1st</option>
                <option value="2">2nd</option>
                <option value="3">3rd</option>
                <option value="4">4th</option>
                <option value="5">5th</option>
                <option value="6">6th</option>
                <option value="7">7th</option>
                <option value="8">8th</option>
                <option value="9">9th</option>
                <option value="10">10th</option>
            </select>
            <span class="text-danger" asp-validation-for="Standard"></span>
        </div>
    </div>
    <div class="row mt-2">
        <div class="col-6">
            <label>Student City</label>
            <input asp-for="City" class="form-control" id="StudentCity" autocomplete="off" />
            <span class="text-danger" asp-validation-for="City"></span>
        </div>
    </div>
    <div class="row mt-2">
        <div class="col-6">
            <div class="form-check">
                <input class="form-check-input" type="checkbox" id="IsRegular" asp-for="IsRegular">
                <label class="form-check-label" for="IsRegular">
                    Is Student Is Regular
                </label>
            </div>
        </div>
    </div>
    <div class="row mt-2">
        <div class="col-6">
            <button class="btn btn-primary" type="button" onclick="SaveStudent()"> Save </button>
        </div>
    </div>

</form>
@section Scripts{

<script src="https://cdnjs.cloudflare.com/ajax/libs/jquery-validate/1.19.5/jquery.validate.min.js" integrity="sha512-rstIgDs0xPgmG6RX1Aba4KV5cWJbAMcvRCVmglpam9SoHZiUCyQVDdH2LPlxoHtrv17XWblE/V/PP+Tr04hbtA==" crossorigin="anonymous" referrerpolicy="no-referrer"></script>
<script src="https://cdnjs.cloudflare.com/ajax/libs/jquery-validation-unobtrusive/4.0.0/jquery.validate.unobtrusive.min.js" integrity="sha512-xq+Vm8jC94ynOikewaQXMEkJIOBp7iArs3IhFWSWdRT3Pq8wFz46p+ZDFAR7kHnSFf+zUv52B3prRYnbDRdgog==" crossorigin="anonymous" referrerpolicy="no-referrer"></script>
<script>
    $(document).ready(function () {
        $.validator.unobtrusive.parse($("#studentForm"));
    })

    function SaveStudent() {
        if ($("#studentForm").valid()) {
            var formData = $("#studentForm").serialize();
            console.log(formData);
            $.ajax({
                url: "/Home/SaveStudentWithSerialize",
                type: "POST",
                data: formData,
                success: function (response) {
                    alert(response);
                },
                error: function (request, status, error) {
                    alert(request.responseText);
                }

            });
        }
    }
</script>
}
Explanation of View
- Here, I create the same view as created in the above example.
- But here all the fields are inside form tag and this form tag has ID which will be used in JavaScript side.
- Main difference you noticed is that asp-for attribute is added in all fields and assign to its respective properties.
- Also added span with validation-for attribute which will show error message when any validation error occur.
Explanation of JavaScript
- Foremost here I added two script from CDN. First is JQuery Validate and second one is JQuery Validate unobtrusive. JQuery Validate unobtrusive used to show validation at client side without submitting form. So here we can save time to make round trip to the server.
- All this JavaScript is added in Script section because of JQuery script is defined in layout file below of RenderBody() where this view will render when we run project. If we do not pass these scripts in this section, it will give JQuery is required because it will render before JQuery is rendered.
- In document ready event, I parse form element to JQuery Validate unobtrusive by form ID. When all the element is loaded in document JQuery Validate unobtrusive add special data attributes to all fields as per validation given in data annotation attributes as you can see in below image.
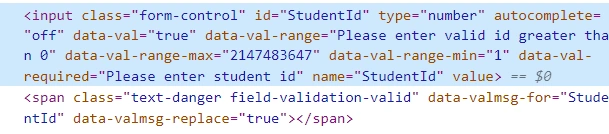
- In SaveStudent function first we check if all the fields value are as per our given validation or not if any error occur it will show in span tag otherwise it will go inside condition and execute rest of the script.
- For formData here we just serialize the form by its ID attribute rather than old way which we have shown in above method. Value is stored same as query string in this object as you see in below image

- Rest of Ajax call is same as we shown above.
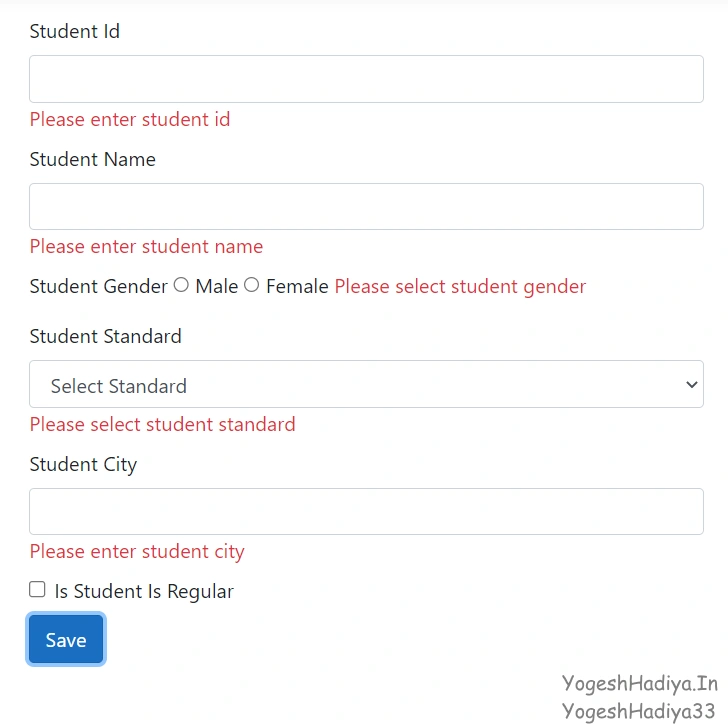
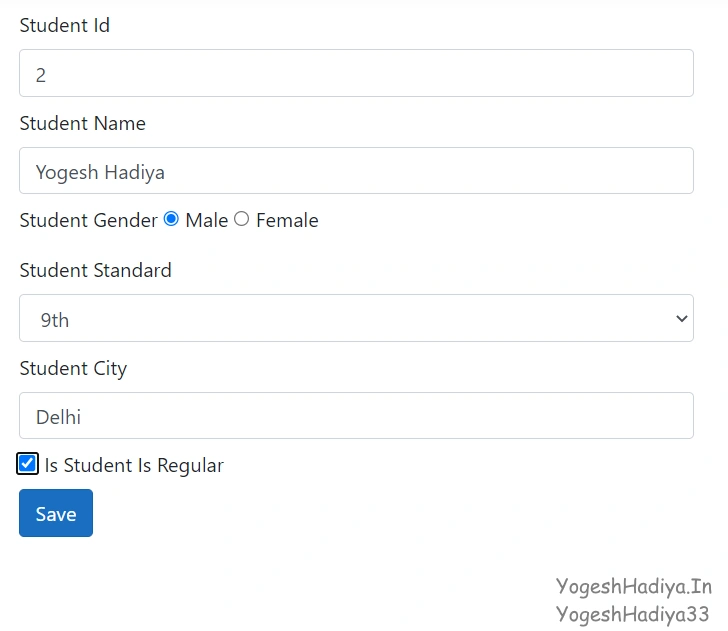


You can download or access all these code from my GitHub.
Join the conversation! Your thoughts help the community grow.