

In this article, let’s create Azure Event Hubs resources, Azure Event Hubs namespace and Event Hub using Azure CLI. Assign “Azure Event Hubs Data Owner” role to Microsoft Entra (Azure AD) user name. Build a .NET console application using Azure.Messaging.EventHubs SDK to send and receive the events. Sign in to Azure and run the application. After this exercise, you will be able to send and retrieve events from Azure Event Hubs using .NET Client Library.
Following tasks are performed in this article:
Create Azure Event Hub resources.
Create Azure Event Hubs namespace and Event Hub.
Assign role to Microsoft Entra (Azure AD) user.
Send and Retrieve Events using .NET Client Library.
Sign in to Azure and Run Application.
Clean up resources.
Create Azure Event Hub resources
First basic task is to create and make ready Azure Event Hub resources to Azure using Azure CLI. Azure CLI (Azure Cloud Shell) is used to create the required resources. Azure CLI is the free Bash shell which can be run directly within the Azure portal. That is preinstalled and configured within the account. Perform the below steps one by one to achieve this.
Use Azure CLI (Azure Cloud Shell)
It is a free Bash shell which can be run directly within the Azure portal. It is preinstalled and configured within an account.
Click Cloud Shell button on the menu bar at the top right side of the Azure portal.

It will launch an interactive shell which can be used to run the steps outlined in this article. Select a Bash environment. To use code editor in cloud shell toolbar go to Settings menu and then select Go to Classic version.
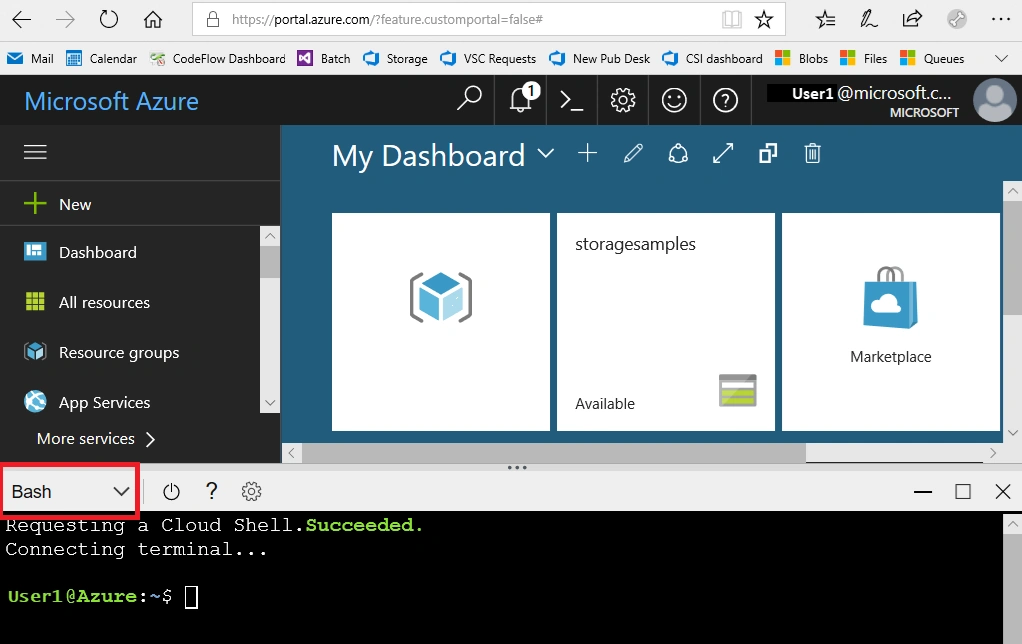
Create resource group - Resource group is a logical container used to hold related resources. In it include the resources which you want to manage as a group. App configuration resource belongs to this resource group. Create it using az group create command.
az group create \
     --name myResourceGroup1 \
     --location eastus2
eastus2 is location code instead of it one can use their nearest region location.
Create variables - Here, several commands require unique names/values with same parameters. Hence, for easy to manage let's create some variables, assign values and reuse them in the command parameters. let command is used as below to create required variables.
let resourceGroup=myResourceGroup1
location=eastus2
namespaceName=myEventHubsns$RANDOM
Create Azure Event Hubs namespace and Event Hub
In this section, lets create an Event Hubs namespace, and then create an Event Hub. One by one perform the following steps in Azure CLI to achieve this.
Create Azure Event Hub namespace
az eventhub namespace create command is used to create an Azure Event Hub namespace and it will be used in .NET console application. This namespace is the logical container for event hub resources in Azure. It provides a unique container which allows to create one or more event hub.
az eventhubs namespace create \
     --name $namespaceName \
     --location $location \
     --resource-group $resourceGroup
Create Event Hub
Below az eventhubs eventhub create command is used to create Event Hub with name myEventHub inside above created Event Hubs namespace.
az eventhubs eventhub create \
     --name myEventHub \
     --resource-group $resourceGroup \
     --namespace-name $namespaceName
Assign role to Microsoft Entra (Azure AD) user
Let’s assign Microsoft Entra user to “Azure Event Hubs Data Owner” role at the Event Hubs namespace level to allow console application to send and receive messages. It is important to assign roles to Microsoft Entra (Azure AD) username. Roles will define what access and permissions a user has within an organization’s Microsoft cloud environment. Roles determine what resources and actions a user can perform. “Azure Event Hubs Data Owner” role is to be assigned to Microsoft Entra user which allows application to send and receive messages. One by one perform below steps in Azure CLI.
Retrieve userPrincipalName
First, retrieve userPrincipalName from account as mentioned in following command. It retrieves the information about currently authenticated user including their UPN and represents that who the role will be assigned to.
userPrincipal=$(az rest
     --method GET
     --url https://graph.microsoft.com/v1.0/me \
     --headers 'Content-Type=application/json' \
     --query userPrincipalName
     --output tsv)
Retrieve resource ID
Second, get the resource ID of Event Hubs namespace using below command. This will be used in next step to set scope for role assignment. Resource ID sets scope for role assignment to specific namespace.
resourceID=$(az eventhubs namespace show \
     --resource-group $resourceGroup \
     --name $namespaceName\
     --query id \
     --output tsv)
Create and Assign Azure Event Hubs Data Owner role
Finally, create and assign “Azure Event Hubs Data Owner” role using az role assignment create command. Command execution will create and assign “Azure Event Hubs Data Owner” role which gives permission to send and retrieve the events. This will give permissions to manage next routines. userPrincipal and resourceID variables are created in first and second steps which are used in this command to retrieve actual value at command execution time.
az role assignment create \
     --assignee $userPrincipal\
     --role "Azure Event Hubs Data Owner" \
     --scope $resourceID
Now, required basic resources are deployed and ready to use in console application.
Send and Retrieve Events using .NET Client Library
Let’s set-up the .NET console application to send and retrieve the the events from Event Hub using .NET Client Library. Perform the following steps one by one into Cloud Shell to achieve this.
.NET Project Setup
Set up one console application to send and retrieve events using .NET Client Library.
Create project directory and change to that directory. First create a directory for the project using below command and move to that directory.
mkdir eventhubs1
cd eventhubs1
Create .NET console application to add and fetch secrets through it. dotnet new console command is used to create a .NET console app.
dotnet new consoleInstall Packages - run dotnet add package command to add Azure.Identity and Azure.Messaging.EventHubs packages in project to use the SDK.
dotnet add package Azure.Identity
dotnet add package Azure.Messaging.EventHubs
Starter Code
Add the below starter code into the project and replace template code in Program.cs file by using editor in Cloud Shell.
Application editing - open Program.cs file to edit it in the Azure CLI using code command.
code Program.csCode replacing - replace existing code of Program.cs with the below code. This is the initial starter code and will replace last two commented lines with actual code in next “Complete code” section. Replace MY_EVENT_HUB_NAMESPACE with actual event hub namespace.
using System.Text;
using Azure.Identity;
using Azure.Messaging.EventHubs;
using Azure.Messaging.EventHubs.Producer;
using Azure.Messaging.EventHubs.Consumer;

// Replace MY_EVENT_HUB_NAMESPACE with actual Event Hub namespace
string namespaceURL = "MY_EVENT_HUB_NAMESPACE.servicebus.windows.net";
string eventHubName = "myEventHub";

// Create DefaultAzureCredentialOptions object to configure DefaultAzureCredential credentials
DefaultAzureCredentialOptions options = new()
{
     ExcludeEnvironmentCredential = true,
     ExcludeManagedIdentityCredential = true
};

// Number of events to be sent to event hub
int numOfEvents = 4;

// CREATE PRODUCER CLIENT & SEND EVENTS

// CREATE CONSUMER CLIENT & RECEIVE EVENTS
Save & Close - Press ctrl + s to save your changes and continue.
Complete Code
Add following code one by one at mentioned commented section to complete the application. Let’s update the code for commented lines for specific operations one by one as described to create a producer client to send events and then create a consumer client to receive events.
Create Producer Client and Send Events - First, create a producer client to send events to Event Hub. Second, create a batch of events and add random number to Event Body and Send Event. Third, use producer client to send batch of events to Event Hub. Locate // CREATE PRODUCER CLIENT & SEND EVENTS comment, then add following code directly beneath comment.
// CREATE PRODUCER CLIENT & SEND EVENTS

// Create Producer Client to Send Events to Event Hub
EventHubProducerClient objEventHubProducerClient = new EventHubProducerClient(
     namespaceURL,
     eventHubName,
     new DefaultAzureCredential(objDefaultAzureCredentialOptions));

// Create batch of events
using EventDataBatch eventBatch = await objEventHubProducerClient.CreateBatchAsync();

// Add random number to Event Body and Send Event
var random = new Random();

for (int i = 1; i <= numberOfEvents; i++)
{
     int randomNumber = random.Next(1, 101);
     string eventBody = $"Event - {randomNumber}";
     if (!eventBatch.TryAdd(new EventData(Encoding.UTF8.GetBytes(eventBody))))
     {
          // Generate error message if event is too large for batch
          throw new Exception($"Event {i} is too large for batch and can't be sent!");
     }
}
try
{
     // Use producer client to send batch of events to Event Hub
     await objEventHubProducerClient.SendAsync(eventBatch);
     Console.WriteLine($"Batch of {numberOfEvents} events has been published successfully!");
     Console.WriteLine("Press any key to retrieve and display events!");
     Console.ReadLine();
}
finally
{
     await objEventHubProducerClient.DisposeAsync();
}
Create Consumer Client and Receive Events - Locate // CREATE CONSUMER CLIENT & RECEIVE EVENTS comment, then add following code directly beneath comment. First, create EventHubConsumerClient to receive events from Event Hub. Second, get total number of events in hub for all partitions to stop reading events. Third, start retrieving events from Event Hub and print it on console.
// CREATE CONSUMER CLIENT & RECEIVE EVENTS

// Create EventHubConsumerClient to Receive Events from Event Hub
await using var objEventHubConsumerClient = new EventHubConsumerClient(
     EventHubConsumerClient.DefaultConsumerGroupName,
     namespaceURL,
     eventHubName,
     new DefaultAzureCredential(objDefaultAzureCredentialOptions));

Console.WriteLine("");
Console.WriteLine("Start retrieving events from Hub ...");

// Get total number of events in hub for all partitions to stop reading events
long totalEventCount = 0;
string[] partitionIds = await objEventHubConsumerClient.GetPartitionIdsAsync();

foreach (var partitionId in partitionIds)
{
     PartitionProperties properties = await objEventHubConsumerClient.GetPartitionPropertiesAsync(partitionId);
     if (!properties.IsEmpty && properties.LastEnqueuedSequenceNumber >= properties.BeginningSequenceNumber)
     {
          totalEventCount += (properties.LastEnqueuedSequenceNumber - properties.BeginningSequenceNumber + 1);
     }
}

// Start retrieving events from Event Hub and print
int retrievedCount = 0;

await foreach (PartitionEvent partitionEvent in objEventHubConsumerClient.ReadEventsAsync(startReadingAtEarliestEvent: true))
{
     if (partitionEvent.Data != null)
     {
          string dataBody = Encoding.UTF8.GetString(partitionEvent.Data.Body.ToArray());
          Console.WriteLine($"Event retrieved: {dataBody}");
          retrievedCount++;

          if (retrievedCount >= totalEventCount)
          {
               Console.WriteLine("");
               Console.WriteLine("All events have been retrieved successfully!");
               Console.WriteLine("Press any key to Exit!");
               Console.ReadLine();
               return;
          }
     }
}
Save & Close - Now it’s time to save and close the file by pressing Ctrl + s to save file and then Ctrl + q to exit the editor. Here, by with this article a complete code is attached in Program.cs file.
Sign in to Azure and Run Application
Now application is ready to run. One by one execute the following commands in Azure CLI to run an application and perform the mentioned steps to verify the result outcomes.
Sign in - az login command used for sign in. Sign in to Azure is mandatory even though Cloud Shell session already may authenticated.
az loginRun Application - dotnet run command used to start console application. Application will display appropriate messages as mentioned in output section.
dotnet runOutput - Application will display print messages on console as below. Here, application will send four messages to Event Hub as set in code. The random number is used to set with each event to distinguish each event.
Batch of 4 events has been published successfully!
Press any key to retrieve and display events!

Start retrieving events from Hub ...
Event retrieved: Event - 3
Event retrieved: Event - 54
Event retrieved: Event - 89
Event retrieved: Event - 16

All events have been retrieved successfully!
Press any key to Exit!
Clean up Resources
Once finished the exercise its recommended to delete cloud resources are being created to avoid the unnecessary resource usage and any future costs. Deleting a resource group will delete all resources contained within it. Perform following steps one by one into Azure Portal to achieve this:
Navigate to resource group which is being created here and view its contents.
Delete resource group selection from the toolbar.
Choose resource group name and then follow next directions to delete resource group and all the resources it contains.
One can also clean up resources using Azure CLI as following:
Delete role assignment - az role assignment delete command is used to remove role assignments.
az role assignment delete\
     --role "Azure Event Hubs Data Owner" \
     --scope $resourceID
Delete event hub - az eventhubs eventhub delete command is used to remove an event hub from specified resource group and namespace.
az eventhubs eventhub delete \
     --name myEventHub \
     --resource-group $resourceGroup \
     --namespace-group $namespaceName\
Delete namespace - az eventhubs namespace delete command is used to delete an existing namespace. It removes all associated resources under a namespace.
az eventhubs namespace delete \
     --name $namespaceName\
     --resource-group $resourceGroup
Delete resource group - az group delete command is used to remove resource group.
az group delete \
     --name myResourceGroup1
Summary
Here, a complete process flow is described to send and retrieve events from Azure Event Hubs using .NET Client Library. Azure Event Hubs resource is created using Azure CLI and assigned “Azure Event Hubs Data Owner” role to Microsoft Entra (Azure AD) user name. Developed a .NET console application using Azure.Messaging.EventHubs SDK to send and receive events. Finally, resources are cleaned up. A complete code of Program.cs file is attached with this article.
Join the conversation! Your thoughts help the community grow.