

Introduction
Managing access to individual SharePoint list items is a common requirement for business applications. Instead of granting access to an entire list, you may want specific users or groups to view or edit only certain items. Power Automate makes this possible by using SharePoint REST APIs to break permission inheritance and assign unique permissions.
In this article, you'll learn how to configure item-level permissions in SharePoint using Send an HTTP request to SharePoint actions in Power Automate.
Why Use Item-Level Permissions?
Item-level permissions are useful when:
Protecting confidential documents or records.
Restricting invoice access to finance teams.
Allowing managers to view only their team's records.
Creating approval workflows with controlled access.
Securing HR or legal documents.
For example, when an invoice is created, only the Finance team and the requester should have access to it, while all other users are restricted.
Solution Overview
The process involves two main steps:
Break the item's inherited permissions.
Assign unique permissions to users or SharePoint groups.
The workflow looks like this:
Trigger
   │
   ▼
Break Permission Inheritance
   │
   ▼
Loop Through Required Users/Groups
   │
   ▼
Assign Permission Level
   │
   ▼
Item Now Has Unique Permissions
Prerequisites
Before you begin, ensure you have:
A SharePoint Online site.
A SharePoint list (for example, InvoiceDetails).
Power Automate access.
Appropriate permissions (Full Control or Manage Permissions).
SharePoint Group IDs or User IDs.
Permission Level IDs (Role Definition IDs).

Step 1: Break Permission Inheritance
Add a Send an HTTP request to SharePoint action.
Configuration
| Property | Value |
|---|---|
| Site Address | Your SharePoint Site |
| Method | POST |
URI
_api/web/lists/getByTitle('InvoiceDetails')/items(ID)/breakroleinheritance(copyRoleAssignments=false,clearSubscopes=true)Replace ID with the dynamic Item ID from your trigger.
What do these parameters mean?
| Parameter | Description |
|---|---|
| copyRoleAssignments=false | Removes inherited permissions completely. |
| clearSubscopes=true | Clears unique permissions on child objects. |
Headers
Accept : application/json;odata=verbose
Content-Type : application/json;odata=verbose
After this step, the item no longer inherits permissions from the parent list.

Step 2: Assign Unique Permissions
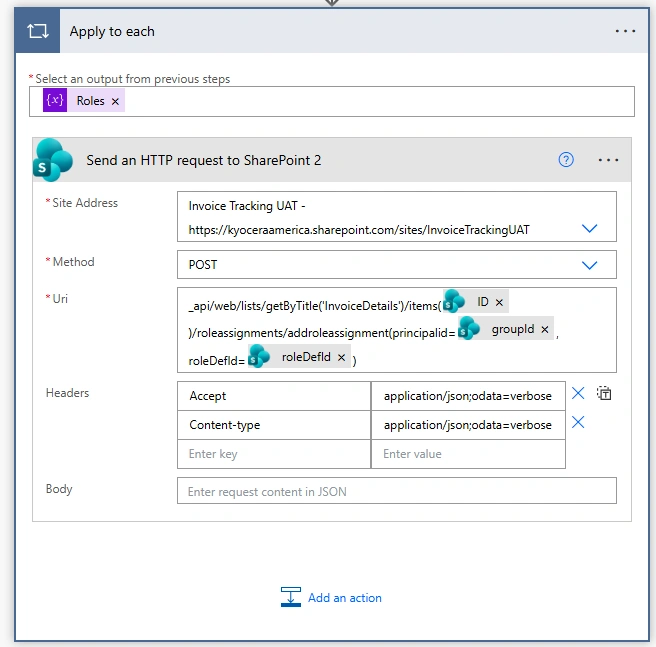
After breaking inheritance, add an Apply to each loop to iterate through the users or SharePoint groups that should receive access.
Inside the loop, add another Send an HTTP request to SharePoint action.
Configuration
| Property | Value |
|---|---|
| Method | POST |
URI
_api/web/lists/getByTitle('InvoiceDetails')/items(ID)/roleassignments/addroleassignment(principalid=GroupID,roledefid=RoleDefId)Replace:
ID → SharePoint Item ID
GroupID → SharePoint Group ID or User ID
RoleDefId → Permission Level ID
Common Role Definition IDs
| Permission Level | RoleDefId |
|---|---|
| Full Control | 1073741829 |
| Design | 1073741828 |
| Edit | 1073741830 |
| Contribute | 1073741827 |
| Read | 1073741826 |
| Limited Access | 1073741825 |
Example
Suppose:
Item ID = 25
Finance Group ID = 18
Permission = Read
The URI becomes:
_api/web/lists/getByTitle('InvoiceDetails')/items(25)/roleassignments/addroleassignment(principalid=18,roledefid=1073741826)This grants the Finance group Read access to Item 25.
Getting a User's Principal ID
If assigning permissions to an individual user instead of a SharePoint group, first retrieve the user's Principal ID.
Use:
_api/web/siteusers/getbyemail('[email protected]')Example response:
{
   "Id": 34
}
Then assign permissions:
_api/web/lists/getByTitle('InvoiceDetails')/items(25)/roleassignments/addroleassignment(principalid=34,roledefid=1073741830)This grants the user Edit permission.
Complete Flow
Trigger when an item is created or modified.
Break permission inheritance.
Retrieve the required SharePoint groups or users.
Loop through each user or group.
Assign the required permission level.
End the flow.
Best Practices
Always break permission inheritance before assigning permissions.
Use SharePoint groups instead of individual users whenever possible.
Store Group IDs and Role Definition IDs in a configuration list for easier maintenance.
Handle errors with Configure Run After or Scope actions.
Limit the number of uniquely secured items to maintain SharePoint performance.
Common Errors and Solutions
| Error | Cause | Solution |
|---|---|---|
| 403 Forbidden | Insufficient permissions | Ensure the flow connection has Full Control or Manage Permissions. |
| 400 Bad Request | Invalid Group ID or Role Definition ID | Verify the IDs are correct. |
| 404 Not Found | Incorrect list name or item ID | Check the list title and dynamic Item ID. |
| Duplicate Role Assignment | Permission already exists | Remove existing permissions or check before adding. |
Advantages of This Approach
Secures sensitive SharePoint items.
Automates permission management.
Eliminates manual permission assignments.
Supports dynamic user and group access.
Scales well for approval and document management solutions.
Conclusion
Power Automate and the SharePoint REST API provide a powerful way to implement item-level permissions. By breaking permission inheritance and assigning unique permissions programmatically, you can ensure that only authorized users or groups have access to sensitive list items. This approach is ideal for scenarios such as invoice tracking, HR records, contract management, and approval workflows, helping organizations improve security while reducing manual administration.
Join the conversation! Your thoughts help the community grow.