

In ASP.NET, two controls are available to upload the files to the web server. When the server receives the posted file data, the application can save, ignore, or check it.
There are the following two controls that allow file uploading.
- HtmlInputFile.
- FileUpload.
Both controls define an important role in file uploading, but the FileUpload control automatically sets the encoding of the form, whereas HtmlInputFile can't perform this process.
In this article we will use the FileUpload control. The FileUpload control allows users to browse and select the file to be uploaded. FileUpload control provides a file browse button and textbox for entering the filename. Basically the FileUpload class is derived from the WebControl Class. The FileUpload class has the following properties:
- FileBytes.
- FileName.
- FileContent.
- PostedFile.
- HasFile.
Step 1
Start Visual Studio.

Figure 1: Start Visual Studio
Now we need to create a website using "File" -> "New" -> "Website".
Figure 2: Create Website
Step 3
Now, select the ASP.NET Empty Website and click on the OK button.

Figure 3: ASP.NET Empty Website
Step 4
Now, add the Web form by right-clicking on the website and provide a name for the Webform.
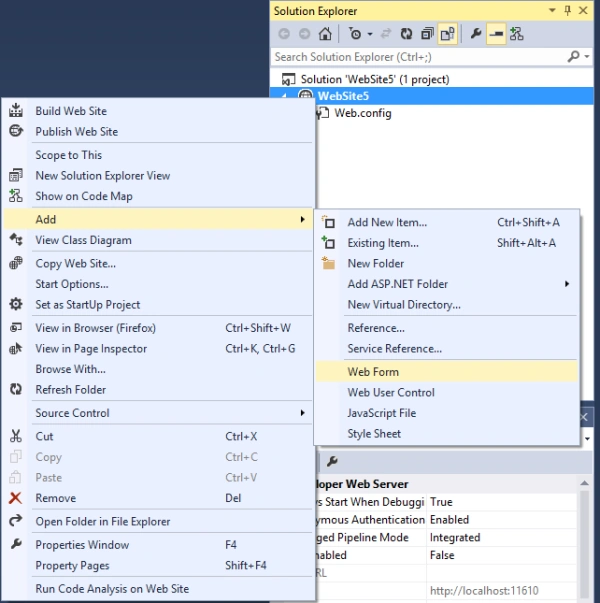
Figure 4: Add Web Form
Step 5
Now we will design the web form as in the following.
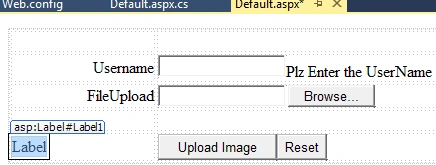
We take the label tool to display the message, whether the image is uploaded or not.
Figure 5: Design Page
Step 6
Now we need to create a table in SQL Server, depending on the requirements.
- create table upload1(uname varchar(50),image varchar(100));
Step 7
After table creation we will write the following code for the button click.
- protected void Button1_Click(object sender, EventArgs e)
- {
- SqlConnection con = new SqlConnection("Data Source=MCNDESKTOP34;Initial Catalog=yatendra;User ID=sa;Password=Password$2");
- if (FileUpload1.HasFile)
- {
- string strname = FileUpload1.FileName.ToString();
- FileUpload1.PostedFile.SaveAs(Server.MapPath("~/upload/") + strname);
- con.Open();
- SqlCommand cmd = new SqlCommand("insert into upload1 values('" + txtname.Text + "','" + strname + "')", con);
- cmd.ExecuteNonQuery();
- con.Close();
- Label1.Visible = true;
- Label1.Text = "Image Uploaded successfully";
- txtname.Text = "";
- }
- else
- {
- Label1.Visible = true;
- Label1.Text = "Plz upload the image!!!!";
- }
- }
Step 8
Now we need to execute the website on the web browser by pressing the F5 key and we will get the following window on the web browser.

Figure 6: Output Window
Now we will give the Username and click on Choose File.

Figure 7: Upload Image
Click on the upload image button then the message appears on the screen "Image Uploaded successfully".

Figure 8: Image Uploaded
Step 10
Now we will check the database that the data arrived or not in the database by the select command.

Figure 9: Check Database
Summary
In this article, I explained how to upload images to a database using ASP.NET.
I hope this is helpful for beginners when they want to upload images in their projects.
Sohaib HussainPosted Jul 23, 2018, 6:32 AM
FileUpload1.PostedFile.SaveAs(Server.MapPath("~/upload/") + strname); //in this line what the term upload means ?
Rahul AnandPosted Sep 11, 2017, 5:29 AM
Sir, in database image field shows <binary data> ..how can i fix that..??
Nilesh GajinkarPosted May 6, 2017, 5:54 PM
How to retrive this image
alen koh95Posted Mar 31, 2017, 7:32 AM
May i know how to take the image from database and it can view?
Sankaranarayanan VPosted Nov 4, 2015, 2:48 AM
Its only save file name not a file. Isn't it?
zainab bashirPosted Sep 4, 2015, 2:54 AM
Very simple and useful! (y)
NitinPosted May 30, 2015, 11:03 AM
Nice
Santhakumar MunuswamyPosted May 29, 2015, 1:20 PM
Thanks for nice one
Aarthna MaheshwariPosted May 29, 2015, 9:16 AM
good 1
Yatendra SharmaPosted May 29, 2015, 8:04 AM
Sibeesh Venu thanx sir
Sibeesh VenuPosted May 29, 2015, 7:28 AM
Nice one.