

Introduction
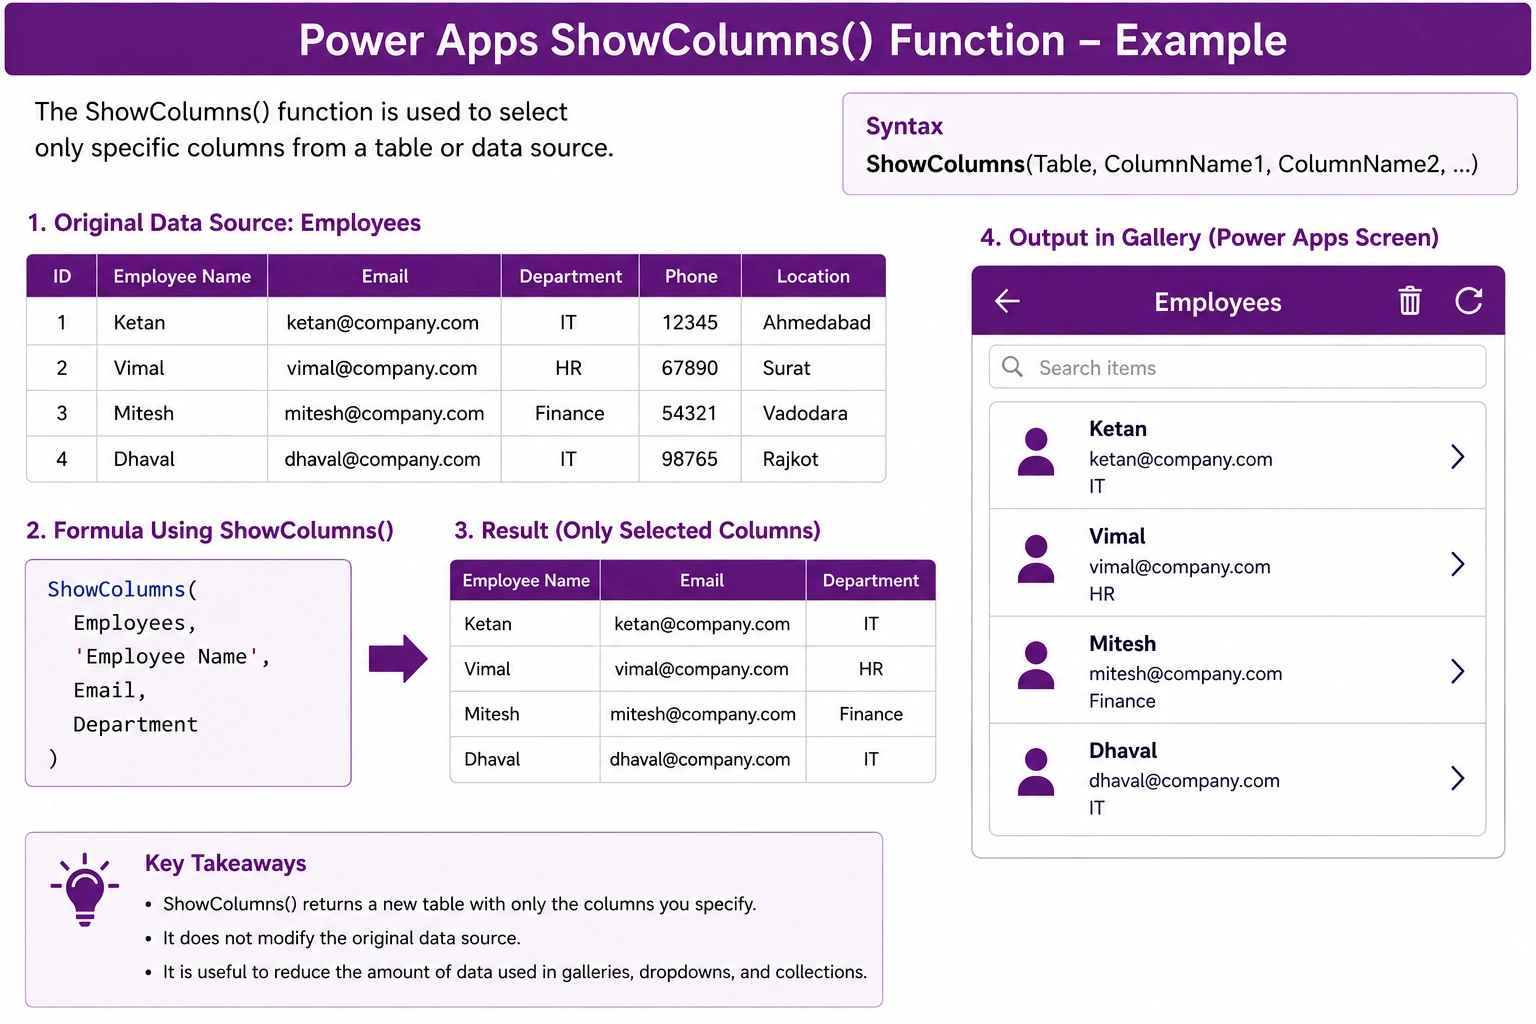
In Microsoft Power Apps, the ShowColumns() function is used to select only specific columns from a table or data source.It is useful when you have a table with many columns but only need a few columns for your application.
Syntax
ShowColumns(Table, ColumnName1, ColumnName2, ...)Table – The table or data source you want to work with.
ColumnName – The columns you want to keep in the result.
Example 1: Select Specific Columns
Suppose you have a data source called Employees with the following columns:
| ID | EmployeeName | Department | Phone | |
|---|---|---|---|---|
| 1 | Ketan | [email protected] | IT | 12345 |
| 2 | Vimal | [email protected] | HR | 67890 |
If you only need the employee name and email, use:
ShowColumns(
    Employees,
    EmployeeName,
    Email
)
Result
| EmployeeName | |
|---|---|
| Ketan | [email protected] |
| Vimal | [email protected] |
The other columns, such as ID, Department, and Phone, are excluded from the result.
Example 2: Use ShowColumns() with Filter()
You can combine ShowColumns() with Filter().
For example, to display only IT employees with their names and emails:
ShowColumns(
    Filter(
        Employees,
        Department = "IT"
    ),
    EmployeeName,
    Email
)
This first filters the records where the department is IT, then returns only the EmployeeName and Email columns.
Example 3: Use ShowColumns() with Sort()
You can also combine ShowColumns() with Sort():
ShowColumns(
    Sort(
        Employees,
        EmployeeName,
        SortOrder.Ascending
    ),
    EmployeeName,
    Email
)
This sorts employees by name and returns only the selected columns.
Example 4: Use ShowColumns() with a Gallery
Suppose you want to show only employee names and departments in a Gallery.
Set the Gallery's Items property to:
ShowColumns(
    Employees,
    EmployeeName,
    Department
)
Then add Labels inside the Gallery:
ThisItem.EmployeeNameand
ThisItem.DepartmentThis keeps the Gallery data limited to the columns that are actually required.
Example 5: Create a Dropdown List
You can use ShowColumns() to prepare a table for a Dropdown or Combo Box.
ShowColumns(
    Employees,
    EmployeeName
)
The control can then use the EmployeeName column to display employee names.
ShowColumns() vs DropColumns()
These two functions work in opposite ways.
ShowColumns()
Use ShowColumns() when you want to keep only the columns you specify.
ShowColumns(
    Employees,
    EmployeeName,
    Email
)
Result: Only EmployeeName and Email are returned.
DropColumns()
Use DropColumns() when you want to remove specific columns and keep the rest.
DropColumns(
    Employees,
    Phone,
    Department
)
Result: All columns are returned except Phone and Department.
Quick Comparison
| Function | Purpose |
|---|---|
| ShowColumns() | Select only required columns |
| DropColumns() | Remove unwanted columns |
| AddColumns() | Add a calculated or custom column |
| RenameColumns() | Rename existing columns |
Real-World Example
Suppose your SharePoint list contains:
ID
Employee Name
Email
Department
Manager
Phone
Location
Created
Modified
But your Power Apps screen only needs:
Employee Name
Email
Department
You can use:
ShowColumns(
    EmployeeList,
    'Employee Name',
    Email,
    Department
)
This creates a smaller table containing only the required columns.
Important Note
ShowColumns() changes the shape of the resulting table. It does not delete columns from your original data source.
For example:
ShowColumns(
    Employees,
    EmployeeName,
    Email
)
The original Employees data source still contains all its columns. Only the returned result contains the selected columns.
Conclusion
The ShowColumns() function is useful when you need to select specific columns from a table in Power Apps.
The basic pattern is:
ShowColumns(
    DataSource,
    Column1,
    Column2,
    Column3
)
It is commonly used with functions such as Filter(), Sort(), AddColumns(), and Distinct() to create clean and focused data collections for Galleries, Dropdowns, Combo Boxes, and other Power Apps controls.
Conclusion
The ShowColumns() function in Power Apps is a simple and useful way to select only the columns you need from a data source or table. It helps create cleaner data structures and is especially useful when working with Galleries, Dropdowns, Combo Boxes, and Collections.
Remember:
ShowColumns() = Select and keep only the required columns.
It does not modify or delete columns from the original data source. Instead, it returns a new table containing only the selected columns.
Jasen FiciPosted Aug 7, 2026, 1:34 PM
We featured this for DotNetNews readers here: https://dotnetnews.co/archive/the-net-news-daily-issue-514/