

Introduction
Android is one of the most popular operating systems for mobiles. We use the camera Application to take images in our day to day lives. This module is used in a loT of photo editing applications. Thus, I will show you how to use the gallery images in an Android Application, using Android Studio. Android is a kernel-based operating system. It allows the user to modify the GUI components and the source code.
Requirements
- Android Studio
- Little bit XML and Java knowledge.
- Android emulator (or) an Android mobile.
- Download link (Android Studio).
Steps to be followed
Step 1
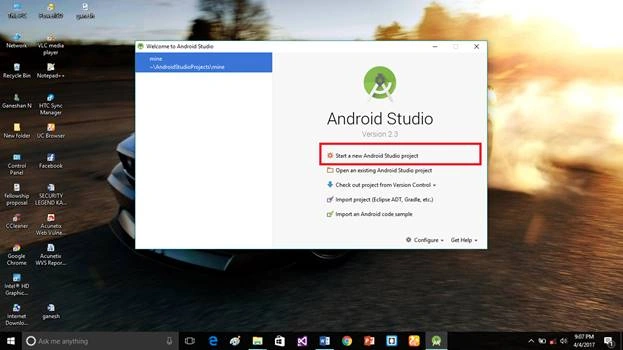
Open an Android Studio and start the new project.
Step 2
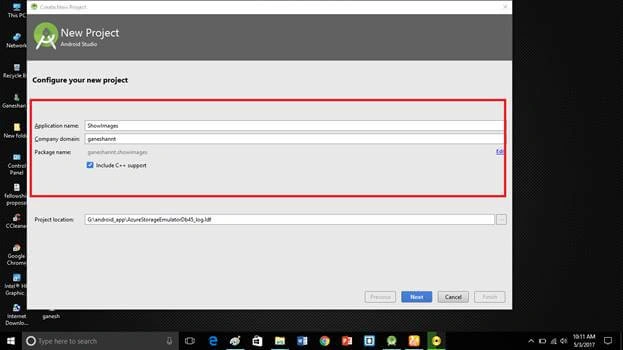
Put the Application name and the company domain. If you wish to use C++ to code the project, include C++ support, followed by clicking Next.
Step 3
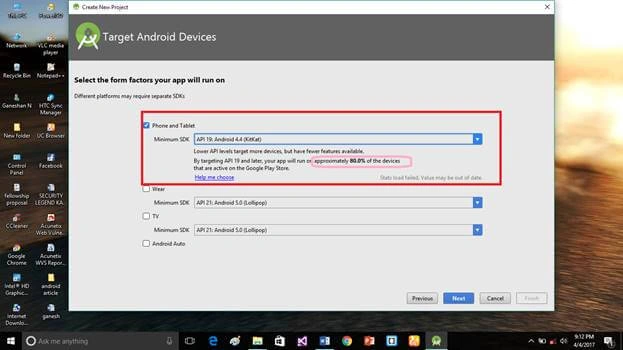
Select Android minimum SDK. After you chose the minimum SDK, it will show the approximate percentage of the people who use that SDK, followed by clicking Next.
Step 4
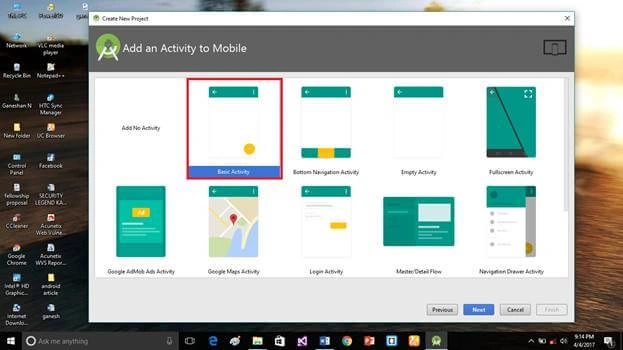
Choose the basic activity, followed by clicking Next.
Step 5
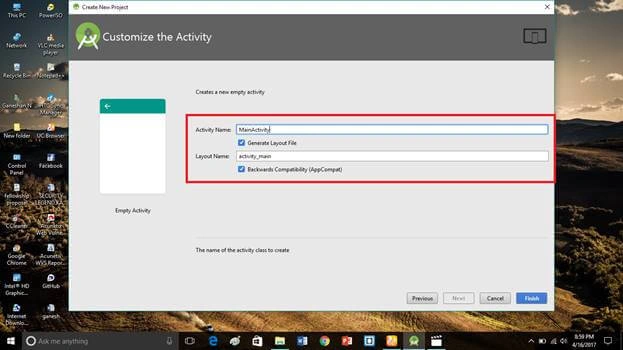
Put the activity name and the layout name. Android Studio basically takes Java class name as what you provide for the activity name and click Finish.
Step 6
First, you need to design the Application. Go to activity_select_image.xml, followed by clicking the text bottom. This XML file contains the designing code for an Android app. In the activity_select_image.xml, copy and paste the code given below.
activity_select_image.xml code
- <RelativeLayout xmlns:android="http://schemas.android.com/apk/res/android"
- xmlns:tools="http://schemas.android.com/tools"
- android:layout_width="match_parent"
- android:layout_height="match_parent"
- tools:context=".SelectImageActivity" >
- <Button
- android:id="@+id/button"
- android:layout_width="wrap_content"
- android:layout_height="wrap_content"
- android:layout_alignParentLeft="true"
- android:layout_alignParentTop="true"
- android:layout_marginLeft="15dp"
- android:layout_marginTop="15dp"
- android:text="@string/pick_button" />
- <ImageView
- android:id="@+id/image"
- android:layout_width="wrap_content"
- android:layout_height="wrap_content"
- android:layout_centerHorizontal="true"
- android:layout_centerVertical="true"
- android:src="@drawable/ic_launcher" />
- </RelativeLayout>
Step 7
In the SelectImageActivity.java, copy and paste the code given below. Java programming is the backend language for Android. Do not replace your package name, else an app will not run.
SelectImageActivity.java code
- package ganeshannt.showimages;
- import android.app.Activity;
- import android.content.Intent;
- import android.database.Cursor;
- import android.graphics.BitmapFactory;
- import android.net.Uri;
- import android.os.Bundle;
- import android.provider.MediaStore;
- import android.view.View;
- import android.view.View.OnClickListener;
- import android.widget.Button;
- import android.widget.ImageView;
- public class SelectImageActivity extends Activity implements OnClickListener {
- // Image loading result to pass to startActivityForResult method.
- private static int LOAD_IMAGE_RESULTS = 1;
- // GUI components
- private Button button; // The button
- private ImageView image;// ImageView
- @Override
- protected void onCreate(Bundle savedInstanceState) {
- super.onCreate(savedInstanceState);
- setContentView(R.layout.activity_select_image);
- // Find references to the GUI objects
- button = (Button)findViewById(R.id.button);
- image = (ImageView)findViewById(R.id.image);
- // Set button's onClick listener object.
- button.setOnClickListener(this);
- }
- @Override
- protected void onActivityResult(int requestCode, int resultCode, Intent data) {
- super.onActivityResult(requestCode, resultCode, data);
- // Here we need to check if the activity that was triggers was the Image Gallery.
- // If it is the requestCode will match the LOAD_IMAGE_RESULTS value.
- // If the resultCode is RESULT_OK and there is some data we know that an image was picked.
- if (requestCode == LOAD_IMAGE_RESULTS && resultCode == RESULT_OK && data != null) {
- // Let's read picked image data - its URI
- Uri pickedImage = data.getData();
- // Let's read picked image path using content resolver
- String[] filePath = { MediaStore.Images.Media.DATA };
- Cursor cursor = getContentResolver().query(pickedImage, filePath, null, null, null);
- cursor.moveToFirst();
- String imagePath = cursor.getString(cursor.getColumnIndex(filePath[0]));
- // Now we need to set the GUI ImageView data with data read from the picked file.
- image.setImageBitmap(BitmapFactory.decodeFile(imagePath));
- // At the end remember to close the cursor or you will end with the RuntimeException!
- cursor.close();
- }
- }
- @Override
- public void onClick(View v) {
- // Create the Intent for Image Gallery.
- Intent i = new Intent(Intent.ACTION_PICK, android.provider.MediaStore.Images.Media.EXTERNAL_CONTENT_URI);
- // Start new activity with the LOAD_IMAGE_RESULTS to handle back the results when image is picked from the Image Gallery.
- startActivityForResult(i, LOAD_IMAGE_RESULTS);
- }
- }
Step 8
In AndroidManifest.xml, add the code given below.
AndroidManifest.xml code
- <?xml version="1.0" encoding="utf-8"?>
- <manifest xmlns:android="http://schemas.android.com/apk/res/android"
- package="ganeshannt.showimages"
- android:versionCode="1"
- android:versionName="1.0" >
- <uses-sdk
- android:minSdkVersion="19"
- android:targetSdkVersion="25" />
- <application
- android:allowBackup="true"
- android:icon="@drawable/ic_launcher"
- android:label="@string/app_name"
- android:theme="@style/AppTheme" >
- <activity
- android:name="ganeshannt.showimages.SelectImageActivity"
- android:label="@string/app_name" >
- <intent-filter>
- <action android:name="android.intent.action.MAIN" />
- <category android:name="android.intent.category.LAUNCHER" />
- </intent-filter>
- </activity>
- </application>
- </manifest>
Step 9
In the Strings.xml, add the code given below. In this string, provide the app settings bar.
Strings.xml code
- <?xml version="1.0" encoding="utf-8"?>
- <resources>
- <string name="app_name">Show Images</string>
- <string name="menu_settings">Settings</string>
- <string name="pick_button">Pick image</string>
- </resources>
Step 13
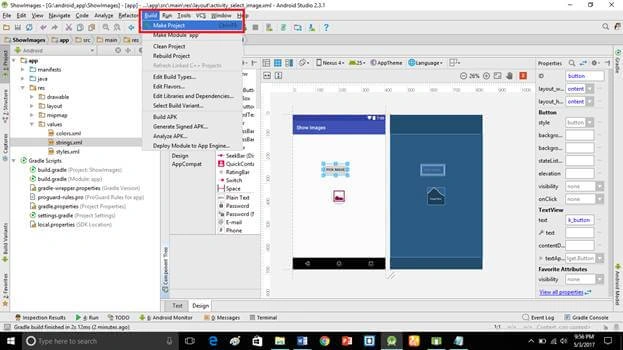
This is our user interface of the Application. Click Make project option.
Step 14
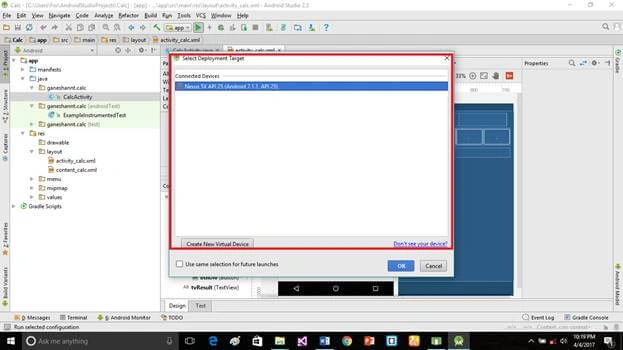
Run the Application, followed by choosing the virtual machine. Click OK.
Deliverables
Here, we have successfully used the gallery images in an Android Application, using an Android Studio, which is created and executed.
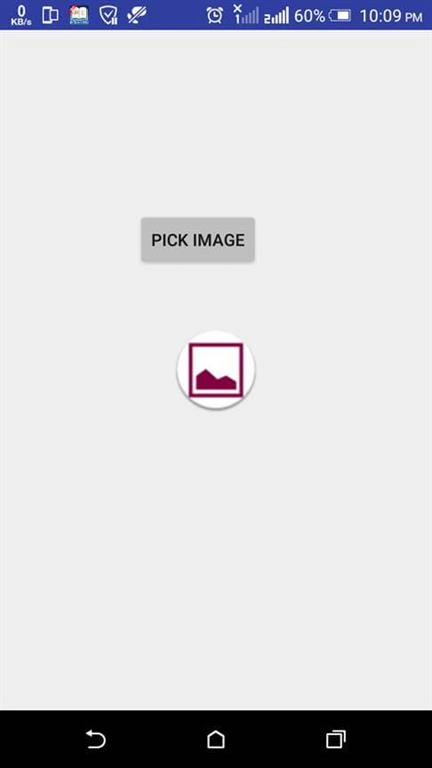 Click the pick image button and it will open the gallery.
 Choose the image, followed by just touching the image.
If you have any doubts, just comment.
Parth PatelPosted May 13, 2017, 1:43 AM
In AndroidManifest.xml file the permission is required
Rathrola Prem KumarPosted May 8, 2017, 5:09 AM
Cool, Thanks for sharing Ganesh :)
Joe WilsonPosted May 6, 2017, 12:13 AM
Thank you for sharing this article.
Saravanakumar SekaranPosted May 5, 2017, 10:29 PM
Wow very nice article