

Introduction
When working with Power Automate, actions such as Get items, Get rows, or API calls often return more data than you actually need. Processing all those properties can make a flow harder to understand and maintain.
The Select action, available under Data Operations, helps solve this problem by allowing you to reshape an array of objects. You can select the properties you need, rename them, and create a clean output structure for the next step in your flow.
Simple concept:
Filter Array decides which records you want. Select decides what information you want from those records.
What is the Select Action?
The Select action transforms an array into a new array with the structure you define.
For example, a SharePoint Get items action may return:
ID
Name
Email
Department
Phone
Location
Created
Modified
Author
Editor
But suppose your next action only requires:
EmployeeName
EmailAddress
Department
Instead of passing all the original properties forward, you can use Select to create a smaller and cleaner structure.
Before Select
[
    {
        Name: "DemoUser1",
        Email: "[email protected]",
        Department: "IT",
        Phone: "12345",
        Location: "India"
    }
]
After Select
[
    {
        EmployeeName: "DemoUser1",
        EmailAddress: "[email protected]",
        Department: "IT"
    }
]
Real-World Example: SharePoint Employee List
Assume you have a SharePoint list called Employees.
The list contains:
ID | Name | Department | Phone | Location | |
|---|---|---|---|---|---|
1 | DemoUser1 | IT | 12345 | India | |
2 | DemoUser2 | HR | 67890 | USA | |
3 | DemoUser3 | Finance | 54321 | UK |
You want to send employee information through an email, but you only need:
Employee Name
Email Address
Department
The flow can be designed as:
Get Items
   ↓
Select
   ↓
Create HTML Table
   ↓
Send EmailAdd the SharePoint Get items action.
Configure:
Site Address
Your SharePoint SiteList Name
EmployeesThe important output from Get items is the value array.
Example:
[
    {
        "Name": "DemoUser1",
        "Email": "[email protected]",
        "Department": "IT",
        "Phone": "12345"
    },
    {
        "Name": "DemoUser2",
        "Email": "[email protected]",
        "Department": "HR",
        "Phone": "67890"
    }
]Click:
+ New step → Data Operation → Select
The Select action contains two important areas:
From
For SharePoint Get items, select:
valueThis tells Power Automate which array should be transformed.
Map
Now define the properties that you want in the output.
Key | Value |
|---|---|
EmployeeName | Name |
EmailAddress | |
Department | Department |
Conceptually:
EmployeeName  → Name
EmailAddress  → Email
Department → DepartmentAfter Select executes, the output becomes:
[
  {
    "EmployeeName": "DemoUser1",
    "EmailAddress": "[email protected]",
    "Department": "IT"
  },
  {
    "EmployeeName": "DemoUser2",
    "EmailAddress": "[email protected]",
    "Department": "HR"
  },
  {
    "EmployeeName": "DemoUser3",
    "EmailAddress": "[email protected]",
    "Department": "Finance"
  }
]
Notice that the number of records remains the same, but the structure of each record has changed.
Select Does Not Filter RecordsThis is one of the most important things to understand.
Suppose Get items returns:
10 recordsAfter Select:
10 recordsSelect changes the properties of each record.
If you want to reduce:
10 records → 5 recordsyou should use Filter array.
Select vs Filter ArrayFeature | Filter Array | Select |
|---|---|---|
Removes records | Yes | No |
Changes properties | No | Yes |
Renames properties | No | Yes |
Reduces number of records | Yes | No |
Creates a new structure | Limited | Yes |
Main purpose | Filter data | Reshape data |
Example
If you want only IT employees:
Get Items
    ↓
Filter Array
    ↓
Select
Filter Array:
Department = ITThen Select:
EmployeeName → Name
EmailAddress → Email
Department → Department
The result contains only IT employees with the required properties.
Using Select in an Invoice Approval FlowSelect is also useful in an Invoice Approval process.
For example, suppose a SharePoint query returns many invoice fields:
Invoice Number
Vendor
Invoice Amount
Invoice Date
Approval Status
Created By
Modified By
Created
Modified
Department
Currency
...
But you want to send an approval summary containing only:
InvoiceNumber
VendorName
Amount
Status
Your flow can be:
Get Invoice Items
       ↓
Filter Array
       ↓
Select
       ↓
Create HTML Table
       ↓
Send Approval Email
The Select mapping could be:
Output Property | Source |
|---|---|
InvoiceNumber | Invoice Number |
VendorName | Vendor |
Amount | Invoice Amount |
Status | Approval Status |
This produces a clean dataset for the email or report.
Why Use Select?1. Create a clean data structure
Instead of passing unnecessary fields through the flow, you can create a structure containing only the required information.
2. Rename properties
For example:
Name → EmployeeName
Email → EmailAddress
This makes the output easier to understand.
3. Remove unnecessary fields
If the source contains 20 properties but you need only 4, Select can produce an output containing those 4 properties.
4. Make downstream actions easier
A clean Select output can be used by actions such as:
Create HTML Table
Create CSV Table
Send an Email
HTTP
Parse JSON
Apply to each
Compose
A common and useful pattern is:
Get Items
    ↓
Filter Array
    ↓
Select
    ↓
Create HTML Table
    ↓
Send Email
Filter Array
Answers:
Which records do I want?
Select
Answers:
What information do I want from those records?
For example:
Get Items
   ↓
Keep only Approved invoices
   ↓
Select Invoice Number, Vendor and Amount
   ↓
Create HTML Table
   ↓
Send Email
This makes the overall flow easier to maintain.
Common Mistakes1. Using the wrong input
For SharePoint Get items, Select normally needs the value array.
Do not accidentally provide the complete Get items response object.
2. Using Select instead of Filter Array
If your requirement is:
"I only want records where Status = Approved."
Use Filter array.
Select alone will not remove the other records.
3. Using unclear output names
Avoid names such as:
Field1
Field2
Data1
Data2
Prefer meaningful names:
InvoiceNumber
VendorName
InvoiceAmount
ApprovalStatus
4. Passing unnecessary fields
If the next action only requires three properties, there is usually no reason to carry many unrelated properties through the rest of the flow.
Complete ExampleA practical Power Automate design could look like this:
When an item is created
        ↓
Get Items
        ↓
Filter Array
   Status = Active
        ↓
Select
   EmployeeName → Name
   EmailAddress → Email
   Department → Department
        ↓
Create HTML Table
        ↓
Send Email
Input
DemoUser1  | [email protected]    | IT
DemoUser2  | [email protected]    | HR
DemoUser3  | [email protected]    | Finance
Select Output
EmployeeName | EmailAddress       | Department
------------------------------------------------
DemoUser1  | [email protected]  | IT
DemoUser2  | [email protected]  | HR
DemoUser3  | [email protected]  | Finance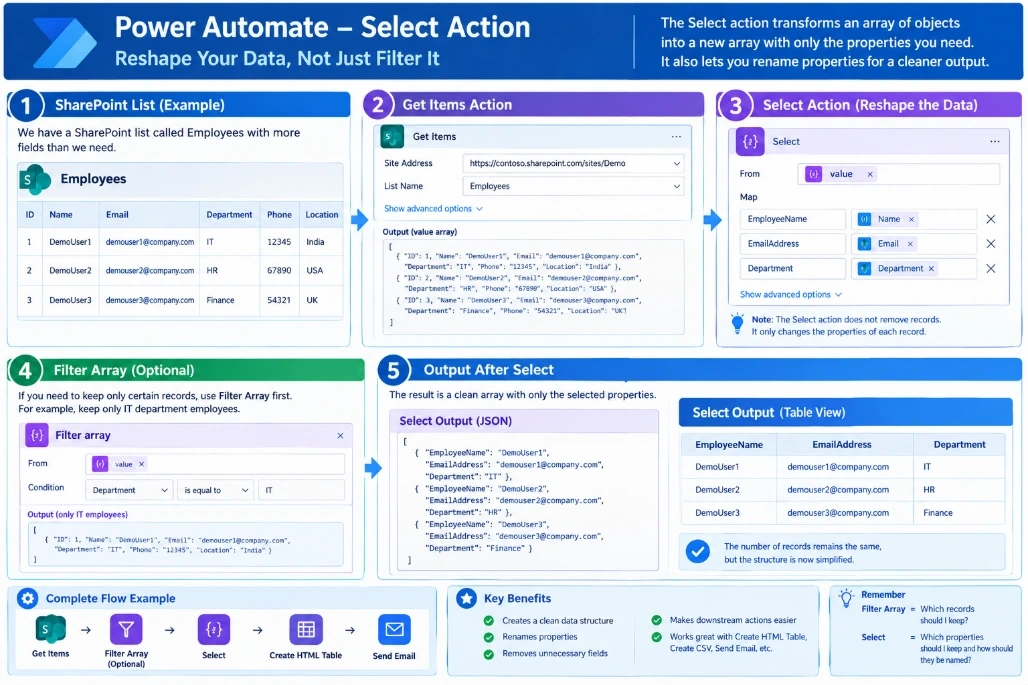
Conclusion
The Select action is a simple but powerful Data Operation in Power Automate for transforming arrays into a clean, meaningful structure.
Remember the easiest way to distinguish the two actions:
Filter Array = Which records should I keep?
Select = Which properties should I keep and how should they be named?
Using Filter Array + Select together can make Power Automate flows cleaner, easier to maintain, and easier to use in later actions.
Available next action: Create a downloadable DOCX file here in this chat containing the editable prose above
Join the conversation! Your thoughts help the community grow.