

So to make your app work with both landscape and portrait orientations in your Windows Phone app, use the following procedure.
Step 1
Design your XAML page that supports the Portrait orientation like this. The two key points here to make your application support both landscape and portrait is you to add the following two properties to the declarations on the top.
- SupportedOrientations="PortraitOrLandscape" Orientation="Portrait"
- OrientationChanged="PhoneApplicationPage_OrientationChanged"
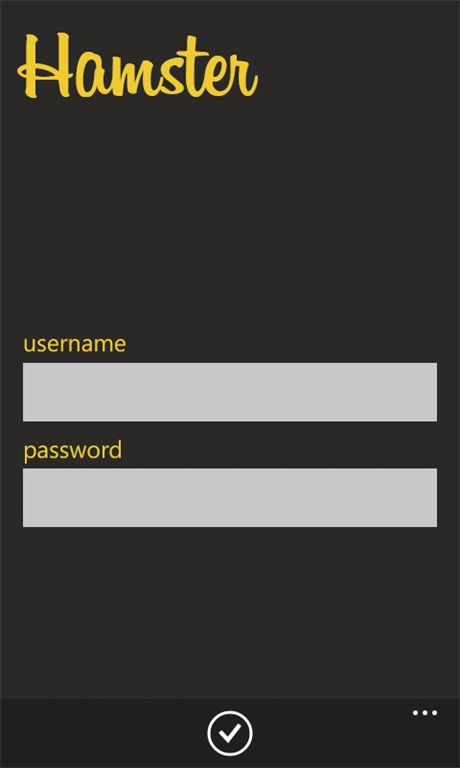
Figure 1: Hamster
- <phone:PhoneApplicationPage
- x:Class="PhoneApp3.MainPage"
- xmlns="http://schemas.microsoft.com/winfx/2006/xaml/presentation"
- xmlns:x="http://schemas.microsoft.com/winfx/2006/xaml"
- xmlns:phone="clr-namespace:Microsoft.Phone.Controls;assembly=Microsoft.Phone"
- xmlns:shell="clr-namespace:Microsoft.Phone.Shell;assembly=Microsoft.Phone"
- xmlns:d="http://schemas.microsoft.com/expression/blend/2008"
- xmlns:mc="http://schemas.openxmlformats.org/markup-compatibility/2006"
- mc:Ignorable="d"
- FontFamily="{StaticResource PhoneFontFamilyNormal}"
- FontSize="{StaticResource PhoneFontSizeNormal}"
- Foreground="{StaticResource PhoneForegroundBrush}"
- SupportedOrientations="PortraitOrLandscape" Orientation="Portrait"
- shell:SystemTray.IsVisible="False" OrientationChanged="PhoneApplicationPage_OrientationChanged">
- <phone:PhoneApplicationPage.ApplicationBar>
- <shell:ApplicationBar IsVisible="True" IsMenuEnabled="False" BackgroundColor="#2A2927" ForegroundColor="#EFCA31">
- <shell:ApplicationBarIconButton IconUri="/Assets/AppBar/check.png" Text="Login" Click="ApplicationBarIconButton_Click_1"/>
- <shell:ApplicationBar.MenuItems>
- <shell:ApplicationBarMenuItem Text="MenuItem 1"/>
- <shell:ApplicationBarMenuItem Text="MenuItem 2"/>
- </shell:ApplicationBar.MenuItems>
- </shell:ApplicationBar>
- </phone:PhoneApplicationPage.ApplicationBar>
- <Grid x:Name="LayoutRoot" Background="#2A2927">
- <Grid.RowDefinitions>
- <RowDefinition Height="Auto"/>
- <RowDefinition Height="Auto"/>
- <RowDefinition Height="Auto"/>
- </Grid.RowDefinitions>
- <Grid.ColumnDefinitions>
- <ColumnDefinition Width ="Auto" />
- </Grid.ColumnDefinitions>
- <StackPanel x:Name="TitlePanel" Grid.Row="0" Margin="12,17,0,28">
- <TextBlock Text="Hamster" Margin="9,0,0,0" Style="{StaticResource PhoneTextTitle1Style}" Foreground="#EFCA31" FontWeight="Light" FontFamily="\Fonts\billabong.ttf#billabong" FontStretch="Expanded" TextWrapping="Wrap" FontSize="100"/>
- </StackPanel>
- <Grid x:Name="ContentPanel" Grid.Row="1" Margin="12,0,12,0">
- <TextBox HorizontalAlignment="Left" Height="85" Margin="0,196,0,0" TextWrapping="Wrap" Text="" VerticalAlignment="Top" Width="456" Padding="5" x:Name="ubox"/>
- <TextBox HorizontalAlignment="Left" Height="85" Margin="0,306,0,0" TextWrapping="Wrap" Text="" VerticalAlignment="Top" Width="456" Padding="5" x:Name="pbox"/>
- <TextBlock HorizontalAlignment="Left" Margin="12,169,0,0" TextWrapping="Wrap" Text="username" VerticalAlignment="Top" Foreground="#EFCA31" FontSize="25" x:Name="uname"/>
- <TextBlock HorizontalAlignment="Left" Margin="12,280,0,0" TextWrapping="Wrap" Text="password" VerticalAlignment="Top" Foreground="#EFCA31" FontSize="25" x:Name="password"/>
- </Grid>
- </Grid>
- </phone:PhoneApplicationPage>
Now you need to go to the PhoneApplicationPage_OrientationChanged event and add the following code.
- private void PhoneApplicationPage_OrientationChanged(object sender, OrientationChangedEventArgs e) {
- PageOrientation orientation = e.Orientation;
- if ((orientation & PageOrientation.Landscape) == PageOrientation.Landscape) {
- TitlePanel.Visibility = Visibility.Visible;
- ContentPanel.HorizontalAlignment = System.Windows.HorizontalAlignment.Stretch;
- uname.Margin = new Thickness(12, 10, 0, 0);
- password.Margin = new Thickness(12, 149, 0, 0);
- pbox.Margin = new Thickness(0, 188, 0, 0);
- ubox.Margin = new Thickness(0, 52, 0, 0);
- } else if ((orientation & PageOrientation.Portrait) == PageOrientation.Portrait) {
- TitlePanel.Visibility = Visibility.Visible;
- ContentPanel.Margin = new Thickness(12, 0, 12, 0);
- uname.Margin = new Thickness(12, 169, 0, 0);
- password.Margin = new Thickness(12, 280, 0, 0);
- pbox.Margin = new Thickness(0, 306, 0, 0);
- ubox.Margin = new Thickness(0, 196, 0, 0);
- }
- }
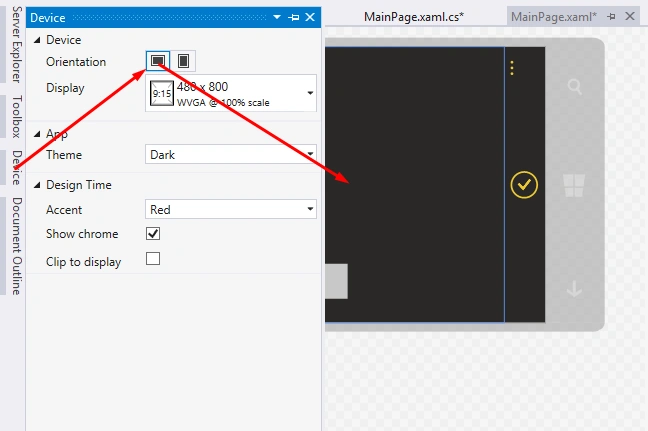
Figure 2: Device
So by changing the orientation you again need to design the XAML page and take those values (margin, row, columns, height, width and so on) put behind the C# file of landscape mode. Now just revert back to portrait mode. Now it's done, your app now supports both orientations. Cheers!
Note
Here the reason we are changing the orientation to landscape mode and redesigning the app is to only get the values of the controls and their alignment, since you cannot exactly provide the values behind code for landscape mode.
Note
Try to use the best matching colors always, don't use bright colors when designing an app, look at other famous apps, how they are designed and how they choose colors. In our subconscious, colors have a heavy impact on the person's mood. This effect varies depending on people and their culture, but there is a set of primary colours with a clear influence marked on a wide range of people, for example Blue of the sky gives people a sense of comfort and tranquility and Green is of gardens and provides a sense of happiness and pleasure.
Charwaka ThupiliPosted Jul 11, 2015, 7:28 AM
Thank you EveryOne
Santhakumar MunuswamyPosted Jul 11, 2015, 3:11 AM
Nice article! Thanks for sharing
Gowtham RajamanickamPosted Jul 10, 2015, 5:04 AM
Good one..
Sibeesh VenuPosted Jul 10, 2015, 4:50 AM
God one.
Gopi ChandPosted Jul 10, 2015, 1:44 AM
Good
Charwaka ThupiliPosted Jul 10, 2015, 12:09 AM
Thanks Nilesh :)
Nilesh JadavPosted Jul 10, 2015, 12:04 AM
Informative article sir