

Introduction
In this article, we will learn how to create S3 Bucket in AWS, how to upload files in S3 Bucket, how to read files from S3 Bucket, and how to delete the file from S3 Bucket in ASP.NET Core.
Prerequisites
- Software
- Dot NET Core
- Visual Studio 2017 with last update or Visual Studio 2019
- Skills
- C#
- AWS
Step 01 - Create Project
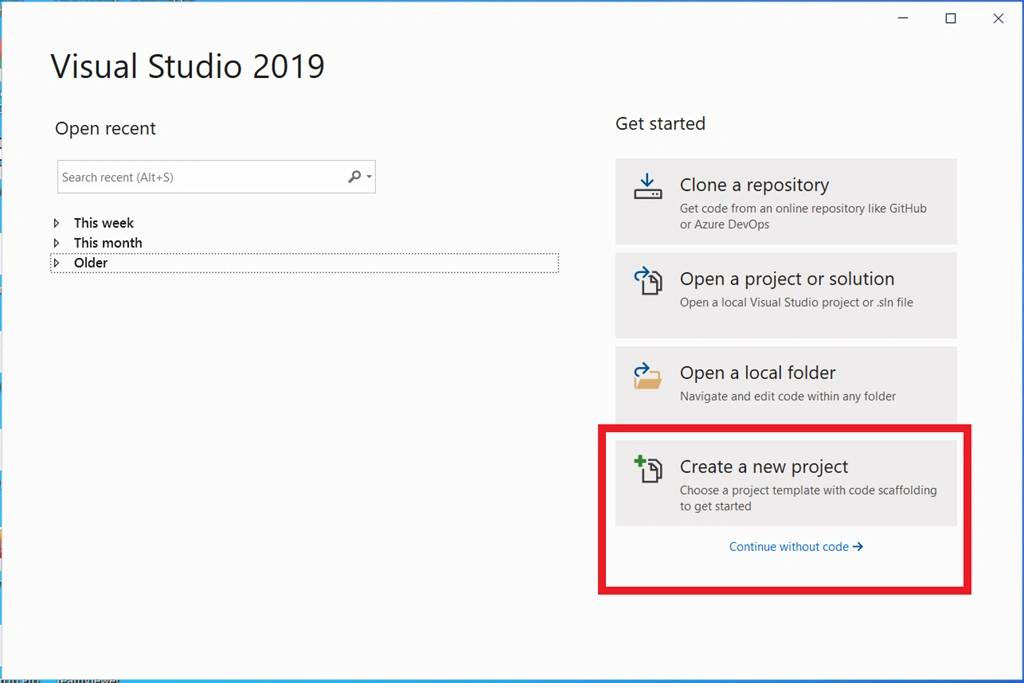
Open Visual Studio Click on “Create a new project”
Select the ASP.NET Core Web Application option.

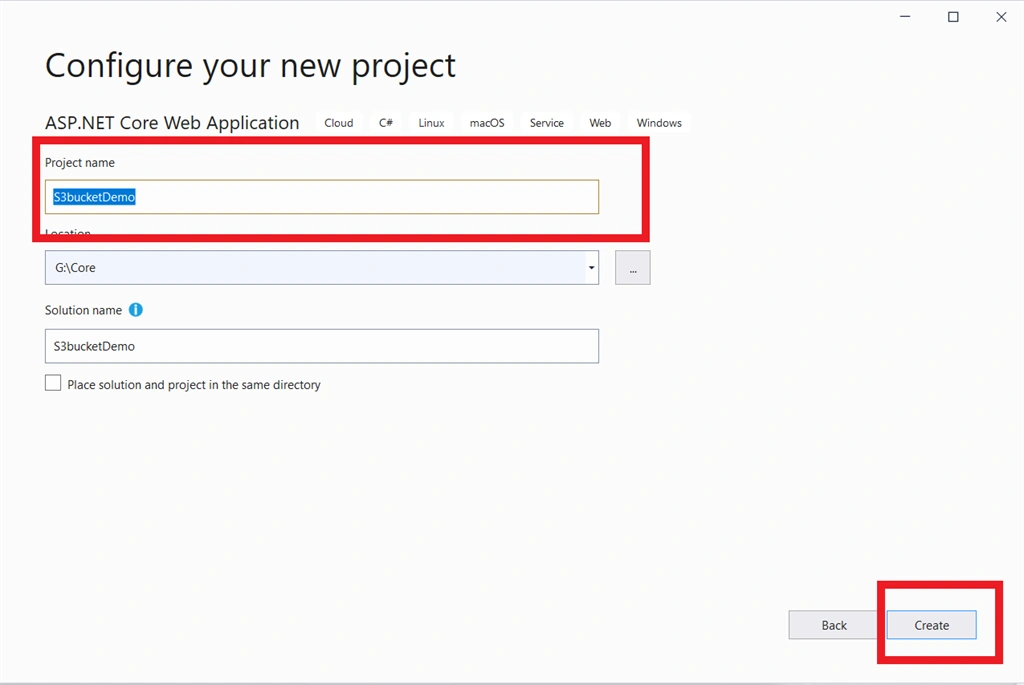
Add the Project name and Solution name.
Select “API” option with “.NET Core” and “ASP .NET Core 3.1” for create ASP .NET API.

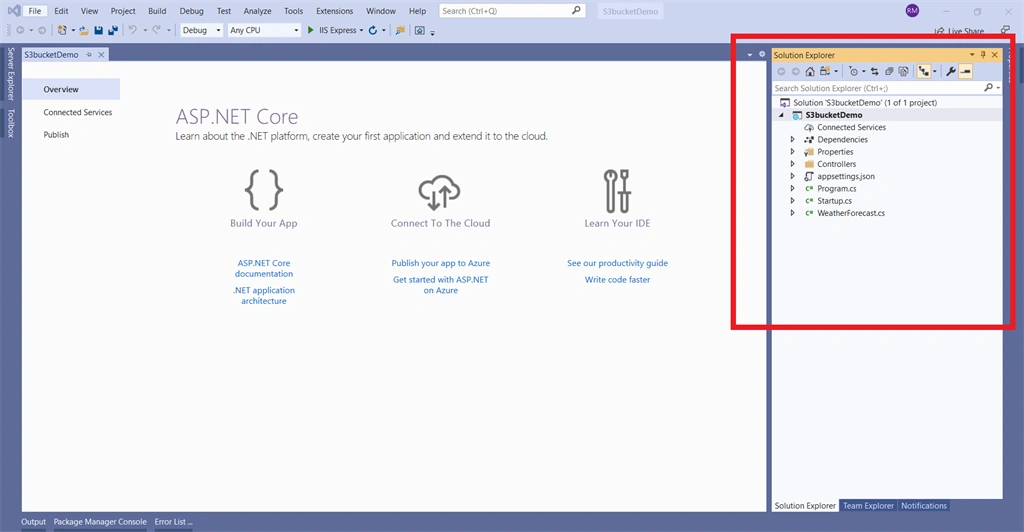
Users can see the default folder structure.
Step 02 - Install Nuget Packages
In this step, we need to install the following NuGet packages:
1. AWSSDK.Extensions.NETCore.Setup2. AWSSDK.S33. Swashbuckle.AspNetCore4. Swashbuckle.AspNetCore.Annotations
Now, we'll proceed to install the above package from Nuget, right-click on the S3bucketDemo project:
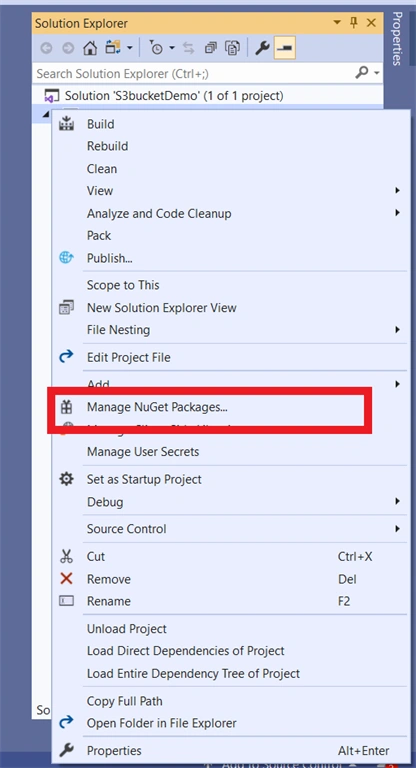
Change to the “Browse” tab and type AWSSDK.Extensions.NETCore.Setup:
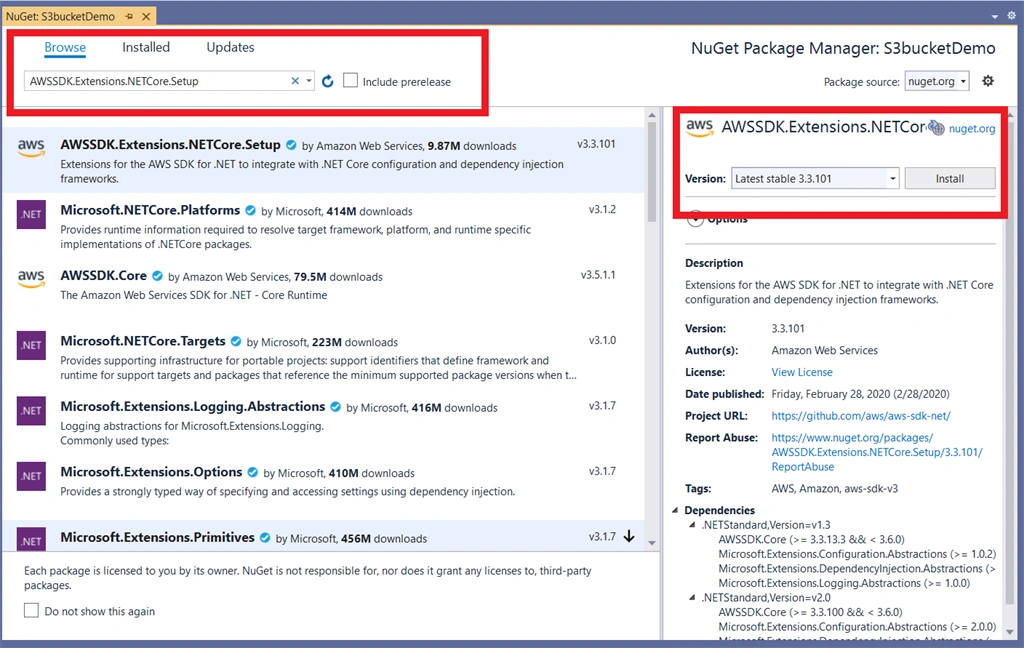
Next...
Install AWSSDK.S3 package
Install Microsoft.IdentityModel.Tokens package
Install Swashbuckle.AspNetCore package
Install Swashbuckle.AspNetCore.Annotations package Step 03 - Now, we have to Install and Configure AWS CLI in our Windows computer
Step A
Go to https://aws.amazon.com/cli/ site and click on “Download and run the 64-bit Windows installer” link as per the below screenshot.
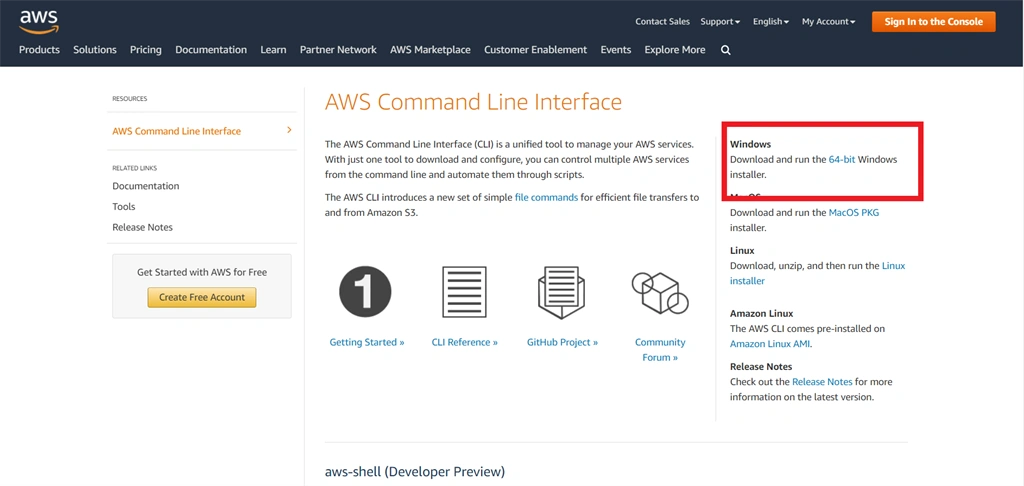
Step B
After successfully download “AWSCLIV2.msi” file, then install.
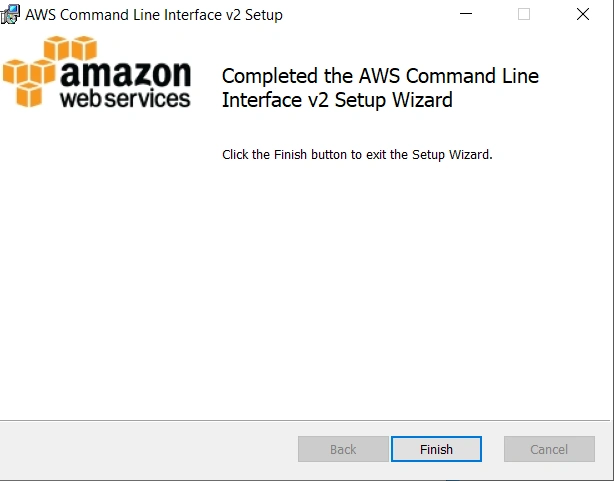
Step C
Check that “AWSCLIV2” installed properly, then open CMD run as an administrator.
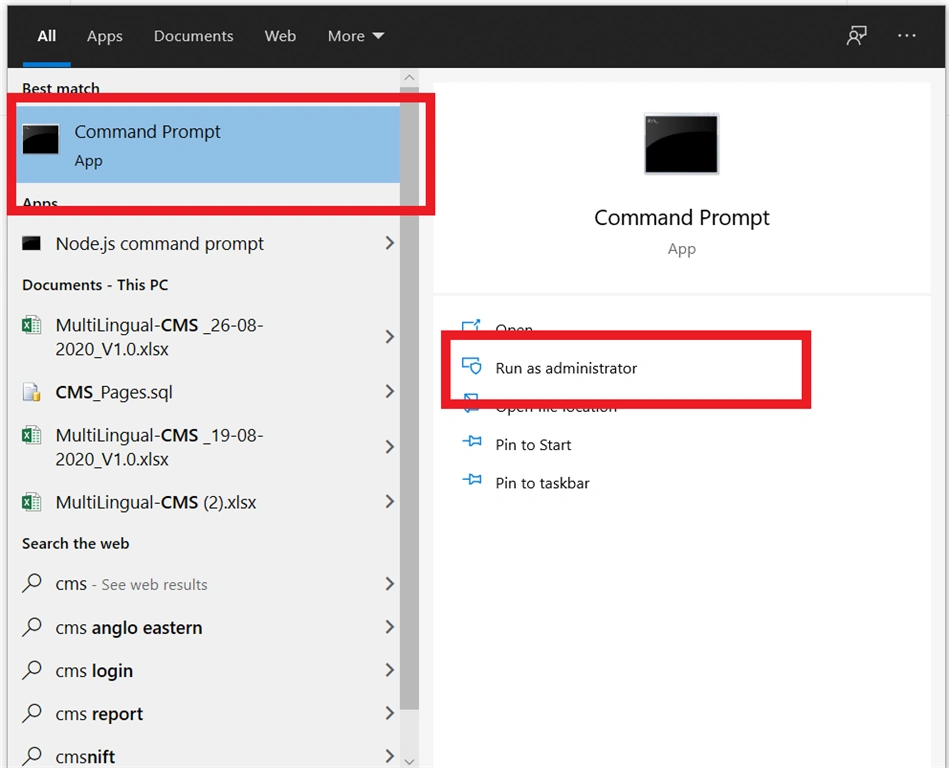
Step D
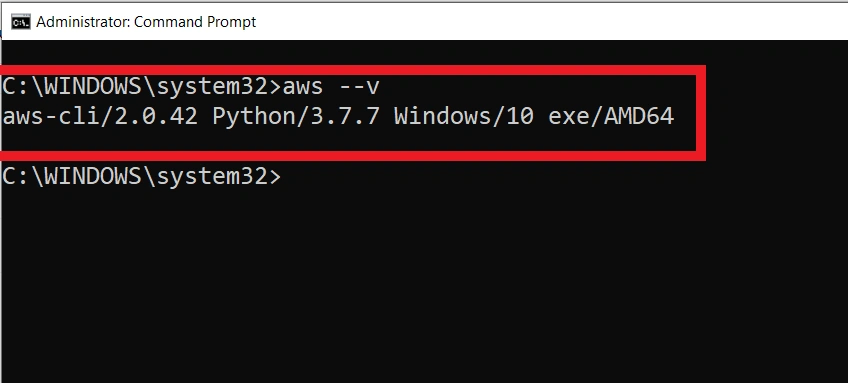
Execute command “aws --v” to check if “AWSCLIV2” installed properly or not.
Step E
Now login in to https://aws.amazon.com/.
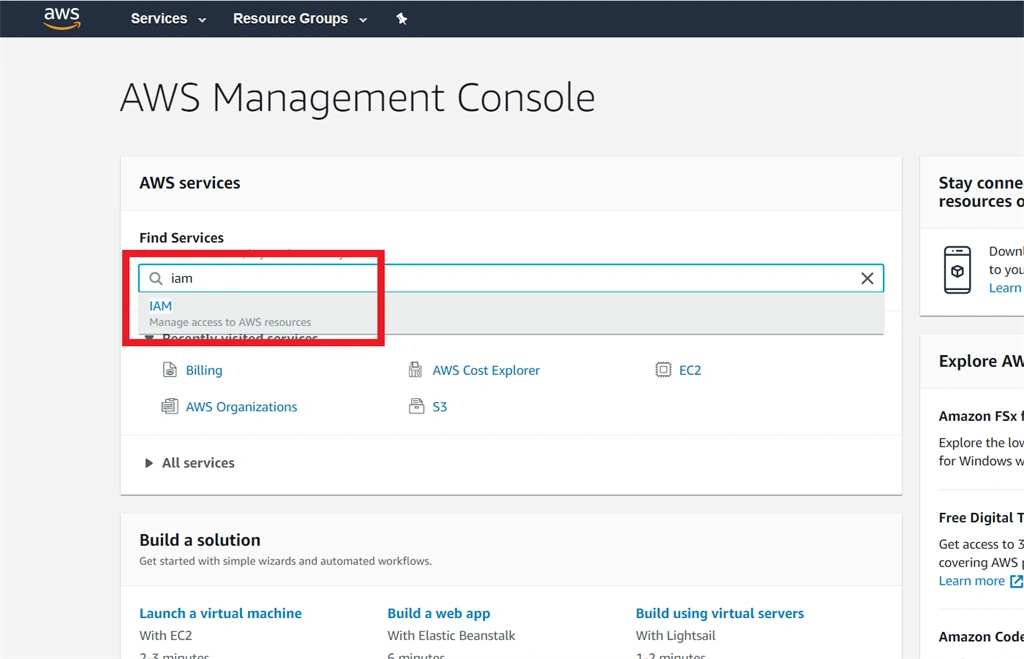
Search IAM in the “Find Services” textbox, as per the below screenshot:
Step G
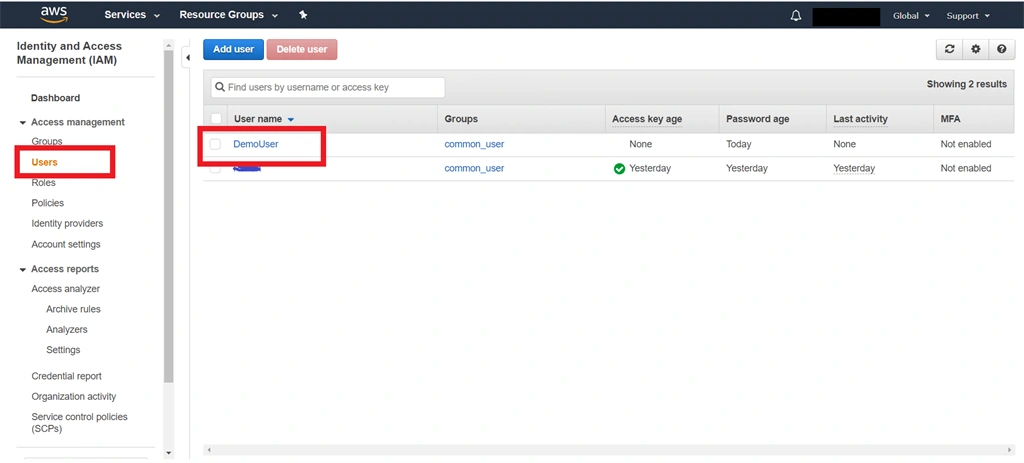
Click on the “Users” link and click on a particular user, as per the below screenshot.
Step H
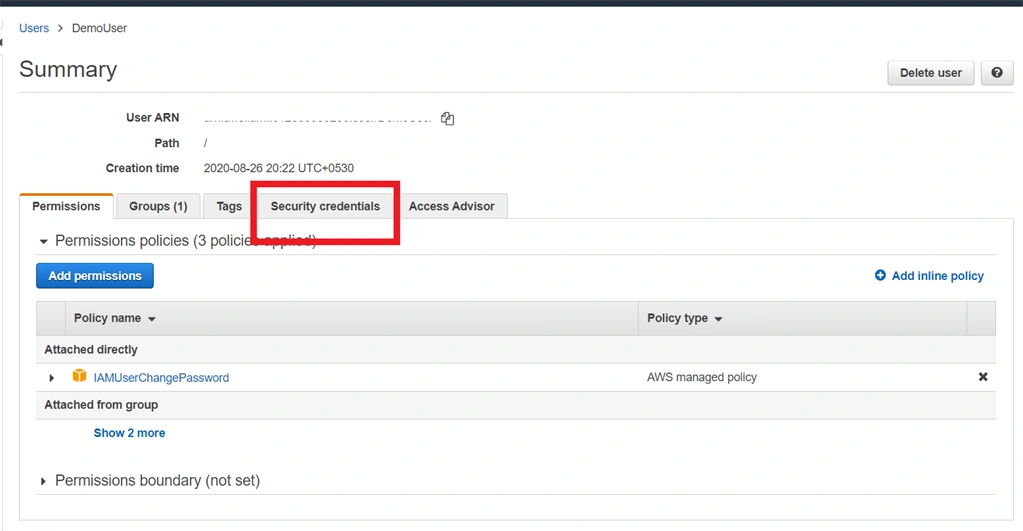
Then click on the “Security credentials” link, as per the below screenshot.
Step I
Then click on the “Create access key” link, as per the below screenshot.
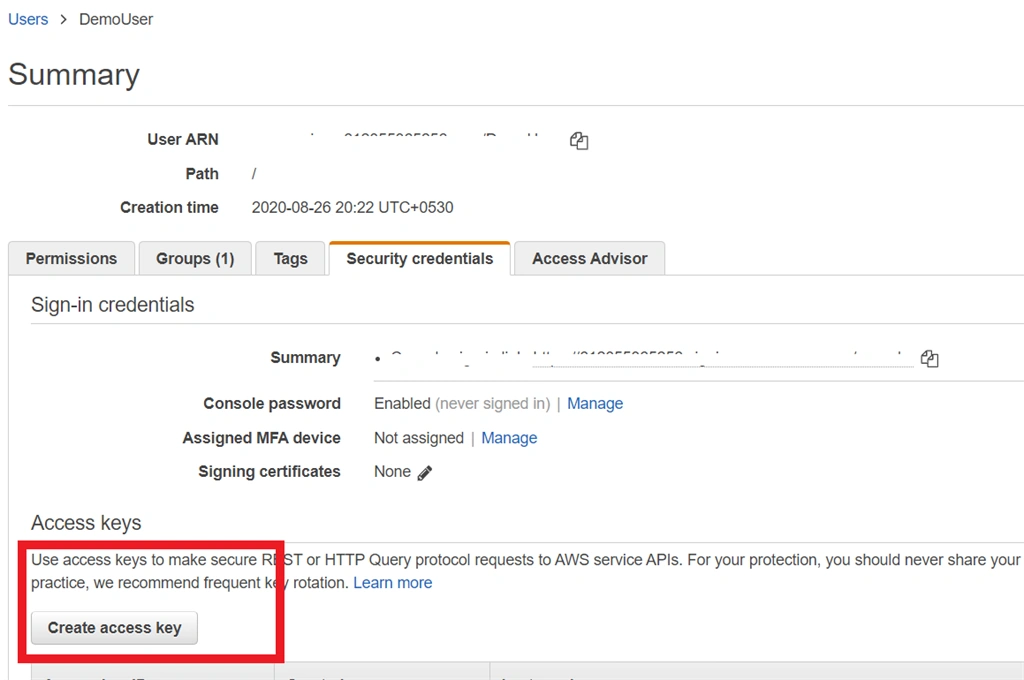
Step J
Then copy “Access key ID”, “Secret access key” and Download .csv for feature use, as per the below screenshot.
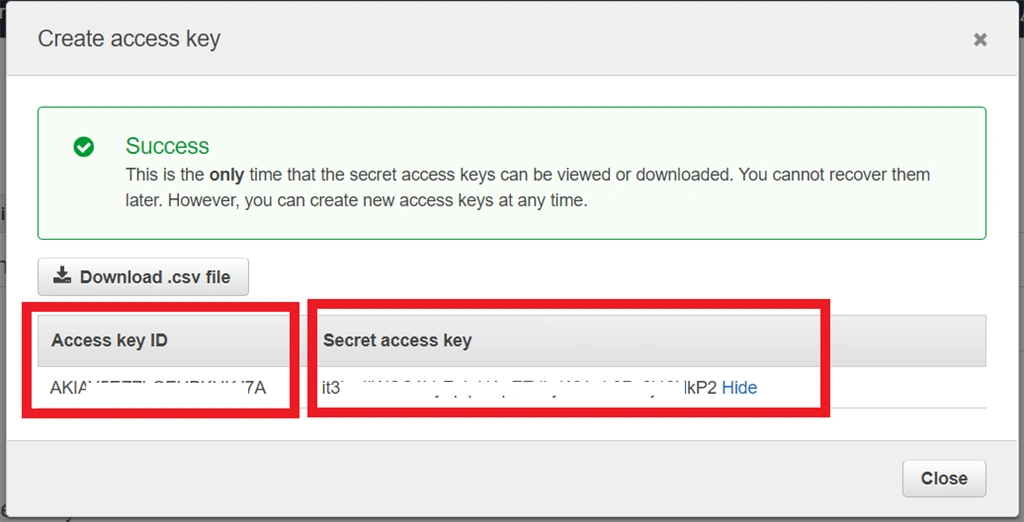
Step K
Now, come back to CMD and run “aws configure” command as per the below screenshot.
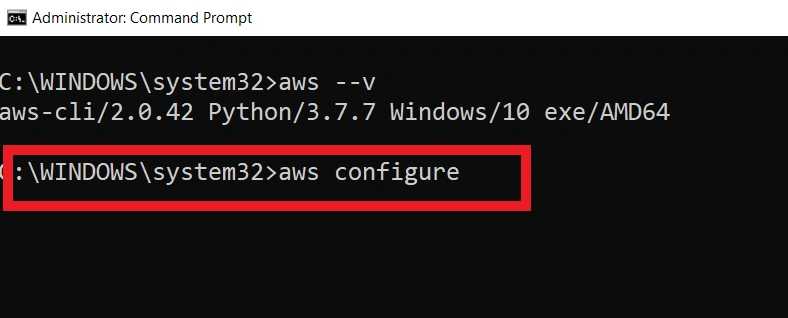
- $ aws configure
- AWS Access Key ID [None]: AKIAIOSFODNN7EXAMPLE
- AWS Secret Access Key [None]: wJalrXUtnFEMI/K7MDENG/bPxRfiCYEXAMPLEKEY
- Default region name [None]: us-west-2
- Default output format [None]: json
Reference Link - https://docs.aws.amazon.com/cli/latest/userguide/cli-configure-files.html
Step L
Open “File Explorer” and go to your user name folder like “C:\Users\UserName” and open the “.aws” folder, as per the below screenshot.
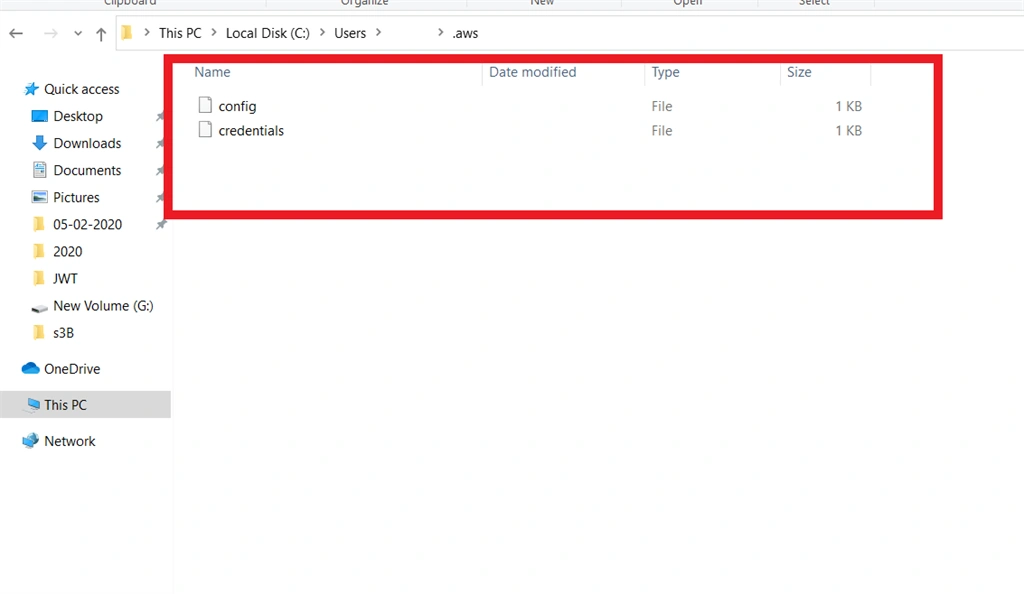
Step 04: Now, we have to create S3 on AWS.
Step A
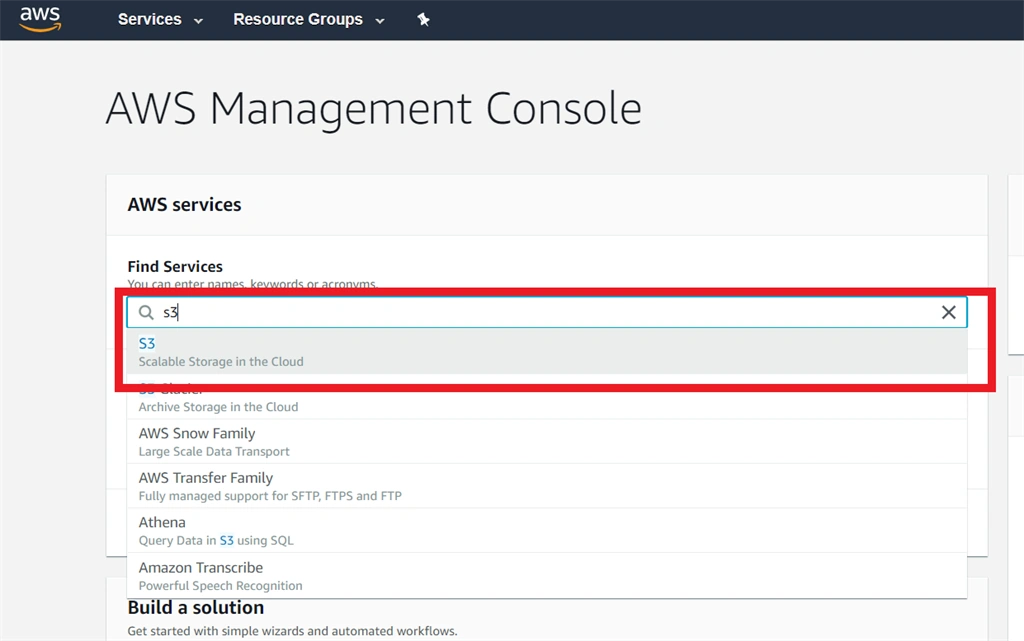
Go to the AWS dashboard and Search s3 in the “Find Services” textbox, as per the below screenshot.
Step B
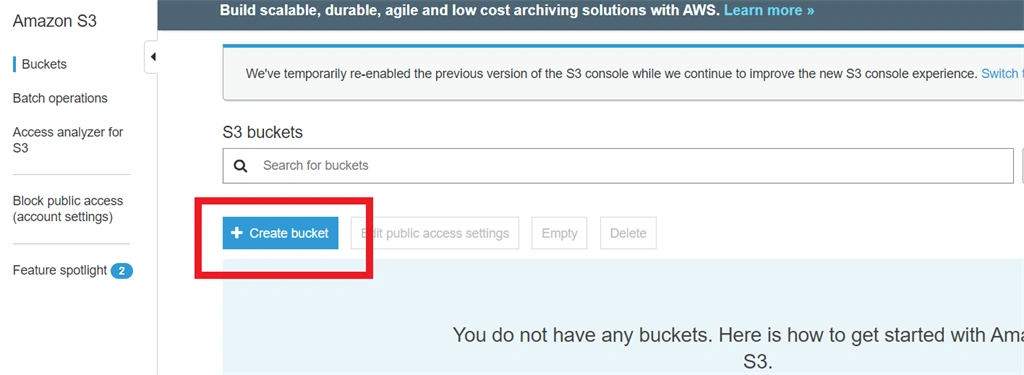
Click on the “Create bucket” button, as per the below screenshot.
Step C
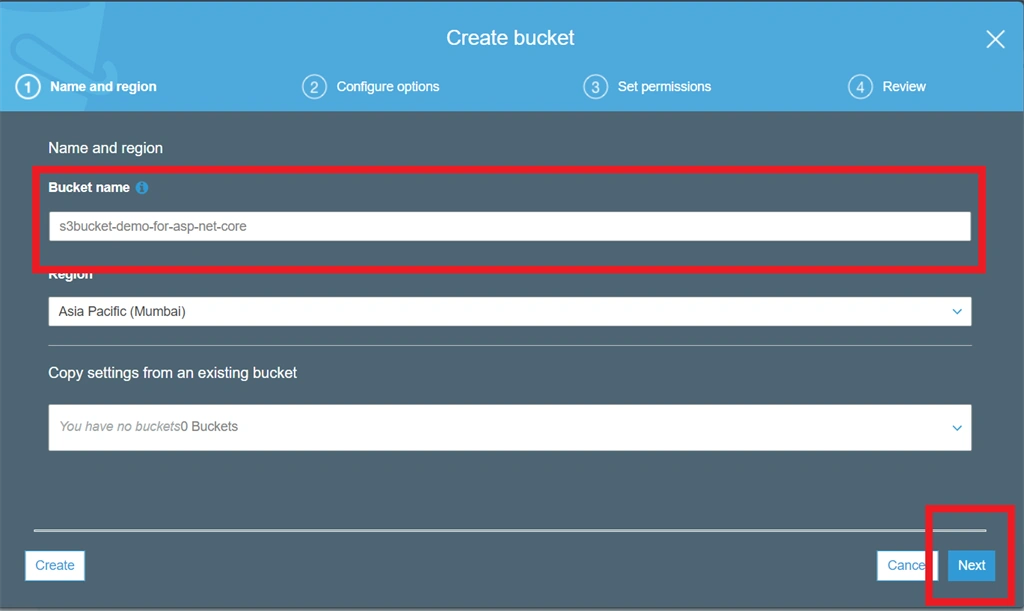
Add “Bucket name” in the “Name and region” tab, as per the below screenshot.
Step D
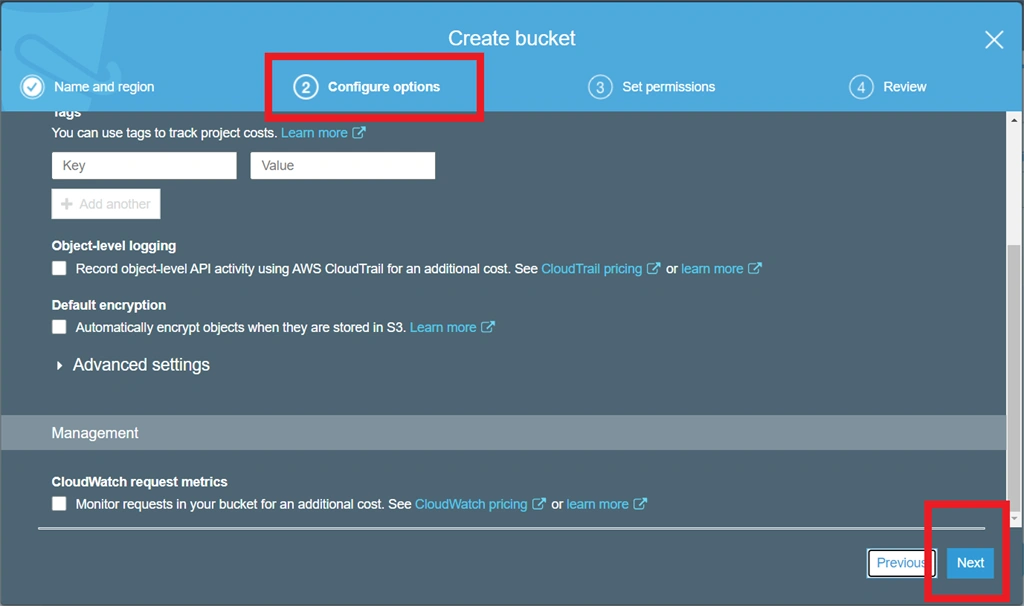
Enable/Disable Configure as per requirement in the “Configure options” tab.
Step E
Set permission as per requirement in the “Set permissions” tab.
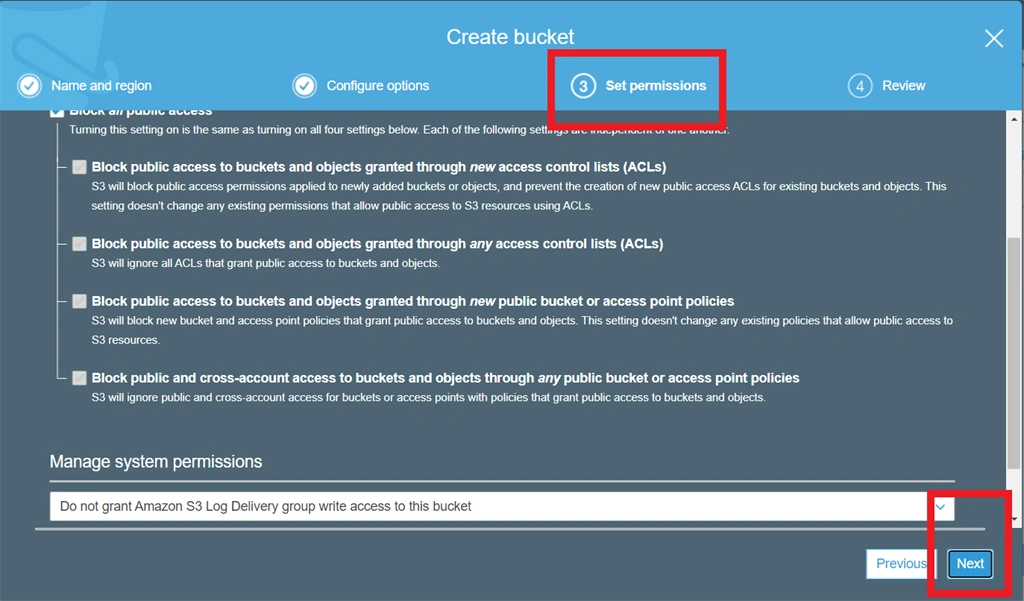
Step F
Then review your bucket configuration in the “Review” tab and click on Create bucket.
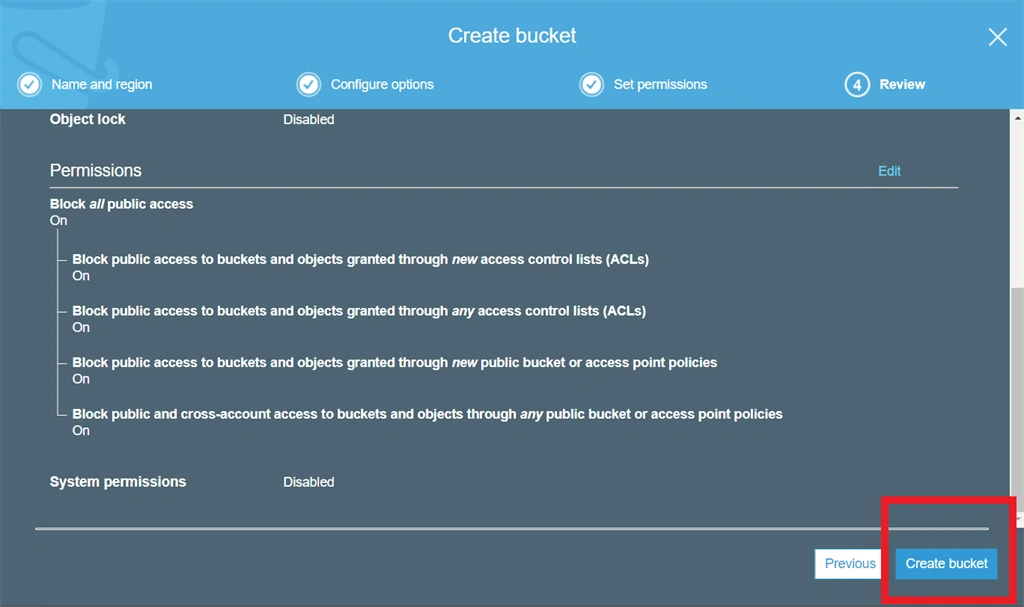
Step G
Then copy your bucket name.
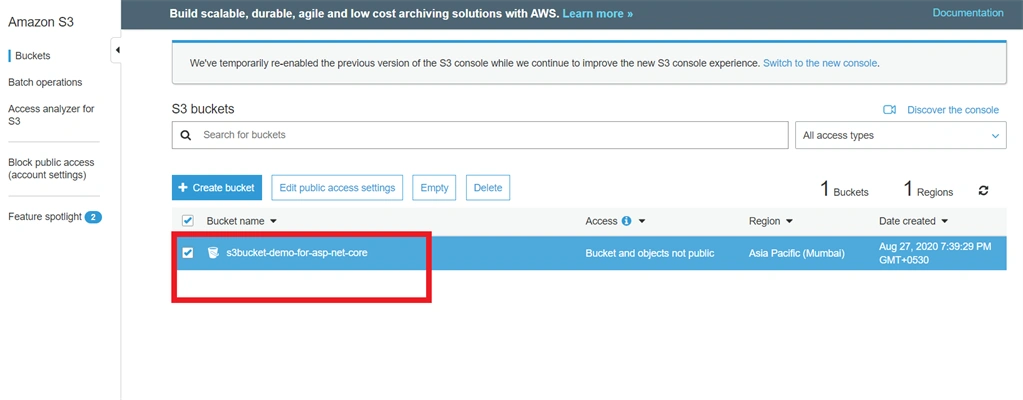
Step 05 - Now we Create Models.
Now, create a directory with the name Models and add the following files:
ServiceConfiguration.cs
EnumModel.cs
Code for ServiceConfiguration.cs file:
- namespace S3bucketDemo.Models
- {
- public class ServiceConfiguration
- {
- public AWSS3Configuration AWSS3 { get; set; }
- }
- public class AWSS3Configuration
- {
- public string BucketName { get; set; }
- }
- }
Code for EnumModel.cs file:
- namespace S3bucketDemo.Models
- {
- public enum UploadFileName
- {
- First = 1,
- Second = 2,
- Third = 3,
- Fourth = 4,
- Fifth = 5,
- }
- }
Step 06 – Update appsettings.Development.json
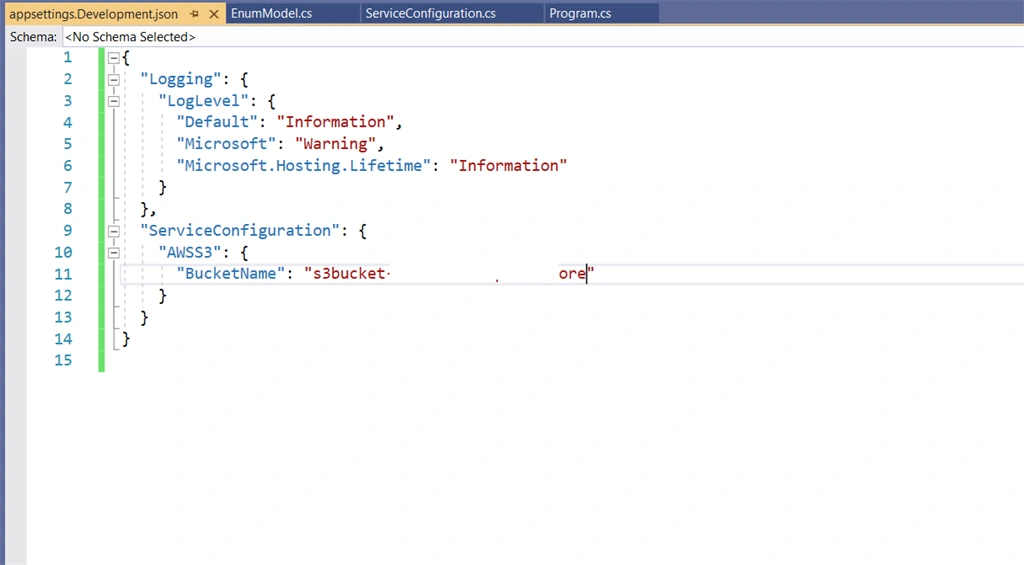
Code for appsettings.Development.json file:
- {
- "Logging": {
- "LogLevel": {
- "Default": "Information",
- "Microsoft": "Warning",
- "Microsoft.Hosting.Lifetime": "Information"
- }
- },
- "ServiceConfiguration": {
- "AWSS3": {
- "BucketName": "*BUCKET_NAME*"
- }
- }
- }
Replace *BUCKET_NAME* with your Bucket Name
Step 07 – Create Helpers
Now, create a directory with the name Helpers and add the following files.
AWSS3BucketHelper.cs:
- using Amazon.S3;
- using Amazon.S3.Model;
- using Microsoft.Extensions.Options;
- using S3bucketDemo.Models;
- using System;
- using System.IO;
- using System.Threading.Tasks;
- namespace S3bucketDemo.Helpers
- {
- public interface IAWSS3BucketHelper
- {
- Task<bool> UploadFile(System.IO.Stream inputStream, string fileName);
- Task<ListVersionsResponse> FilesList();
- Task<Stream> GetFile(string key);
- Task<bool> DeleteFile(string key);
- }
- public class AWSS3BucketHelper : IAWSS3BucketHelper
- {
- private readonly IAmazonS3 _amazonS3;
- private readonly ServiceConfiguration _settings;
- public AWSS3BucketHelper(IAmazonS3 s3Client, IOptions<ServiceConfiguration> settings)
- {
- this._amazonS3 = s3Client;
- this._settings = settings.Value;
- }
- public async Task<bool> UploadFile(System.IO.Stream inputStream, string fileName)
- {
- try
- {
- PutObjectRequest request = new PutObjectRequest()
- {
- InputStream = inputStream,
- BucketName = _settings.AWSS3.BucketName,
- Key = fileName
- };
- PutObjectResponse response = await _amazonS3.PutObjectAsync(request);
- if (response.HttpStatusCode == System.Net.HttpStatusCode.OK)
- return true;
- else
- return false;
- }
- catch (Exception ex)
- {
- throw ex;
- }
- }
- public async Task<ListVersionsResponse> FilesList()
- {
- return await _amazonS3.ListVersionsAsync(_settings.AWSS3.BucketName);
- }
- public async Task<Stream> GetFile(string key)
- {
- GetObjectResponse response = await _amazonS3.GetObjectAsync(_settings.AWSS3.BucketName, key);
- if (response.HttpStatusCode == System.Net.HttpStatusCode.OK)
- return response.ResponseStream;
- else
- return null;
- }
- public async Task<bool> DeleteFile(string key)
- {
- try
- {
- DeleteObjectResponse response = await _amazonS3.DeleteObjectAsync(_settings.AWSS3.BucketName, key);
- if (response.HttpStatusCode == System.Net.HttpStatusCode.NoContent)
- return true;
- else
- return false;
- }
- catch (Exception ex)
- {
- throw ex;
- }
- }
- }
- }
Step 08 – Create Service
Now, create a directory with the name Services and add the following files:
- using Amazon.S3.Model;
- using S3bucketDemo.Helpers;
- using S3bucketDemo.Models;
- using System;
- using System.Collections.Generic;
- using System.IO;
- using System.Linq;
- using System.Threading.Tasks;
- namespace S3bucketDemo.Services
- {
- public interface IAWSS3FileService
- {
- Task<bool> UploadFile(UploadFileName uploadFileName);
- Task<List<string>> FilesList();
- Task<Stream> GetFile(string key);
- Task<bool> UpdateFile(UploadFileName uploadFileName, string key);
- Task<bool> DeleteFile(string key);
- }
- public class AWSS3FileService : IAWSS3FileService
- {
- private readonly IAWSS3BucketHelper _AWSS3BucketHelper;
- public AWSS3FileService(IAWSS3BucketHelper AWSS3BucketHelper)
- {
- this._AWSS3BucketHelper = AWSS3BucketHelper;
- }
- public async Task<bool> UploadFile(UploadFileName uploadFileName)
- {
- try
- {
- var path = Path.Combine("Files", uploadFileName.ToString() + ".png");
- using (FileStream fsSource = new FileStream(path, FileMode.Open, FileAccess.Read))
- {
- string fileExtension = Path.GetExtension(path);
- string fileName = string.Empty;
- fileName = $"{DateTime.Now.Ticks}{fileExtension}";
- return await _AWSS3BucketHelper.UploadFile(fsSource, fileName);
- }
- }
- catch (Exception ex)
- {
- throw ex;
- }
- }
- public async Task<List<string>> FilesList()
- {
- try
- {
- ListVersionsResponse listVersions = await _AWSS3BucketHelper.FilesList();
- return listVersions.Versions.Select(c => c.Key).ToList();
- }
- catch (Exception ex)
- {
- throw ex;
- }
- }
- public async Task<Stream> GetFile(string key)
- {
- try
- {
- Stream fileStream = await _AWSS3BucketHelper.GetFile(key);
- if (fileStream == null)
- {
- Exception ex = new Exception("File Not Found");
- throw ex;
- }
- else
- {
- return fileStream;
- }
- }
- catch (Exception ex)
- {
- throw ex;
- }
- }
- public async Task<bool> UpdateFile(UploadFileName uploadFileName, string key)
- {
- try
- {
- var path = Path.Combine("Files", uploadFileName.ToString() + ".png");
- using (FileStream fsSource = new FileStream(path, FileMode.Open, FileAccess.Read))
- {
- return await _AWSS3BucketHelper.UploadFile(fsSource, key);
- }
- }
- catch (Exception ex)
- {
- throw ex;
- }
- }
- public async Task<bool> DeleteFile(string key)
- {
- try
- {
- return await _AWSS3BucketHelper.DeleteFile(key);
- }
- catch (Exception ex)
- {
- throw ex;
- }
- }
- }
- }
Step 09 – Create Files Folder
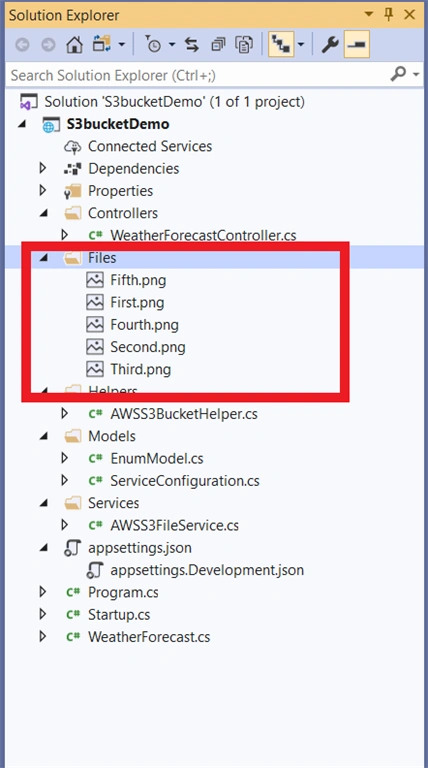
Now, create a directory with the name Files and add random any five “.png” image with “First.png”, “Second.png”, “Third.png”, “Fourth.png” and “Fifth.png” as per the below screenshot.
Step 10 – Update Startup.cs
Code for Startup.cs file:
- using Amazon.S3;
- using Microsoft.AspNetCore.Builder;
- using Microsoft.AspNetCore.Hosting;
- using Microsoft.Extensions.Configuration;
- using Microsoft.Extensions.DependencyInjection;
- using Microsoft.Extensions.Hosting;
- using Microsoft.OpenApi.Models;
- using S3bucketDemo.Helpers;
- using S3bucketDemo.Models;
- using S3bucketDemo.Services;
- namespace S3bucketDemo
- {
- public class Startup
- {
- public Startup(IConfiguration configuration)
- {
- Configuration = configuration;
- }
- readonly string MyAllowSpecificOrigins = "_myAllowSpecificOrigins";
- public IConfiguration Configuration { get; }
- // This method gets called by the runtime. Use this method to add services to the container.
- public void ConfigureServices(IServiceCollection services)
- {
- services.AddControllers();
- var appSettingsSection = Configuration.GetSection("ServiceConfiguration");
- services.AddAWSService<IAmazonS3>();
- services.Configure<ServiceConfiguration>(appSettingsSection);
- services.AddTransient<IAWSS3FileService, AWSS3FileService>();
- services.AddTransient<IAWSS3BucketHelper, AWSS3BucketHelper>();
- services.AddSwaggerGen(c =>
- {
- c.SwaggerDoc("v1", new OpenApiInfo { Title = "My API", Version = "v1" });
- });
- services.AddCors(options =>
- {
- options.AddPolicy(name: MyAllowSpecificOrigins, builder =>
- builder
- .AllowAnyOrigin()
- .AllowAnyMethod()
- .AllowAnyHeader());
- // .AllowCredentials());
- });
- }
- // This method gets called by the runtime. Use this method to configure the HTTP request pipeline.
- public void Configure(IApplicationBuilder app, IWebHostEnvironment env)
- {
- if (env.IsDevelopment())
- {
- app.UseDeveloperExceptionPage();
- }
- app.UseHttpsRedirection();
- app.UseRouting();
- app.UseAuthorization();
- app.UseCors(MyAllowSpecificOrigins);
- // Enable middleware to serve generated Swagger as a JSON endpoint.
- app.UseSwagger();
- // Enable middleware to serve swagger-ui (HTML, JS, CSS, etc.),
- // specifying the Swagger JSON endpoint.
- app.UseSwaggerUI(c =>
- {
- c.SwaggerEndpoint("/swagger/v1/swagger.json", "My API V1");
- });
- app.UseEndpoints(endpoints =>
- {
- endpoints.MapControllers();
- });
- }
- }
- }
Step 11 – Add Controller
Now, add the AWSS3FileController.cs files in the Controllers folder:
Code for AuthController.cs file:
- using Microsoft.AspNetCore.Mvc;
- using S3bucketDemo.Models;
- using S3bucketDemo.Services;
- using System.Threading.Tasks;
- namespace S3bucketDemo.Controllers
- {
- [Produces("application/json")]
- [Route("api/[controller]")]
- [ApiController]
- public class AWSS3FileController : ControllerBase
- {
- private readonly IAWSS3FileService _AWSS3FileService;
- public AWSS3FileController(IAWSS3FileService AWSS3FileService)
- {
- this._AWSS3FileService = AWSS3FileService;
- }
- [Route("uploadFile")]
- [HttpPost]
- public async Task<IActionResult> UploadFileAsync(UploadFileName uploadFileName)
- {
- var result = await _AWSS3FileService.UploadFile(uploadFileName);
- return Ok(new { isSucess = result });
- }
- [Route("filesList")]
- [HttpGet]
- public async Task<IActionResult> FilesListAsync()
- {
- var result = await _AWSS3FileService.FilesList();
- return Ok(result);
- }
- [Route("getFile/{fileName}")]
- [HttpGet]
- public async Task<IActionResult> GetFile(string fileName)
- {
- try
- {
- var result = await _AWSS3FileService.GetFile(fileName);
- return File(result, "image/png");
- }
- catch
- {
- return Ok("NoFile");
- }
- }
- [Route("updateFile")]
- [HttpPut]
- public async Task<IActionResult> UpdateFile(UploadFileName uploadFileName, string fileName)
- {
- var result = await _AWSS3FileService.UpdateFile(uploadFileName, fileName);
- return Ok(new { isSucess = result });
- }
- [Route("deleteFile/{fileName}")]
- [HttpDelete]
- public async Task<IActionResult> DeleteFile(string fileName)
- {
- var result = await _AWSS3FileService.DeleteFile(fileName);
- return Ok(new { isSucess = result });
- }
- }
- }
Step 12 - Running Web API
Now, press F5 to start debugging for the Web API project, if everything is OK, we'll get the following output in the browser.

Now we have to open “/Swagger” to execute the API for upload and read file from the “Files” folder in our solution.
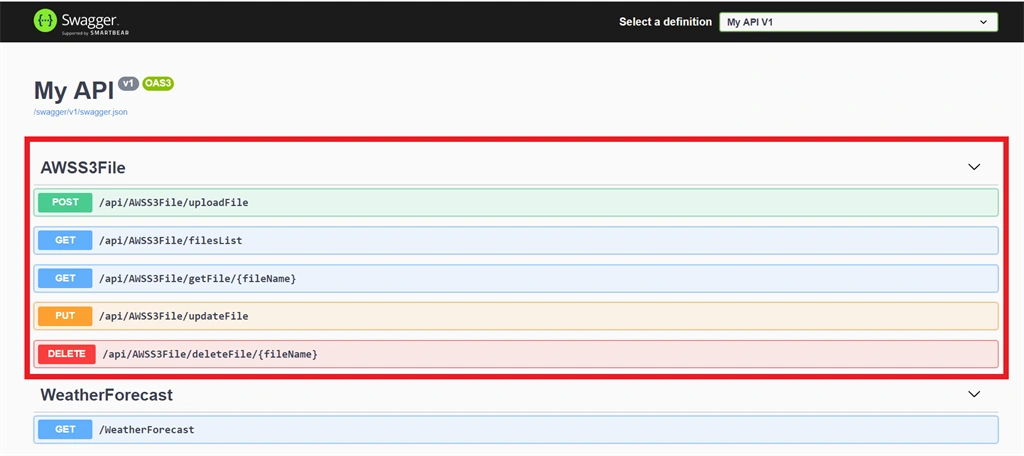
Upload File in AWS S3Bucket
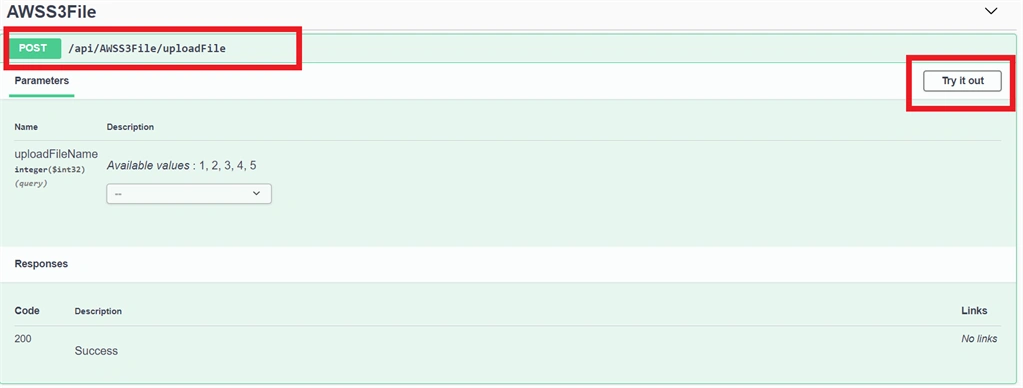
Click on the “/api/AWSS3File/uploadFile” tab and click on the “Try it out” button, as shown in the below screenshot.
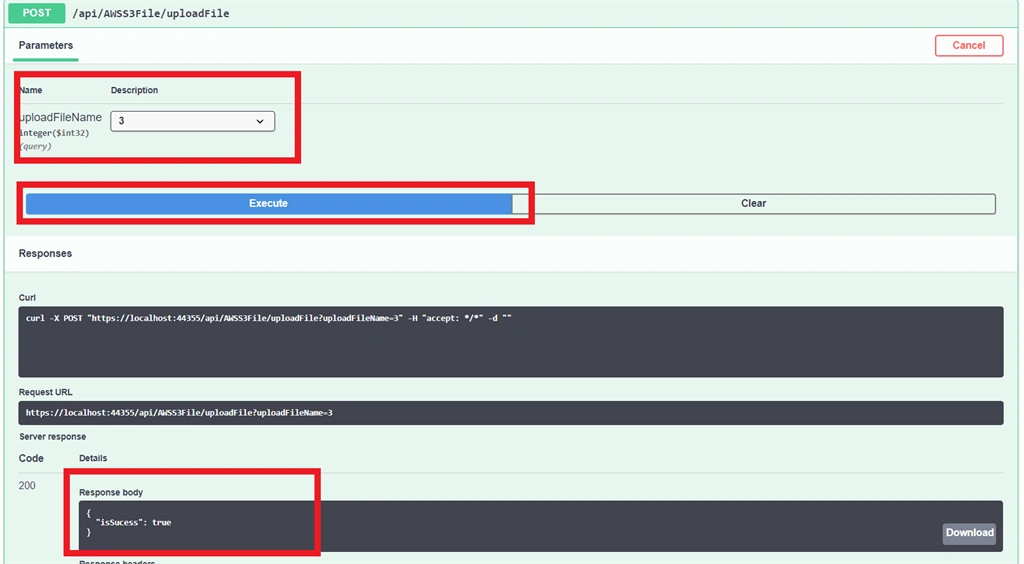
Now select any number in the dropdown and click on the “Execute” button then you can see the API response, as per the below screenshot.
List of Files name in AWS S3Bucket
Click on “/api/AWSS3File/filesList” tab and click on “Try it out” then click on the “Execute” button, then you can see the API response, as per the below screenshot.
Read a file from AWS S3Bucket
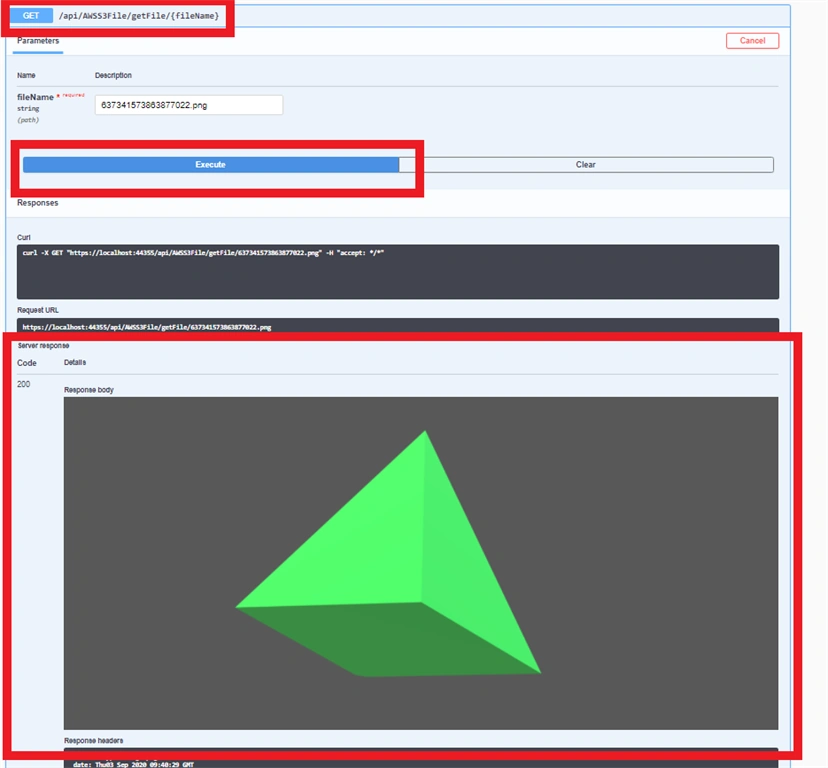
Copy any file name from “/api/AWSS3File/filesList” response and click on “/api/AWSS3File/getFile/{fileName}” tab and click on “Try it out” then past the file name in the text box then click on the “Execute” button then you can see API response, as per below screenshot.
Update File in AWS S3Bucket
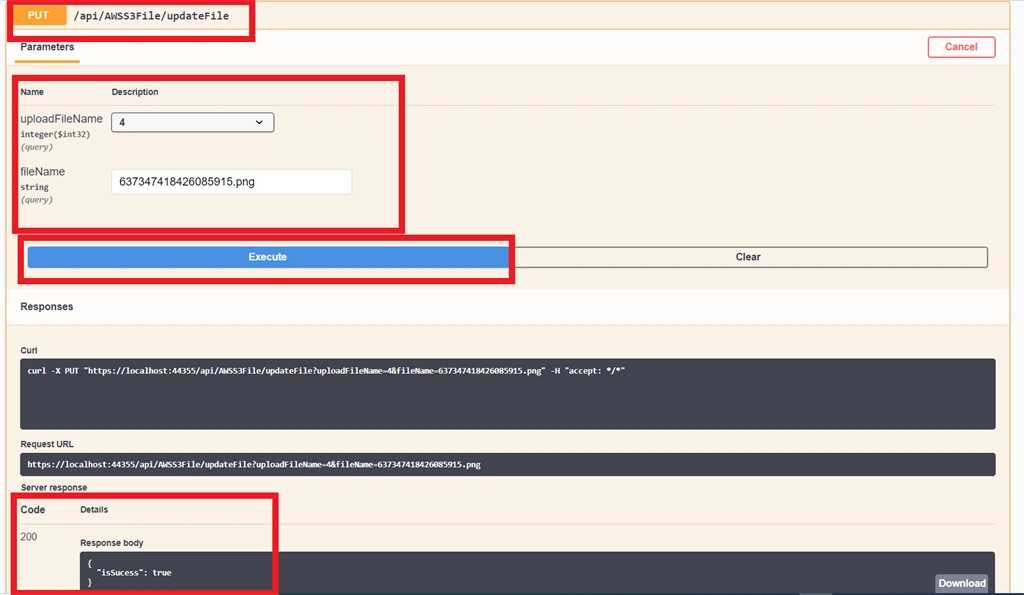
Copy any file name from “/api/AWSS3File/filesList” response and click on “/api/AWSS3File/updateFile” tab and click on “Try it out” then past the file name in the text box then select any number in the dropdown and click on “Execute” button then you can see the API response, as shown in the below screenshot.
Delete File from AWS S3Bucket
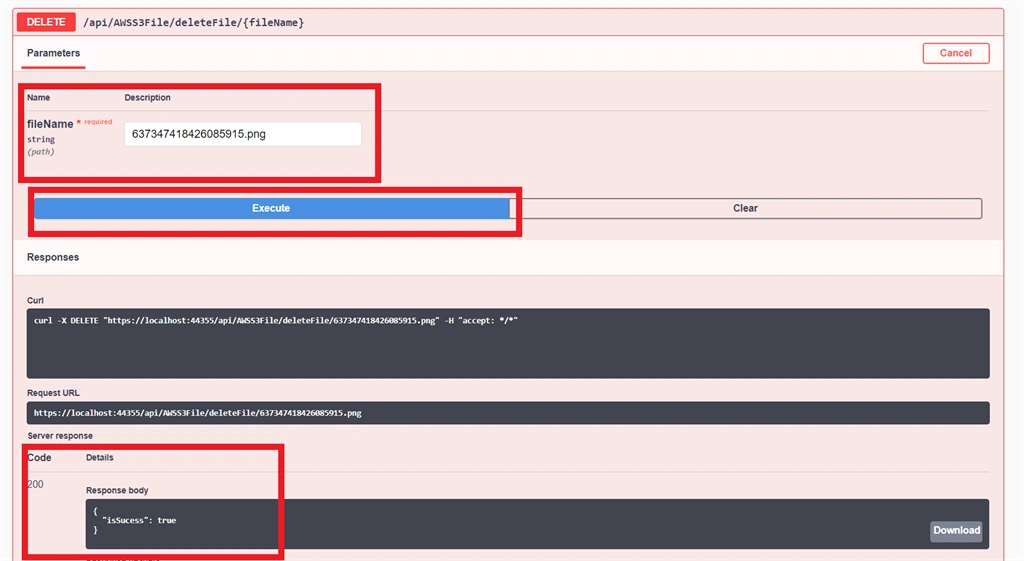
Copy any file name from “/api/AWSS3File/filesList” response and click on “/api/AWSS3File/deleteFile/{fileName}” tab and click on “Try it out” then past the file name in the text box then click on the “Execute” button, then you can see API response as shown in the below screenshot.
Melwyn NPosted Oct 4, 2021, 10:10 AM
I am getting below error. System.Reflection.TargetInvocationException: Exception has been thrown by the target of an invocation. ---> Amazon.Runtime.AmazonClientException: No RegionEndpoint or ServiceURL configured at Amazon.Runtime.ClientConfig.Validate() at Amazon.S3.AmazonS3Config.Validate() at Amazon.Runtime.AmazonServiceClient..ctor(AWSCredentials credentials, ClientConfig config) at Amazon.S3.AmazonS3Client..ctor(AWSCredentials credentials, AmazonS3Config clientConfig) --- End of inner exception stack trace --- at System.RuntimeMethodHandle.InvokeMethod(Object target, Object[] arguments, Signature sig, Boolean constructor, Boolean wrapExceptions) at System.Reflection.RuntimeConstructorInfo.Invoke(BindingFlags invokeAttr, Binder binder, Object[] parameters, CultureInfo culture) at System.Reflection.ConstructorInfo.Invoke(Object[] parameters) at Amazon.Extensions.NETCore.Setup.ClientFactory.CreateClient(Type serviceInterfaceType, AWSCredentials credentials, ClientConfig config) at Amazon.Extensions.NETCore.Setup.ClientFactory.CreateServiceClient(ILogger logger, Type serviceInterfaceType, AWSOptions options) at Amazon.Extensions.NETCore.Setup.ClientFactory.CreateServiceClient(IServiceProvider provider) at Microsoft.Extensions.DependencyInjection.ServiceLookup.CallSiteRuntimeResolver.VisitFactory(FactoryCallSite factoryCallSite, RuntimeResolverContext context) at Microsoft.Extensions.DependencyInjection.ServiceLookup.CallSiteVisitor`2.VisitCallSiteMain(ServiceCallSite callSite, TArgument argument) at Microsoft.Extensions.DependencyInjection.ServiceLookup.CallSiteRuntimeResolver.VisitCache(ServiceCallSite callSite, RuntimeResolverContext context, ServiceProviderEngineScope serviceProviderEngine, RuntimeResolverLock lockType) at Microsoft.Extensions.DependencyInjection.ServiceLookup.CallSiteRuntimeResolver.VisitRootCache(ServiceCallSite singletonCallSite, RuntimeResolverContext context) at Microsoft.Extensions.DependencyInjection.ServiceLookup.CallSiteVisitor`2.VisitCallSite(ServiceCallSite callSite, TArgument argument) at Microsoft.Extensions.DependencyInjection.ServiceLookup.CallSiteRuntimeResolver.VisitConstructor(ConstructorCallSite constructorCallSite, RuntimeResolverContext context) at Microsoft.Extensions.DependencyInjection.ServiceLookup.CallSiteVisitor`2.VisitCallSiteMain(ServiceCallSite callSite, TArgument argument) at Microsoft.Extensions.DependencyInjection.ServiceLookup.CallSiteRuntimeResolver.VisitDisposeCache(ServiceCallSite transientCallSite, RuntimeResolverContext context) at Microsoft.Extensions.DependencyInjection.ServiceLookup.CallSiteVisitor`2.VisitCallSite(ServiceCallSite callSite, TArgument argument) at Microsoft.Extensions.DependencyInjection.ServiceLookup.CallSiteRuntimeResolver.VisitConstructor(ConstructorCallSite constructorCallSite, RuntimeResolverContext context) at Microsoft.Extensions.DependencyInjection.ServiceLookup.CallSiteVisitor`2.VisitCallSiteMain(ServiceCallSite callSite, TArgument argument) at Microsoft.Extensions.DependencyInjection.ServiceLookup.CallSiteRuntimeResolver.VisitDisposeCache(ServiceCallSite transientCallSite, RuntimeResolverContext context) at Microsoft.Extensions.DependencyInjection.ServiceLookup.CallSiteVisitor`2.VisitCallSite(ServiceCallSite callSite, TArgument argument) at Microsoft.Extensions.DependencyInjection.ServiceLookup.CallSiteRuntimeResolver.Resolve(ServiceCallSite callSite, ServiceProviderEngineScope scope) at Microsoft.Extensions.DependencyInjection.ServiceLookup.DynamicServiceProviderEngine.<>c__DisplayClass1_0.<RealizeService>b__0(ServiceProviderEngineScope scope) at Microsoft.Extensions.DependencyInjection.ServiceLookup.ServiceProviderEngine.GetService(Type serviceType, ServiceProviderEngineScope serviceProviderEngineScope) at Microsoft.Extensions.DependencyInjection.ServiceLookup.ServiceProviderEngineScope.GetService(Type serviceType) at Microsoft.Extensions.DependencyInjection.ActivatorUtilities.GetService(IServiceProvider sp, Type type, Type requiredBy, Boolean isDefaultParameterRequired) at lambda_method(Closure , IServiceProvider , Object[] ) at Microsoft.AspNetCore.Mvc.Controllers.ControllerActivatorProvider.<>c__DisplayClass4_0.<CreateActivator>b__0(ControllerContext controllerContext) at Microsoft.AspNetCore.Mvc.Controllers.ControllerFactoryProvider.<>c__DisplayClass5_0.<CreateControllerFactory>g__CreateController|0(ControllerContext controllerContext) at Microsoft.AspNetCore.Mvc.Infrastructure.ControllerActionInvoker.Next(State& next, Scope& scope, Object& state, Boolean& isCompleted) at Microsoft.AspNetCore.Mvc.Infrastructure.ControllerActionInvoker.InvokeInnerFilterAsync() --- End of stack trace from previous location where exception was thrown --- at Microsoft.AspNetCore.Mvc.Infrastructure.ResourceInvoker.<InvokeFilterPipelineAsync>g__Awaited|19_0(ResourceInvoker invoker, Task lastTask, State next, Scope scope, Object state, Boolean isCompleted) at Microsoft.AspNetCore.Mvc.Infrastructure.ResourceInvoker.<InvokeAsync>g__Awaited|17_0(ResourceInvoker invoker, Task task, IDisposable scope) at Microsoft.AspNetCore.Routing.EndpointMiddleware.<Invoke>g__AwaitRequestTask|6_0(Endpoint endpoint, Task requestTask, ILogger logger) at Swashbuckle.AspNetCore.SwaggerUI.SwaggerUIMiddleware.Invoke(HttpContext httpContext) at Swashbuckle.AspNetCore.Swagger.SwaggerMiddleware.Invoke(HttpContext httpContext, ISwaggerProvider swaggerProvider) at Microsoft.AspNetCore.Authorization.AuthorizationMiddleware.Invoke(HttpContext context) at Microsoft.AspNetCore.Diagnostics.DeveloperExceptionPageMiddleware.Invoke(HttpContext context) HEADERS ======= Accept: */* Accept-Encoding: gzip, deflate, br Accept-Language: en-US,en;q=0.9 Connection: close Content-Length: 0 Host: localhost:44377 Referer: https://localhost:44377/swagger/index.html User-Agent: Mozilla/5.0 (Windows NT 10.0; Win64; x64) AppleWebKit/537.36 (KHTML, like Gecko) Chrome/93.0.4577.82 Safari/537.36 sec-ch-ua: "Google Chrome";v="93", " Not;A Brand";v="99", "Chromium";v="93" sec-ch-ua-mobile: ?0 sec-ch-ua-platform: "Windows" origin: https://localhost:44377 sec-fetch-site: same-origin sec-fetch-mode: cors sec-fetch-dest: empty
Paul CabreraPosted Sep 25, 2021, 12:13 AM
Great article, thanks
Valerie SmithPosted Aug 26, 2021, 3:59 PM
I am getting read timeout errors on the sing (FileStream fsSource = new FileStream(path, FileMode.Open, FileAccess.Read) in the upload method any suggestions what could be wrong?
mallesh byriPosted Aug 4, 2021, 3:21 PM
How to pass endregion to IAmazon interace?
k satyanarayanaPosted Apr 22, 2021, 7:24 AM
Hi Rohan Mistry is these APIs Can i test throw Postman?