

In this article I will explain how to bind data and images in a GridView and a ListView; to do so use the following steps.
Step 1
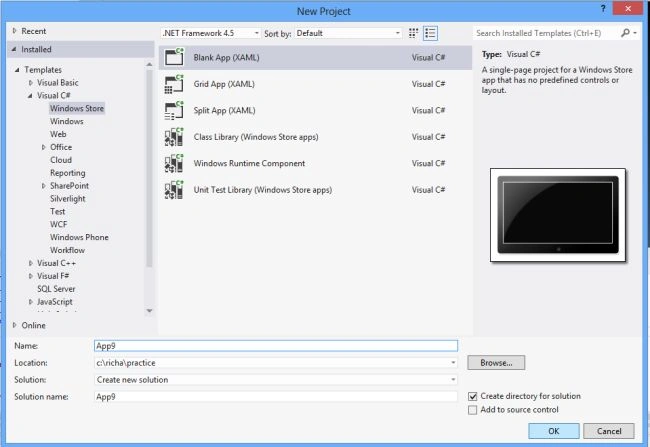
First open Visual Studio 2012 RC and click on the File -> New -> Project. A window appears. In this select Windows Store from the Visual C# left pane and the blank page from the center pane. Then give the name of the project and click ok.
Step 2
Now In the MainPage.xaml file write the code as:
<Page
x:Class="SemanticZoom.MainPage"
xmlns="http://schemas.microsoft.com/winfx/2006/xaml/presentation"
xmlns:x="http://schemas.microsoft.com/winfx/2006/xaml"
xmlns:local="using:SemanticZoom"
xmlns:d="http://schemas.microsoft.com/expression/blend/2008"
xmlns:mc="http://schemas.openxmlformats.org/markup-compatibility/2006"
mc:Ignorable="d">
<Grid>
<Grid.Background>
<LinearGradientBrush EndPoint="0.5,1" StartPoint="0.5,0">
<GradientStop Color="Black"/>
<GradientStop Color="#FF83B4F0" Offset="1"/>
</LinearGradientBrush>
</Grid.Background>
<TextBlock Name="content" Text="Latest Laptops Information" Height="50" Width="350" FontSize="25"HorizontalAlignment="Center" VerticalAlignment="Top"/>
<TextBlock Text="Select any option from the list :" FontSize="15" Margin="50,130,0,0"/>
<ListBox Name="list1" Height="111" Width="304" FontSize="20"SelectionChanged="list1_SelectionChanged" HorizontalAlignment="Left" VerticalAlignment="Top"Margin="50,150,0,0">
<x:String >Select GridView</x:String>
<x:String>Select listView</x:String>
</ListBox>
</Grid>
</Page>
Step 3
Add some images in your project to bind the images.
Step 4
Add Two more blank pages by right-clicking on the project then click Add -> New Item as: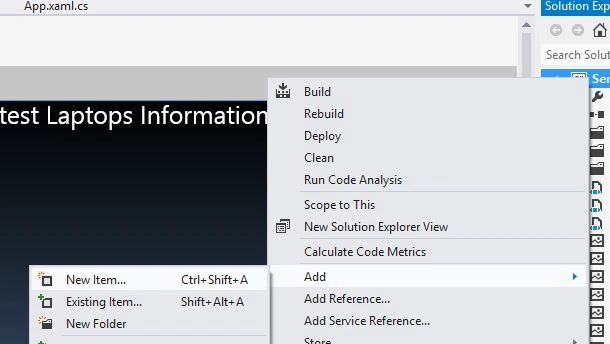
Step 5
A window appears. In this select BlankPage and give the name for the page as you prefer. I didn't change the name and simply left the name as BlankPage1.xaml; see: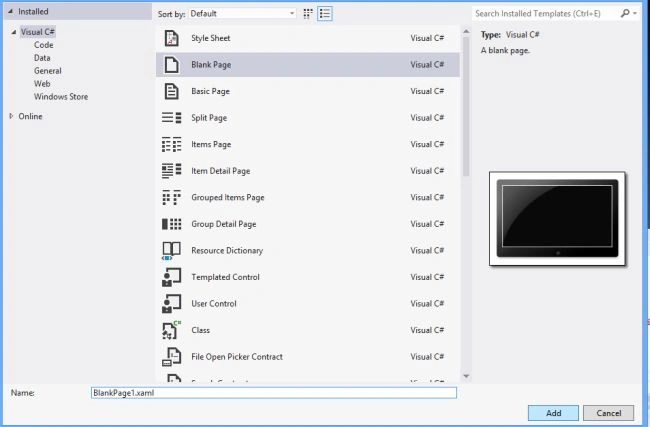
Step 6
Now add the code in the MainPage.xaml.cs file as:
public sealed partial class MainPage : Page
{
public MainPage()
{
this.InitializeComponent();
}
private void list1_SelectionChanged(object sender, SelectionChangedEventArgs e)
{
if (list1.SelectedIndex == 0)
{
this.Frame.Navigate(typeof(BlankPage1));
}
else
{
this.Frame.Navigate(typeof(BlankPage2));
}
}
}
Step 7
Add a class by right-clicking on the project in the Solution Explorer and then click Add -> Class. Give the name of the class that you want to give. Now write the code in this class as:
public string Image_Name { get; set; }
public string Image { get; set; }
public string Description { get; set; }
Step 8
Add the code in the BlankPage1.xaml file as,
<Page
x:Class="SemanticZoom.BlankPage1"
xmlns="http://schemas.microsoft.com/winfx/2006/xaml/presentation"
xmlns:x="http://schemas.microsoft.com/winfx/2006/xaml"
xmlns:local="using:SemanticZoom"
xmlns:d="http://schemas.microsoft.com/expression/blend/2008"
xmlns:mc="http://schemas.openxmlformats.org/markup-compatibility/2006"
mc:Ignorable="d">
<Grid Background="{StaticResource ApplicationPageBackgroundThemeBrush}">
<TextBlock Name="content" Text="Latest Laptops Information" Height="50" Width="350" FontSize="25"HorizontalAlignment="Center" VerticalAlignment="Top"/>
<GridView Name="display" ItemsSource="{Binding}" Foreground="#FFE6D52E" Margin="40,111,56,143" >
<GridView.Background>
<LinearGradientBrush EndPoint="0.5,1" StartPoint="0.5,0">
<GradientStop Color="Black"/>
<GradientStop Color="#FF1A59E2" Offset="1"/>
</LinearGradientBrush>
</GridView.Background>
<GridView.ItemTemplate>
<DataTemplate>
<StackPanel Orientation="Vertical">
<StackPanel.Background>
<LinearGradientBrush EndPoint="0.5,1" StartPoint="0.5,0">
<GradientStop Color="Black"/>
<GradientStop Color="#FF443585" Offset="1"/>
</LinearGradientBrush>
</StackPanel.Background>
<TextBlock Text="{Binding Image_Name}" FontSize="25" Padding="10"/>
<Image Source="{Binding Path=Image}" Height="100" Width="250"/>
<TextBlock Text="{Binding Description}" FontSize="15"/>
</StackPanel>
</DataTemplate>
</GridView.ItemTemplate>
</GridView>
<Button Name="homepage" Height="53" Width="115" Content="BACK" Click="homepage_Click"HorizontalAlignment="Center" Margin="622,685,629,30"/>
</Grid>
</Page>
Step 9
Add the code in BlankPage.xaml.cs file as:
public sealed partial class BlankPage1 : Page
{
public BlankPage1()
{
this.InitializeComponent();
List<Semantic> list = new List<Semantic>()
{
new Semantic{Image_Name="DellInspiran15",Image= "DellInspiran15.jpg", Description="439 - 450 - Dell Inspiron 13 laptop"},
new Semantic{Image_Name="DellInspiran25", Image="DellInspiran25.jpg", Description="295 -295 - dell laptop inspiron 1410"},
new Semantic{Image_Name="DellLaptop24" ,Image="DellLaptop24.jpg", Description="475-361 - NEW DELL 3RD"},
new Semantic{Image_Name="DellStudioNotebook" ,Image="DellStudioNotebook.jpg", Description="544-405 - Laptop Models"},
new Semantic{Image_Name="DellVostro3500" ,Image="DellVostro3500.jpg", Description="500-386 - Dell Vostro 3500"},
new Semantic{Image_Name="DellXPS17Price" ,Image="DellXPS17Price.jpg", Description="400-299 -Dell laptop "},
new Semantic{Image_Name="DellLatestLaptop2011" ,Image="DellLatestLaptop2011.jpg", Description="520-348 - types of laptops models"},
new Semantic{Image_Name="DellStudio17TouchScreen" ,Image="DellStudio17TouchScreen.jpg", Description="500-415 - Dell Studio 17 Touchscreen "},
new Semantic{Image_Name="DigitalClutchLaptop" ,Image="DigitalClutchLaptop.jpg", Description="800-680 - various laptop "},
};
display.DataContext = list;
}
private void homepage_Click(object sender, RoutedEventArgs e)
{
this.Frame.Navigate(typeof(MainPage));
}
}
Step 10
Add the code in the BlankPage2.xaml as:
<Page
x:Class="SemanticZoom.BlankPage2"
xmlns="http://schemas.microsoft.com/winfx/2006/xaml/presentation"
xmlns:x="http://schemas.microsoft.com/winfx/2006/xaml"
xmlns:local="using:SemanticZoom"
xmlns:d="http://schemas.microsoft.com/expression/blend/2008"
xmlns:mc="http://schemas.openxmlformats.org/markup-compatibility/2006"
mc:Ignorable="d">
<Grid Background="{StaticResource ApplicationPageBackgroundThemeBrush}">
<TextBlock Name="content" Text="Latest Laptops Information" Height="50" Width="350" FontSize="25"HorizontalAlignment="Center" VerticalAlignment="Top"/>
<ListView Name="display" ItemsSource="{Binding}" Foreground="#FFE6D52E" Margin="40,111,50,140" >
<ListView.Background>
<LinearGradientBrush EndPoint="0.5,1" StartPoint="0.5,0">
<GradientStop Color="Black"/>
<GradientStop Color="#FF1A59E2" Offset="1"/>
</LinearGradientBrush>
</ListView.Background>
<ListView.ItemTemplate>
<DataTemplate>
<StackPanel Orientation="Vertical">
<StackPanel.Background>
<LinearGradientBrush EndPoint="0.5,1" StartPoint="0.5,0">
<GradientStop Color="Black"/>
<GradientStop Color="#FF443585" Offset="1"/>
</LinearGradientBrush>
</StackPanel.Background>
<TextBlock Text="{Binding Image_Name}" FontSize="25" Padding="10"/>
<Image Source="{Binding Path=Image}" Height="100" Width="250"/>
<TextBlock Text="{Binding Description}" FontSize="15"/>
</StackPanel>
</DataTemplate>
</ListView.ItemTemplate>
</ListView>
<Button Name="homepage" Height="53" Width="115" Content="BACK" Click="homepage_Click"HorizontalAlignment="Center" Margin="622,685,629,30"/>
</Grid>
</Page>
Step 11
Add the code in the BlankPage2.xaml.cs file as:
public sealed partial class BlankPage2 : Page
{
public BlankPage2()
{
this.InitializeComponent();
List<Semantic> list = new List<Semantic>()
{
new Semantic{Image_Name="DellInspiran15",Image= "DellInspiran15.jpg", Description="439-450 - Dell Inspiron 13 laptop"},
new Semantic{Image_Name="DellInspiran25", Image="DellInspiran25.jpg", Description="295-295 - dell laptop inspiron 1410"},
new Semantic{Image_Name="DellLaptop24" ,Image="DellLaptop24.jpg", Description="475-361 - NEW DELL 3RD"},
new Semantic{Image_Name="DellStudioNotebook" ,Image="DellStudioNotebook.jpg", Description="544-405 - Laptop Models"},
new Semantic{Image_Name="DellVostro3500" ,Image="DellVostro3500.jpg", Description="500-386 - Dell Vostro 3500"},
new Semantic{Image_Name="DellXPS17Price" ,Image="DellXPS17Price.jpg", Description="400-299 -Dell laptop "},
new Semantic{Image_Name="DellLatestLaptop2011" ,Image="DellLatestLaptop2011.jpg", Description="520-348 - types of laptops models"},
new Semantic{Image_Name="DellStudio17TouchScreen" ,Image="DellStudio17TouchScreen.jpg", Description="500- 415 - Dell Studio 17 Touchscreen "},
new Semantic{Image_Name="DigitalClutchLaptop" ,Image="DigitalClutchLaptop.jpg", Description="800-680 - various laptop "},
};
display.DataContext = list;
}
private void homepage_Click(object sender, RoutedEventArgs e)
{
this.Frame.Navigate(typeof(MainPage));
}
}
Step 12
Now run the application by pressing F5. The first screen that you see in your output looks like: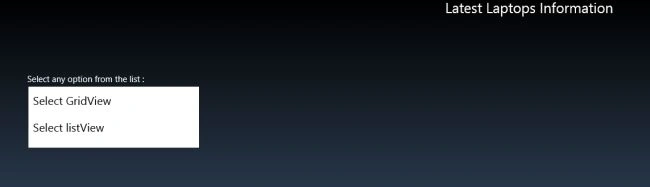
When we select the first option (that is select GridView) the output looks like:
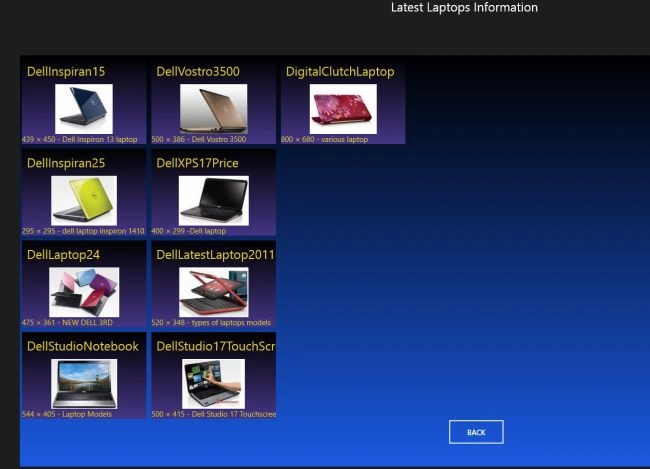
Then when go back and select the second option (that is select ListView) the output and image binding in the ListView looks like: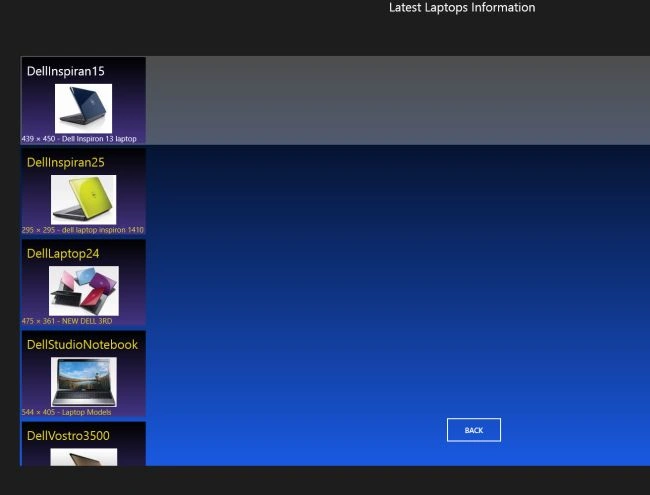
Summary
In this article I will explain how to Bind the Images in the ListView and the GridView.
devdatt chavdaPosted Mar 29, 2018, 7:10 AM
Thank you very much...it work propare..
Nate HPosted Jan 9, 2013, 7:09 PM
What if I have the user add a picture that would be added to the listview? What would that be like? Thanks!
kiran kPosted Nov 29, 2012, 8:19 AM
How can i get navigated to details page and load that laptop details if i clicked any laptop in aboove app