

This article explains how to create an image gallery in ASP.NET using the FileUpload control and a DataList.
I have designed the form and added the following two controls:
- Fileupload control: control to upload the image file to a folder and the information is saved into a SQL Server database table.
- DataList: to display the image in a repeating column row.
The following is the step-by-step procedure to create an Image Gallery in ASP.NET C# using a FileUpload control and a DataList.
Step 1: Create a table in your database as below:
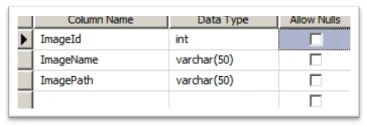
The Image id is the identity column.
Step 2: Design the form as follows:
- <%@ Page Language="C#" AutoEventWireup="true" CodeBehind="ImageGallery.aspx.cs" Inherits="Image_Library.ImageGallery" %>
- <!DOCTYPE html PUBLIC "-//W3C//DTD XHTML 1.0 Transitional//EN" "http://www.w3.org/TR/xhtml1/DTD/xhtml1-transitional.dtd">
- <html xmlns="http://www.w3.org/1999/xhtml">
- <head runat="server">
- <title></title>
- </head>
- <body>
- <form id="form1" runat="server">
- <div>
- <table>
- <tr>
- <td colspan="3">
- <h2>
- Image Gallery</h2>
- </td>
- </tr>
- <tr>
- <td>
- Upload Image
- </td>
- <td>
- <asp:FileUpload ID="imgFileUpload" runat="server" />
- </td>
- <td>
- <asp:Button ID="btnUpload" runat="server" Text="Upload" OnClick="btnUpload_Click" />
- </td>
- </tr>
- </table>
- </div>
- <div id="divImageList" runat="server">
- <asp:DataList ID="dtListImageGallery" runat="server" RepeatColumns="3" RepeatDirection="Horizontal"
- Width="50%" BorderColor="#336699" BorderStyle="Solid" BorderWidth="2px">
- <ItemTemplate>
- <asp:Label ID="Label1" runat="server" Text='<%# Eval("ImageName") %>' Font-Bold="True"
- Font-Size="10pt" ForeColor="#336699" Width="100%" />
- <br />
- <asp:Image Width="100" ID="imgGallery" ImageUrl='<%# Bind("ImagePath", "~/ImageGallery/{0}") %>'
- runat="server" />
- </ItemTemplate>
- <ItemStyle HorizontalAlign="Center" VerticalAlign="Top" />
- </asp:DataList>
- </div>
- </form>
- </body>
- </html>
Step 3: Add the following code on the click of the button.
- SqlConnection conn = new SqlConnection(@"Data Source=.\sqlexpress;Initial Catalog=LMS;Integrated Security=True");
- if (imgFileUpload.PostedFile != null)
- {
- string imagename = Path.GetFileName(imgFileUpload.PostedFile.FileName);
- imagename = imagename.Split('.')[0].ToString();
- string pathname;
- pathname = Server.MapPath("~\\ImageGallery\\") + DateTime.Now.ToString("ddMMyyhhmmsstt") + imgFileUpload.FileName;
- imgFileUpload.PostedFile.SaveAs(pathname);
- try
- {
- conn.Open();
- string insquery = "Insert into MyImageGallery(ImageName,ImagePath) values('" + imagename + "','"+DateTime.Now.ToString("ddMMyyhhmmsstt") + imgFileUpload.FileName.ToString() + "')";
- SqlCommand cmd = new SqlCommand(insquery, conn);
- cmd.ExecuteNonQuery();
- conn.Close();
- BindDataList();
- }
- catch (Exception ex)
- {
- Response.Write(ex.Message);
- }
- }
Step 4: Call a method BindDataList on page load and write the following code inside the method:
- private void BindDataList()
- {
- SqlConnection conn = new SqlConnection(@"Data Source=.\sqlexpress;Initial Catalog=LMS;Integrated Security=True");
- conn.Open();
- sqlda = new SqlDataAdapter("SELECT * FROM MyImageGallery", conn);
- dt = new DataTable();
- sqlda.Fill(dt);
- sqlda.Dispose();
- dtListImageGallery.DataSource = dt;
- dtListImageGallery.DataBind();
- conn.Close();
- }
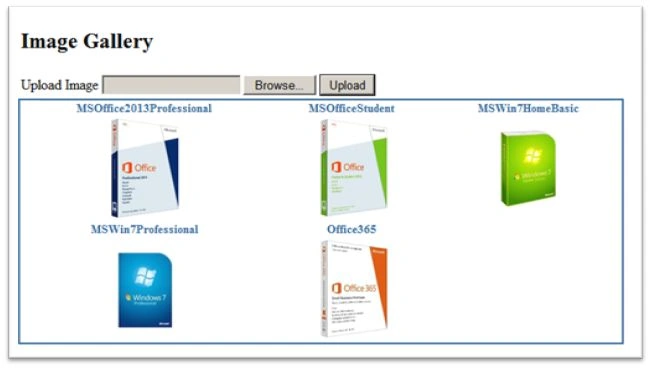
Step 5: Run the application, the Image gallery will be shown as below:
Conclusion
In this article, I explained how to design and develop the image gallery in ASP.NET C#.
Join the conversation! Your thoughts help the community grow.