

In this example we will store employee information with an employee image preview and display the inserted employee information with PhotoID in GridView.
Now to start this example step-by-step.
Step 1
This is the database side.
First create an EmployeeImage table in the SQL database as in the following.
- create Table EmployeeImage
- (
- ImageId int identity(1,1), --- make auto increment id
- ImgName nvarchar(50),
- Photo image,
- Contact nvarchar(15),
- Designation varchar(50)
- )
Go to Visual Studio.
Step 3
This is the Page Design.
Here open your project and add a new .aspx page as in the following.
Now right-click on your project name and add a new item to the project.
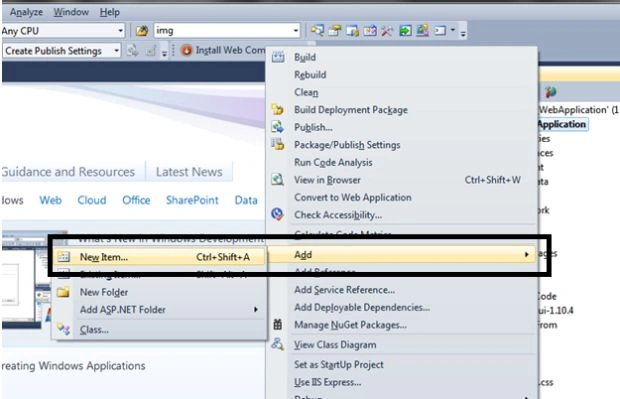
Figure 1: Add New Item
Click on new item and add a new webform and provide a suitable name as follows:
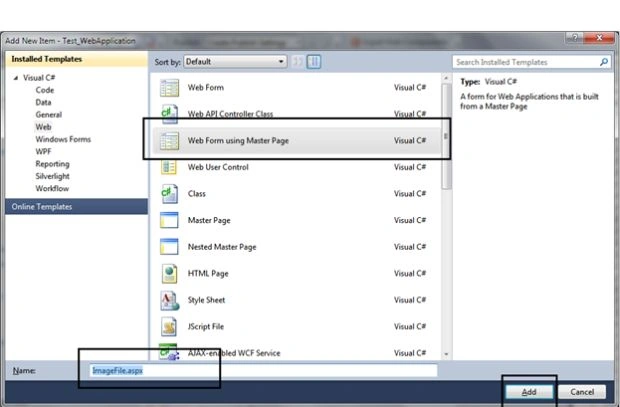
Figure 2: Add Design Page
First write the image upload and display the preview code using the jQuery function as in the following:
- <script type="text/javascript">
- function previewFile() {
- var ImagePreview = document.querySelector('#<%=ImgUpload.ClientID %>');
- var ImageFile = document.querySelector('#<%=FileUpload.ClientID %>').files[0];
- var reader = new FileReader();
- reader.onloadend = function () {
- ImagePreview.src = reader.result;
- }
- if (ImageFile) {
- reader.readAsDataURL(ImageFile);
- } else {
- ImagePreview.src = "";
- }
- }
- </script>
- <div>
- <fieldset style="width: 490px"><legend>Employee Information With PhotoID</legend>
- <asp:Table runat="server" Width="442px" >
- <asp:TableRow>
- <asp:TableCell></asp:TableCell><asp:TableCell><asp:Image ID="ImgUpload" ToolTip="Upload Employee Photo Here" runat="server" Height="200px" Width="200px" /></asp:TableCell>
- </asp:TableRow>
- <asp:TableRow>
- <asp:TableCell> Upload Image:</asp:TableCell><asp:TableCell> <input ID="FileUpload" type="file" name="file" onchange="previewFile()" runat="server" /></asp:TableCell>
- </asp:TableRow>
- <asp:TableRow>
- <asp:TableCell>Employee Name:</asp:TableCell><asp:TableCell><asp:TextBox ID="txtName" runat="server"></asp:TextBox> </asp:TableCell>
- </asp:TableRow>
- <asp:TableRow>
- <asp:TableCell>Contact</asp:TableCell><asp:TableCell><asp:TextBox ID="txtContact" runat="server" ></asp:TextBox></asp:TableCell>
- </asp:TableRow>
- <asp:TableRow>
- <asp:TableCell>Designation</asp:TableCell><asp:TableCell><asp:TextBox ID="txtDesignation" runat="server" ></asp:TextBox></asp:TableCell>
- </asp:TableRow>
- <asp:TableRow>
- <asp:TableCell></asp:TableCell><asp:TableCell><asp:Button ID="btnDataInsert" runat="server" Text="SUBMIT" onclick="btnDataInsert_Click" /></asp:TableCell>
- </asp:TableRow>
- </asp:Table>
- </fieldset>
- </div>
- <div>
- <asp:GridView ID="GridEmpImg" runat="server" AutoGenerateColumns="False">
- <Columns>
- <asp:TemplateField HeaderText="Image">
- <ItemTemplate>
- <asp:Image ID="Image1" runat="server" ImageUrl='<%# "DisplayImage.ashx?ImageId="+ Eval("ImageId") %>' Height="150px" Width="150px"/>
- </ItemTemplate>
- </asp:TemplateField>
- <asp:BoundField HeaderText = "Employee Name" DataField="imgname" />
- <asp:BoundField HeaderText = "Contact" DataField="Contact" />
- <asp:BoundField HeaderText = "Designation" DataField="Designation" />
- </Columns>
- </asp:GridView>
- </div>
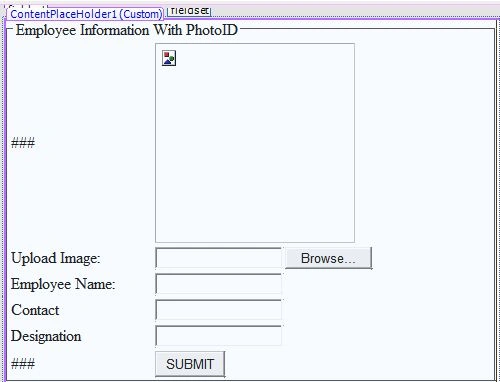
Figure 3: UI Design
Step 4
Add a Connection String in the web.config file as in the following:
- <connectionStrings>
- <add name="connstr" connectionString="Data Source=RAKESH-PC;Initial Catalog=SqlServerTech;User ID=sa;Password=jm" providerName="System.Data.SqlClient"/>
- <add name="Pratical_testConnectionString" connectionString="Data Source=RAKESH-PC;Initial Catalog=Pratical_test;User ID=sa" providerName="System.Data.SqlClient"/>
- </connectionStrings>
This is the Page code.
In this section we will write the image upload code, insert code and select employee information with PhotoId code using a generic file method HttpHandler as follows:
- using System;
- using System.Collections.Generic;
- using System.Linq;
- using System.Web;
- using System.Web.UI;
- using System.Web.UI.WebControls;
- using System.Configuration;
- using System.Data.SqlClient;
- using System.Data;
- using System.IO;
- namespace Test_WebApplication.ImageCode
- {
- public partial class ImageDemo : System.Web.UI.Page
- {
- string constring = ConfigurationManager.ConnectionStrings["connstr"].ConnectionString;
- protected void Page_Load(object sender, EventArgs e)
- {
- EmpImageInfo();
- }
- protected void Upload(object sender, EventArgs e)
- {
- string fileName = FileUpload.PostedFile.FileName;
- }
- protected void btnDataInsert_Click(object sender, EventArgs e)
- {
- int length = FileUpload.PostedFile.ContentLength;
- byte[] imgbyte = new byte[length];
- HttpPostedFile image = FileUpload.PostedFile;
- image.InputStream.Read(imgbyte, 0, length);
- string ImgName = txtName.Text;
- string Contact = txtContact.Text;
- string Designation = txtDesignation.Text;
- SqlConnection conn = new SqlConnection(constring);
- conn.Open();
- SqlCommand cmd = new SqlCommand("INSERT INTO EmployeeImage (ImgName,photo,Contact,Designation) VALUES (@ImgName,@photo,@Contact,@Designation)", conn);
- cmd.Parameters.Add("@ImgName", SqlDbType.VarChar, 50).Value = ImgName;
- cmd.Parameters.Add("@photo", SqlDbType.Image).Value = imgbyte;
- cmd.Parameters.Add("@Contact", SqlDbType.NVarChar, 15).Value = Contact;
- cmd.Parameters.Add("@Designation", SqlDbType.VarChar, 50).Value = Designation;
- int count = cmd.ExecuteNonQuery();
- conn.Close();
- if (count == 1)
- {
- EmpImageInfo();
- ScriptManager.RegisterStartupScript(this, this.GetType(), "alertmessage", "javascript:alert('" + ImgName + " PhotoID Information Inserted successfully')", true);
- }
- txtName.Text = string.Empty;
- txtContact.Text = string.Empty;
- txtDesignation.Text = string.Empty;
- }
- private void EmpImageInfo()
- {
- SqlConnection conn = new SqlConnection(constring);
- SqlCommand cmd = new SqlCommand("SELECT ImageId, ImgName,Photo,Contact,Designation from EmployeeImage", conn);
- SqlDataAdapter da = new SqlDataAdapter(cmd);
- DataTable dt = new DataTable();
- da.Fill(dt);
- GridEmpImg.DataSource = dt;
- GridEmpImg.DataBind();
- }
- }
- }
Add a .ashx.cs file to the project.
Now add one more important file, a generic handler, to the project for the image display in the GridView as follows:
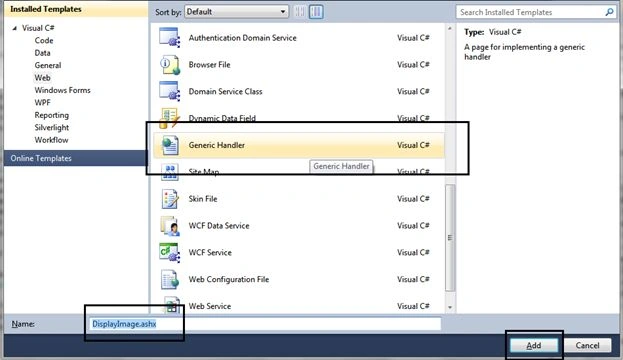
Figure 4: Add Generic File
Now write the generic handler code to display the image from the database as in the following:
- using System;
- using System.Collections.Generic;
- using System.Linq;
- using System.Web;
- using System.Configuration;
- using System.Data.SqlClient;
- using System.IO;
- using System.Data;
- namespace Test_WebApplication.ImageCode
- {
- public class DisplayImage : IHttpHandler
- {
- string constring = ConfigurationManager.ConnectionStrings["connstr"].ConnectionString;
- public void ProcessRequest(HttpContext context)
- {
- string ImageId = context.Request.QueryString["ImageId"];
- SqlConnection conn = new SqlConnection(constring);
- conn.Open();
- SqlCommand cmd = new SqlCommand("select Photo from EmployeeImage where ImageId=" + ImageId, conn);
- SqlDataReader dr = cmd.ExecuteReader();
- dr.Read();
- context.Response.BinaryWrite((Byte[])dr[0]);
- conn.Close();
- context.Response.End();
- }
- public bool IsReusable
- {
- get
- {
- return false;
- }
- }
- }
- }
Run the code in a browser by pressing F5.
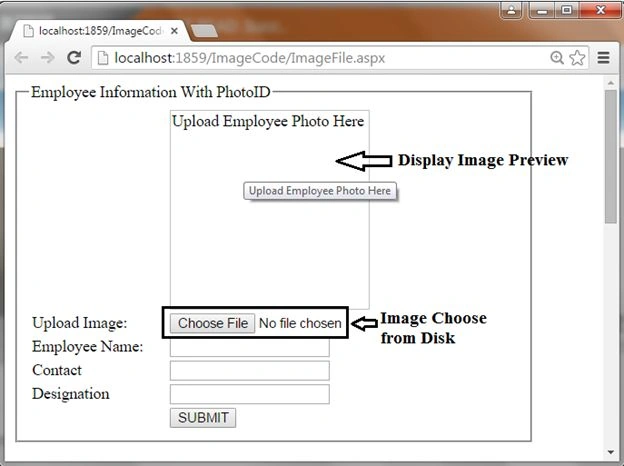
Figure 5: UI on Browser
Choose an image file from disk.
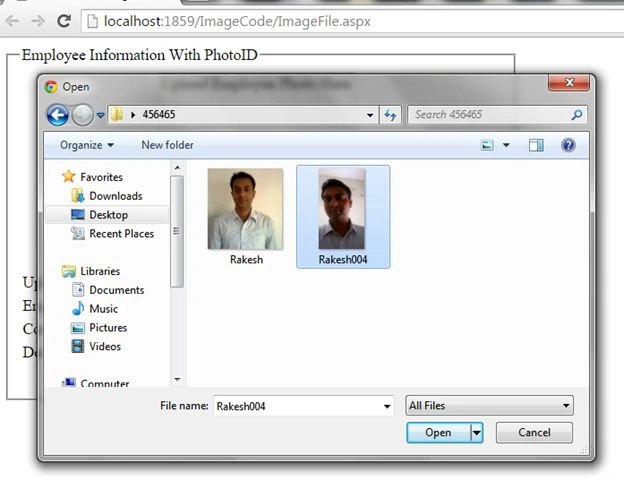
Figure 6: Choose file from disk
Showing the image preview as follows:
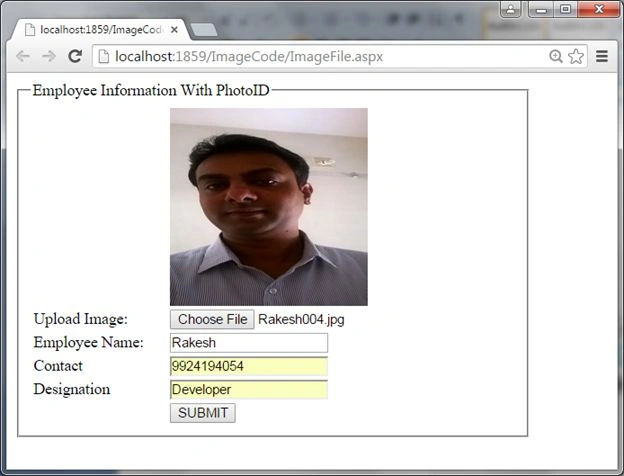
Figure 7: Image Preview
Now click the submit button and you will get a record insert message in a dialog box as in the following:

Figure 8: Message Display
The inserted employee record is shown in the GridView control.
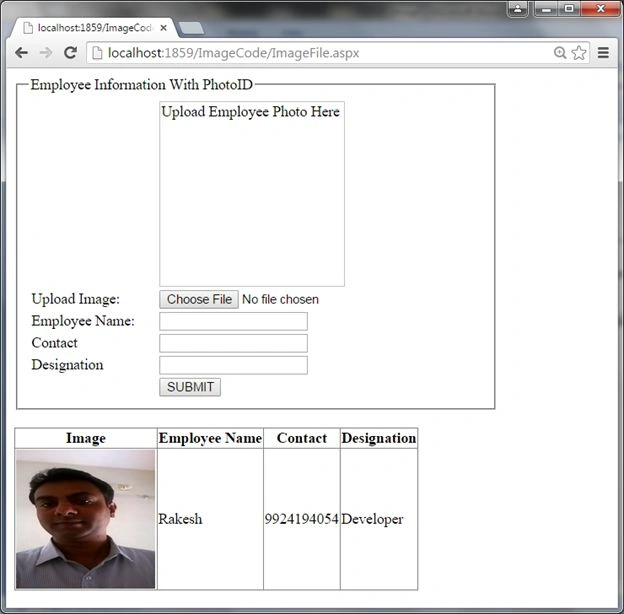
Figure 9: Inserted Record Display
Also check in the database table as in the following:
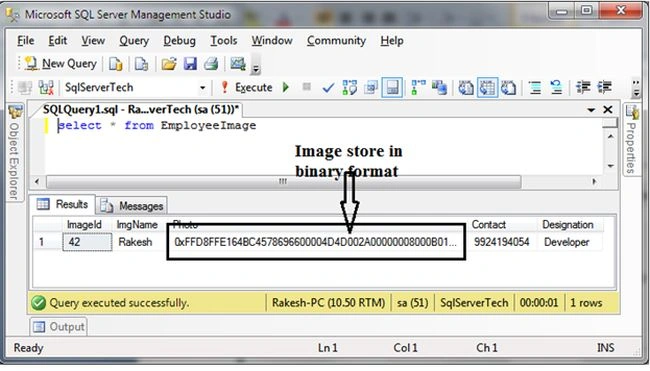
Figure 10:
In the preceding figure you can see that the image was stored in binary data format.
Asif RehmanPosted Jul 17, 2018, 2:23 PM
What is the purpose of handler...the application is running without calling it.
Former memberPosted Jul 11, 2015, 3:17 AM
this is really good for fresher like me. thank you sir thank you very much
Sibeesh VenuPosted Jul 8, 2015, 12:44 AM
Good One! Thanks for sharing
Nilesh JadavPosted Jul 8, 2015, 12:25 AM
Nice one sir
Neeraj KumarPosted Jul 7, 2015, 4:11 PM
Nice..
Gopi ChandPosted Jul 7, 2015, 3:59 PM
Yeah..its good one
Santhakumar MunuswamyPosted Jul 7, 2015, 2:56 PM
Good Article! Thanks for sharing
Debasis SahaPosted Jul 7, 2015, 11:28 AM
Good one
Suraj SahooPosted Jul 7, 2015, 8:24 AM
Good Article. Keep it up..:)
Sibeesh VenuPosted Jul 7, 2015, 7:15 AM
Good One.
Gowtham RajamanickamPosted Jul 7, 2015, 6:26 AM
nice blog
Gowtham RajamanickamPosted Jul 7, 2015, 6:25 AM
good one..