

Client side rendering was introduced in SharePoint 2013. The primary purpose of CSR is to provide the conditional formatting of the data present within the list views. Prior to SharePoint 2013, XSLT formatting was the way to go in order to implement the conditional formatting of the list views. XSLT formatting requires an in-depth knowledge of working with XSL and debugging was also cumbersome. However, with CSR, we can tap in to the rendering process and override some of the default properties of the list view, using JavaScript. Some of the properties that can be overridden are:
- OnPreRender
- OnPostRender
- View
- Body
- Item
- Fields
- Header
- Footer
Let’s see how to implement CSR in the list view to create a Key Performance Indicator (KPI).
Requirement
Assign KPI to a list column, based on a condition; i.e., comparing two other columns in the same list.

The main purpose of the Client side rendering is to tap in to the rendering process. The entry point is the function, shown below:
- SPClientTemplates.TemplateManager.RegisterTemplateOverrides(overrideCurrentContext);
- (function()
- {
- varoverrideCurrentContext = {};
- overrideCurrentContext.Templates = {};
- overrideCurrentContext.Templates.Fields = {
- 'Target_x0020_Status':
- {
- 'View': TargetStatus
- }
- };
- SPClientTemplates.TemplateManager.RegisterTemplateOverrides(overrideCurrentContext);
- })();
Now, let’s have a look at the overriding function TargetStatus.
- function TargetStatus(ctx)
- {
- vartotalSalesVal = ctx.CurrentItem.Total_x0020_Sales.replace(",", "");
- vartargetSalesVal = ctx.CurrentItem.Sales_x0020_Target.replace(",", "");
- if (parseInt(totalSalesVal) > parseInt(targetSalesVal))
- {
- returnvalue = "<span><imgsrc='/sites/Playground/SiteAssets/TargetMet.jpg' width='20px' height='20px'style='border:0px;'></span>";
- return returnvalue;
- }
- else if (parseInt(targetSalesVal) - parseInt(totalSalesVal) <= 1000)
- {
- returnvalue = "<span><imgsrc='/sites/Playground/SiteAssets/Reaching.jpg' width='20px' height='20px'style='border:0px;'></span>";
- return returnvalue;
- }
- else
- {
- returnvalue = "<span><imgsrc='/sites/Playground/SiteAssets/LongWay.jpg' width='20px' height='20px'style='border:0px;'></span>";
- return returnvalue;
- }
- }
Ctx.CurrentItem.ColumnName will get the value of the column. Since it is a number field, it has an inherent comma for the values greater than 1000. To do a numerical comparison, we have to remove comma, which is done, as shown below:
- vartotalSalesVal =ctx.CurrentItem.Total_x0020_Sales.replace(",", "");
Since we have overridden the field property, the overriding method will run for each row in the list. The column values in each row will be compared and based on the result whereas the third column will have a new value. Thus, we have returned an HTML image element, that will be assigned to the destination column for each row during the rendering process.
Note
In order to implement a rendering logic to each row in the list, override the fields property.
Full Code
- (function()
- {
- varoverrideCurrentContext = {};
- overrideCurrentContext.Templates = {};
- overrideCurrentContext.Templates.Fields = {
- 'Target_x0020_Status':
- {
- 'View': TargetStatus
- }
- };
- SPClientTemplates.TemplateManager.RegisterTemplateOverrides(overrideCurrentContext);
- })();
- function TargetStatus(ctx)
- {
- vartotalSalesVal = ctx.CurrentItem.Total_x0020_Sales.replace(",", "");
- vartargetSalesVal = ctx.CurrentItem.Sales_x0020_Target.replace(",", "");
- if (parseInt(totalSalesVal) > parseInt(targetSalesVal))
- {
- returnvalue = "<span><imgsrc='/sites/Playground/SiteAssets/TargetMet.jpg' width='20px' height='20px'style='border:0px;'></span>";
- return returnvalue;
- }
- else if (parseInt(targetSalesVal) - parseInt(totalSalesVal) <= 1000)
- {
- returnvalue = "<span><imgsrc='/sites/Playground/SiteAssets/Reaching.jpg' width='20px' height='20px'style='border:0px;'></span>";
- return returnvalue;
- }
- else
- {
- returnvalue = "<span><imgsrc='/sites/Playground/SiteAssets/LongWay.jpg' width='20px' height='20px'style='border:0px;'></span>";
- return returnvalue;
- }
- }
- Save the code as a js file and upload it to one of the Libraries, say: Site Assets.
- Go to the edit page of the list view by appending the URL “? ToolpaneView=2” at the end of the list view’s .aspxurl.
- Click Edit Web part for the list view. Under Miscellaneous section, there is a text box for entering JSLink.
- Add the relative URL of the js file after ~site or ~sitecollection depending upon the location of the Site Assets Library (or any other repository), where you have uploaded the js file.

Click Apply. This will apply JSLink to the list view.
Output
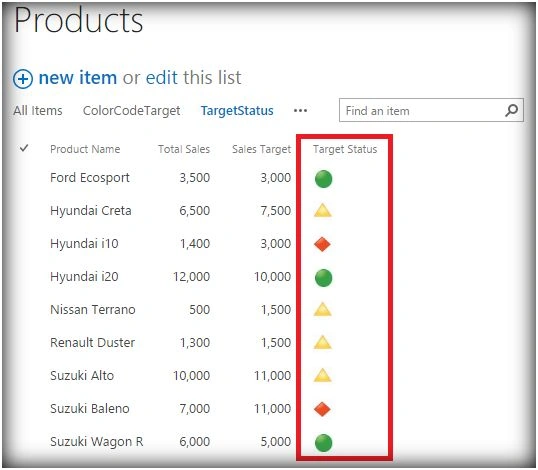
Thus, we have seen how we can compare the two column values and assign a KPI image to the third column, using JSLink and Client Side Rendering.
Imran AliPosted Dec 11, 2019, 10:08 AM
Hi, would you please let me know what type of column "Target Status" should be?
Santhakumar MunuswamyPosted Jun 25, 2016, 12:25 AM
Thank you for nice article
Bhuvanesh MohankumarPosted Jun 24, 2016, 12:54 PM
Good one
Debasis SahaPosted Jun 24, 2016, 9:03 AM
Good One..
kalu singh raoPosted Jun 24, 2016, 1:35 AM
Nice...
RajaPosted Jun 24, 2016, 12:11 AM
Good One...
Prasanna MuraliPosted Jun 23, 2016, 12:02 PM
Nice one..