

Introduction
We know that every smartphone handle is lightweight data to handle their data. Like all, the Windows Phone OS favors SQLite. Moving to a demonstration, we have this.
By CRUD, I mean Create, Read, Update and Delete. These are the fundamental operation we try on any DBMS. As prerequites, I suppose you have prior knowledge of SQL query. Although, I have a brief intro in their respective section.
Table of Contents
- Setup Environment (all DLL and NuGet updates)
- Design the XAML
- Code, apply CRUD operation
Environment Setup
Step 1
Create an Empty Windows Phone 8 Project. Now, before proceeding to anything, you need to update your Extensions (and, yes, it is mandatory).
Tools > Extension and Updates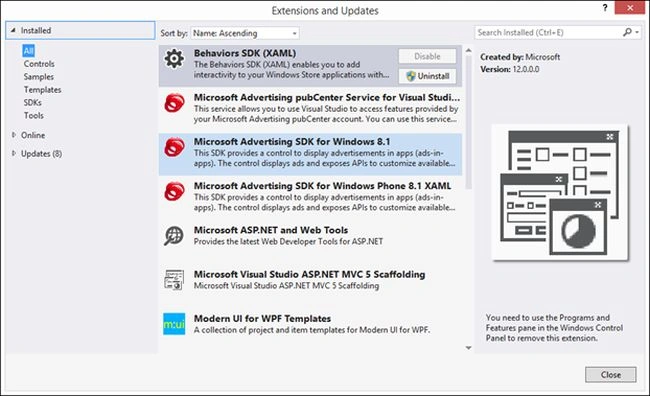
In the Online tab, search for “sqlite for windows phone” and download the update.
Note: If your project belongs to Windows Phone 8.1, then update for SQLite for Windows Phone 8.1 else do as shown.
After downloading, you get a confirmation. Click on Close and move on.
Step 2
After installing the library for SQLite, we need the sqlite-net-wp8 NuGet package. Actually, it a helper-class file.
So, move to Tools > Manage NuGet Packet Manager > Manages NuGet Packages for Solution and search for sqlite-net-wp8 in the search tab.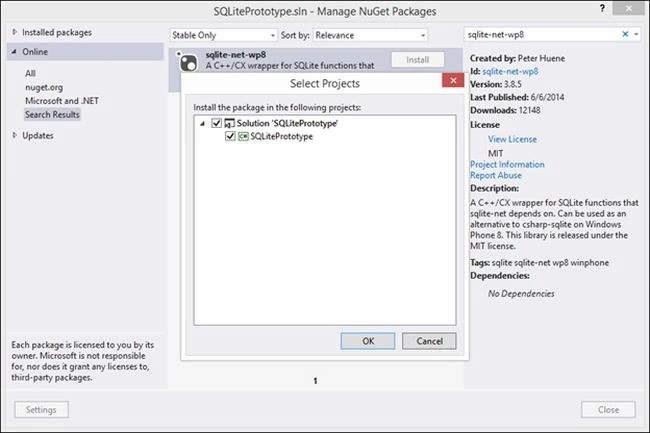
Step 3
Until now, we have included the desired library, helper class. Now, we define the CPU architecture of the app,
Build > Configuration Manager. And, change the Active Solution Platform to x86 (for the emulator) or ARM (for a Windows Phone Device).
Code Illustration
Step 1
We have now completed all the requirements. So, let's start the coding part. First, we will design a look-alike prototype for this demonstration. 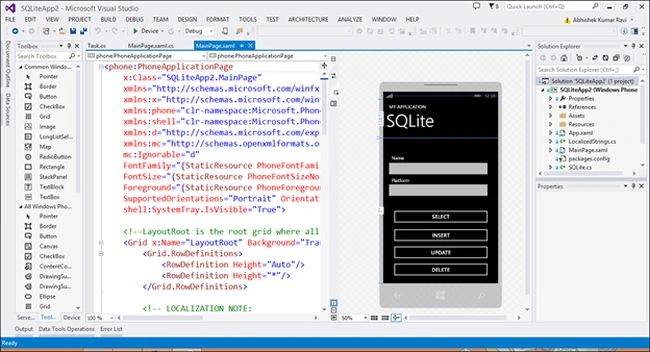
And try to mock the XAML layout window.
Step 2
As you know, every database has its schema in other words definition of its table.
So, here we will create a class file that has table's schema.
For this, create an empty class file in your project.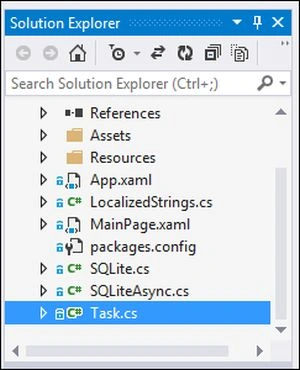
I have Task.cs that defines the schema of my table.
So, our table will be like something this.
Fig: Task Table
In this layout, we have three attributes and id is the Primary Key for the table. And we want our id to be incremented automatically.
- using SQLite;
- using System;
- using System.Collections.Generic;
- using System.Linq;
- using System.Text;
- using System.Threading.Tasks;
- namespace SQLiteApp2
- {
- public sealed class Task
- {
- // Schema Of The Table
- [PrimaryKey, AutoIncrement]
- public int id { get; set; }
- public string name { get; set; }
- public string platform { get; set; }
- }
- }
Step 3
Before moving to the code part, add the desired namespaces to your project as in the following:
- using System.IO;
- using Sqlite;
- using Windows.Storage;
- using SQLite;
- // Path of The Database
- public static string DB_PATH = Path.Combine(Path.Combine(ApplicationData.Current.LocalFolder.Path,"sample.sqlite"));
- private SQLiteConnection dbConnection;
And, in the On_NavigatedTo event.
- protected override void OnNavigatedTo(NavigationEventArgs e)
- {
- // When it Enters into Page
- dbConnection = new SQLiteConnection(DB_PATH);
- dbConnection.CreateTable<Task>();
- }
- protected override void OnNavigatedFrom(NavigationEventArgs e)
- {
- // When it Leaves from
- if(dbConnection!=null)
- {
- dbConnection.Close();
- }
- }
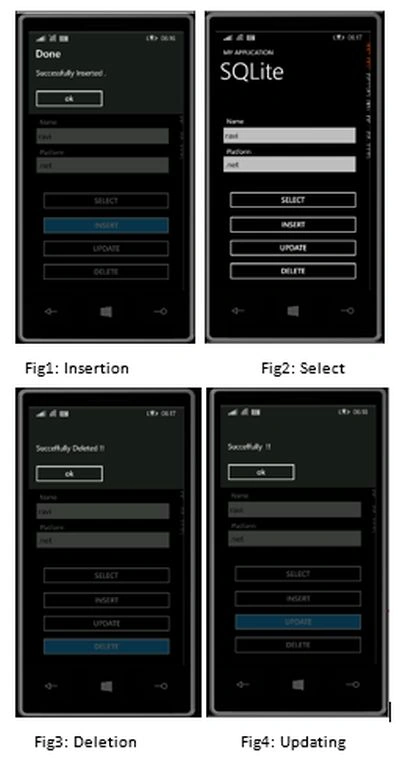
We begin with INSERTION and then SELECTION.
- private void btnInsert_Click(object sender, RoutedEventArgs e)
- {
- // INSERT into Table
- Task task = new Task()
- {
- name = nameTextBox.Text.ToString(),
- platform = platformTextBox.Text.ToString()
- };
- // Now, Insert
- dbConnection.Insert(task);
- // Confirmation
- MessageBox.Show("Successfully Inserted .","Done",MessageBoxButton.OK);
- // Reset The Fields
- nameTextBox.Text = "";
- platformTextBox.Text = "";
- }
Unlike Insert, we don't have any exact method for Selection. So, we need the query() method.
- private void btnSelect_Click(object sender, RoutedEventArgs e)
- {
- // Retrive Data
- var data = dbConnection.Query<Task>("select platform from task where name='"+nameTextBox.Text.ToString()+"'").FirstOrDefault();
- if(data != null)
- {
- platformTextBox.Text = data.platform.ToString();
- }
- else
- {
- MessageBox.Show("Sorry!!","Error",MessageBoxButton.OK);
- }
- }
That's why we have written "data.platform" to access its value. And what if the data is Null. Then, the table is empty.
Moving to updating the table, you can do it in a similar way.
- private void btnUpdate_Click(object sender, RoutedEventArgs e)
- {
- // Upadte Button
- if(nameTextBox.Text != "")
- {
- Task temp = dbConnection.Query<Task> ("update task set platform='"+platformTextBox.Text.ToString()+"' where name='"+nameTextBox.T
- ext.ToString()+"'").FirstOrDefault();
- dbConnection.Update(temp);
- MessageBox.Show("Succeffully Updated !!");
- }
- }
We will do exactly the same thing do for the deletion.
- private void btnDelete_Click(object sender, RoutedEventArgs e)
- {
- // Delete
- Task temp = dbConnection.Query<Task>("select platform from task where name='"+nameTextBox.Text.ToString()+"'").FirstOrDefault();
- if (temp != null)
- {
- dbConnection.Delete(temp);
- MessageBox.Show("Succeffully Deleted !!");
- }
- else
- {
- MessageBox.Show("No Row Selected","Error",MessageBoxButton.OK);
- }
- }
Conclusion
SQLite provides great support for creating highly durable static apps. With a database, you can handle the data efficiently and easily.
For any issue, feel free to ask and try to resolve it from the enclosed solution file.
For SQL queries you better learn about them from: SQL Tutorial.
Asfend YarPosted Mar 11, 2016, 11:41 AM
nice info