

Introduction
Today we will learn how to import the Excel or CSV file to the SQL Server table through an ASP.Net MVC application. To insert or update the record we will use the stored procedure. Refere to my previous article SQL Bulk Insert And Update Records Using Stored Procedures to learn how to create the stored procedure for same. We will use the same stored procedure created in my previous article to import the file.
Prerequisite
Basic knowledge of Asp.Net MVC controller, View and Entity Framework.
Step 1
First, we will create Controller action to read the XLS file and convert the data to list. To read the Excel file we will use a packge named Excel Data Reader.
Go to nuget package manager and install these two package,
- ExcelDataReader
- ExcelDataReader.DataSet.
Step 2
Create a model named Employee and paste the below code .
- public class Employee
- {
- public int Id { get; set; }
- public string EmpName { get; set; }
- public string Position { get; set; }
- public string Location { get; set; }
- public int Age { get; set; }
- public int Salary { get; set; }
- }
Create a controller named EmployeeController and Create action method named ImportFile() as below.
- public class EmployeeController : Controller
- {
- private readonly EmployeeDbContext _dbContext;
- public EmployeeController()
- {
- _dbContext = new EmployeeDbContext();
- }
- // GET: Student
- public ActionResult Index()
- {
- return View();
- }
- [HttpPost]
- public async Task<ActionResult> ImportFile()
- {
- return View("Index");
- }
- }
Step 4
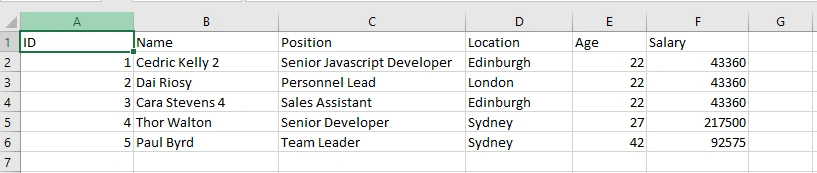
Now we will create a method to read data from an Excel file and it will return the data in list format. Below is the sample image of CSV file that we are going to import.
Note
We will use the first row of file as header or column name to map data to list. Value of first row should be same as mentioned in image because we are going to map the data based on that value only.
Now create a method in Employee Controller to read the CSV file and and return data into list format, paste the below code in Employee Controller.
- private List<Employee> GetDataFromCSVFile(Stream stream)
- {
- var empList = new List<Employee>();
- try
- {
- using (var reader = ExcelReaderFactory.CreateCsvReader(stream))
- {
- var dataSet = reader.AsDataSet(new ExcelDataSetConfiguration
- {
- ConfigureDataTable = _ => new ExcelDataTableConfiguration
- {
- UseHeaderRow = true // To set First Row As Column Names
- }
- });
- if (dataSet.Tables.Count > 0)
- {
- var dataTable = dataSet.Tables[0];
- foreach (DataRow objDataRow in dataTable.Rows)
- {
- if (objDataRow.ItemArray.All(x => string.IsNullOrEmpty(x?.ToString()))) continue;
- empList.Add(new Employee()
- {
- Id = Convert.ToInt32(objDataRow["ID"].ToString()),
- EmpName = objDataRow["Name"].ToString(),
- Position = objDataRow["Position"].ToString(),
- Location = objDataRow["Location"].ToString(),
- Age = Convert.ToInt32(objDataRow["Age"].ToString()),
- Salary = Convert.ToInt32(objDataRow["Salary"].ToString()),
- });
- }
- }
- }
- }
- catch (Exception)
- {
- throw;
- }
- return empList;
- }
The above method is using the nuget pacakge ExcelDataReader and reading the value from CSV file. ExcelDataReader will return the data in DataTable object. We have converted that DataTable object into List.
Step 5
We have created the method to read CSV file and get data in List format. Now we will create a file upload control to upload the file from webpage. Create a view for EmployeeController named as Index and paste the below code to create a file upload controller on webpage.
- @{
- ViewBag.Title = "Index";
- }
- <h2>Index</h2>
- <div class="row">
- <div class="col-sm-12" style="padding-bottom:20px">
- <div class="col-sm-2">
- <span>Select File :</span>
- </div>
- <div class="col-sm-3">
- <input class="form-control" type="file" name="importFile" id="importFile" />
- </div>
- <div class="col-sm-3">
- <input class="btn btn-primary" id="btnUpload" type="button" value="Upload" />
- </div>
- </div>
- </div>
Now we will call the ImportFile action of EmployeeController through ajax call from the webpage. And we will send the file as formdata through ajax call. Add the below code in your Index view.
- @section scripts{
- <script>
- $(document).on("click", "#btnUpload", function () {
- var files = $("#importFile").get(0).files;
- var formData = new FormData();
- formData.append('importFile', files[0]);
- $.ajax({
- url: '/Employee/ImportFile',
- data: formData,
- type: 'POST',
- contentType: false,
- processData: false,
- success: function (data) {
- if (data.Status === 1) {
- alert(data.Message);
- } else {
- alert("Failed to Import");
- }
- }
- });
- });
- </script>
- }
Step 6
Now we have to update our controller action to read the file and send from webpage and import it into database. Update the ImportFile action of Employee Controller as below.
- [HttpPost]
- public async Task<ActionResult> ImportFile(HttpPostedFileBase importFile)
- {
- if (importFile == null) return Json(new { Status = 0, Message = "No File Selected" });
- try
- {
- var fileData = GetDataFromCSVFile(importFile.InputStream);
- var dtEmployee = fileData.ToDataTable();
- var tblEmployeeParameter = new SqlParameter("tblEmployeeTableType", SqlDbType.Structured)
- {
- TypeName = "dbo.tblTypeEmployee",
- Value = dtEmployee
- };
- await _dbContext.Database.ExecuteSqlCommandAsync("EXEC spBulkImportEmployee @tblEmployeeTableType", tblEmployeeParameter);
- return Json(new { Status = 1, Message = "File Imported Successfully " });
- }
- catch (Exception ex)
- {
- return Json(new { Status = 0, Message = ex.Message });
- }
- }
Here we are getting the file in HttpPostedFileBase format sent from Ajax call. We have called the method to read CSV file on Line 8 that we have created in Step 4. In Line 10 we have called extension method to convert the list into DataTable so we can send DataTable object as Sql Parameter.
Note
Extension method ToDataTable is not available in C#, as it's my own extension method. You can find the code for that method in Step 7 of the same article.
We have created Sql Parameter in Line 11 of type Structured. Type name isthe type of our table type object that we have created in my previous article. And we have called the stored procedure at Line 17.
Step 7
Extension method to convert the List object into DataTable.
Step 8
- public static class Extensions
- {
- public static DataTable ToDataTable<T>(this List<T> items)
- {
- DataTable dataTable = new DataTable(typeof(T).Name);
- //Get all the properties
- PropertyInfo[] Props = typeof(T).GetProperties(BindingFlags.Public | BindingFlags.Instance);
- foreach (PropertyInfo prop in Props)
- {
- //Defining type of data column gives proper data table
- var type = (prop.PropertyType.IsGenericType && prop.PropertyType.GetGenericTypeDefinition() == typeof(Nullable<>) ? Nullable.GetUnderlyingType(prop.PropertyType) : prop.PropertyType);
- //Setting column names as Property names
- dataTable.Columns.Add(prop.Name, type);
- }
- foreach (T item in items)
- {
- var values = new object[Props.Length];
- for (int i = 0; i < Props.Length; i++)
- {
- //inserting property values to datatable rows
- values[i] = Props[i].GetValue(item, null);
- }
- dataTable.Rows.Add(values);
- }
- return dataTable;
- }
- }
We have implemented the functionality, and now we will launch the application and see the output. After launching the application goes to the below URL:
https://localhost:<Port Number>/Employee/Index and you will be able to see the below output.
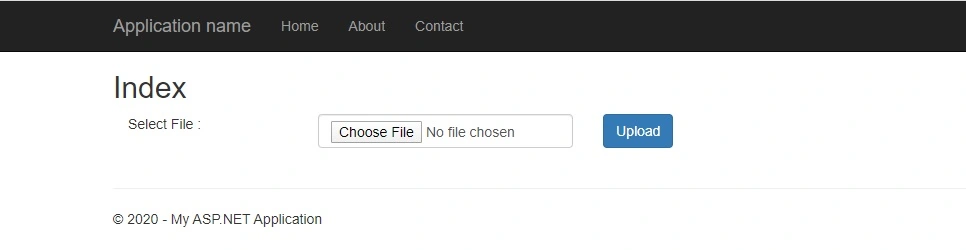
Now select the CSV file that we have created in Step 4 and click on upload. Once the file upload is completed you will get an alert message.
Thanks for reading this article. Let me know your feedback to enhance the quality of the article.
Brian JoelPosted Nov 3, 2021, 1:52 PM
Hello, the file that I load enters the controller as null, what could it be?
Lauren VargasPosted Sep 30, 2021, 3:43 AM
?Qu? dice EXEC que es un procedimiento de tienda?
Amit MittalPosted Apr 10, 2021, 11:43 AM
Getting following error "Column, parameter, or variable @tblCompanyTableType. : Cannot find data type dbo.tblTypeCompany."
TC Gürbüz MetePosted Mar 29, 2021, 10:46 AM
Could you please provide another solution instead of stored procedure ? I want to write all data by using entity framework, not by using sp. Thank you.
caglar sarikayaPosted Feb 24, 2021, 12:03 PM
What if my excel is 100k rows and 30 columns and SQL works on a remote server
Akram AlamPosted Oct 19, 2020, 5:36 AM
Import function is taking a lot time while importing data in Db
Rikardo CidPosted Oct 15, 2020, 5:09 PM
If i need to import the file to multiple tables?col a to col d = table,1 col e to col h = table2
Talaviya BhavdipPosted Sep 1, 2020, 10:27 PM
I have implemented the below demo in my project:https://www.c-sharpcorner.com/article/import-excel-file-to-sql-table-in-asp-net-mvc/ but I can't get the column name on that so can you please help me. error message something like below: Column 'FirstName' does not belong to table Table1. please look at the data table at https://www.screenpresso.com/=z9QEb
Talaviya BhavdipPosted Sep 1, 2020, 8:49 AM
Can you please give me this sp : spBulkImportEmployee
moinul mithuPosted Apr 26, 2020, 6:12 AM
Hi, First of all thanks for your article. I'm getting an error "Column 'ID' does not belong to table Table1 datatable" Can you please help me regarding this issue?
varada varPosted Apr 20, 2020, 5:25 AM
Please provide download link
Ulfah PutriPosted Apr 16, 2020, 5:53 PM
I get an error "'_dbContext' does not contain a definition for 'Database' and no extension method 'Database' accepting a first argument of type '_dbContext' could be found (are you missing a using directive or an assembly reference?)". How can I solve it?
Dorothy LeePosted Feb 6, 2020, 5:15 PM
Do you have an ASP.net CORE version of this please?