

Here, I will bind static data to a grid view for a demo but you may bind data to a grid view dynamically.
Step 1: The Table
Create the table as in the following:
- CREATE TABLE tblCustomer(
- Id int NOT NULL,
- name varchar(50) NOT NULL,
- gender varchar(6) NOT NULL,
- email varchar(30) NOT NULL,
- country varchar(30) NOT NULL,
- city varchar(30) NOT NULL
- )
Step 2: Stored Procedure
Create the Stored Procedure as in the following:
- CREATE procedure Pr_SaveCustomer
- @CustomerXml xml
- as
- BEGIN TRANSACTION
- BEGIN TRY
- DECLARE @index int
- EXEC sp_xml_preparedocument @index OUTPUT, @CustomerXml;
- insert into tblCustomer
- (Id,
- name,
- gender,
- email,
- country,
- city)
- select Id,Name,Gender,Email,Country,City
- FROM OPENXML (@index, '/DocumentElement/Table1',2)
- WITH (
- Id int,
- Name varchar(50),
- Gender varchar(6),
- Email varchar(30),
- Country varchar(30),
- City varchar(30)
- );
- EXEC sp_xml_removedocument @index
- COMMIT TRANSACTION
- END TRY
- BEGIN CATCH
- ROLLBACK TRANSACTION
- END CATCH
Step 3: UI Design
Create the UI Design as in the following:
- <body>
- <form id="form1" runat="server">
- <div>
- <table border="1">
- <tr>
- <td>
- <asp:GridView ID="grdBulk" runat="server" AutoGenerateColumns="False" CellPadding="3"
- BackColor="#DEBA84" BorderColor="#DEBA84" BorderStyle="None" BorderWidth="1px"
- CellSpacing="2">
- <FooterStyle BackColor="#F7DFB5" ForeColor="#8C4510" />
- <HeaderStyle BackColor="#A55129" Font-Bold="True" ForeColor="White" />
- <PagerStyle ForeColor="#8C4510" HorizontalAlign="Center" />
- <RowStyle BackColor="#FFF7E7" ForeColor="#8C4510" />
- <SelectedRowStyle BackColor="#738A9C" Font-Bold="True" ForeColor="White" />
- <SortedAscendingCellStyle BackColor="#FFF1D4" />
- <SortedAscendingHeaderStyle BackColor="#B95C30" />
- <SortedDescendingCellStyle BackColor="#F1E5CE" />
- <SortedDescendingHeaderStyle BackColor="#93451F" />
- <Columns>
- <asp:BoundField DataField="Id" HeaderText="Id" />
- <asp:BoundField DataField="Name" HeaderText="Name" />
- <asp:BoundField DataField="Gender" HeaderText="Gender" />
- <asp:BoundField DataField="Email" HeaderText="Email" />
- <asp:BoundField DataField="Country" HeaderText="Country" />
- <asp:BoundField DataField="City" HeaderText="City" />
- </Columns>
- </asp:GridView>
- </td>
- </tr>
- <tr>
- <td align="center">
- <asp:Button ID="btnSubmit" runat="server" Text="Submit" OnClick="btnSubmit_Click"
- Style="background: #fff; border: 1px solid #000; text-shadow: 0px 0px 0px #000;
- text-align: center" />
- </td>
- </tr>
- </table>
- </div>
- </form>
- </body>
Check that the UI design looks as in the following: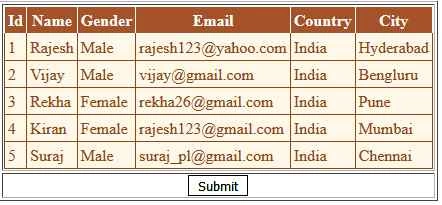
Step 4: Code Behind
Create the Code Behind as in the following:
- using System;
- using System.Collections.Generic;
- using System.Linq;
- using System.Web;
- using System.Web.UI;
- using System.Web.UI.WebControls;
- using System.Data;//
- using System.Data.SqlClient;
- using System.IO;//
- namespace Demo
- {
- public partial class BulkSave : System.Web.UI.Page
- {
- protected void Page_Load(object sender, EventArgs e)
- {
- if (!IsPostBack)
- {
- BindCustomer();
- }
- }
- private void BindCustomer()
- {
- DataTable dt = new DataTable();
- dt.Columns.Add(new DataColumn("Id", typeof(int)));
- dt.Columns.Add(new DataColumn("Name", typeof(string)));
- dt.Columns.Add(new DataColumn("Gender", typeof(string)));
- dt.Columns.Add(new DataColumn("Email", typeof(string)));
- dt.Columns.Add(new DataColumn("Country", typeof(string)));
- dt.Columns.Add(new DataColumn("City", typeof(string)));
- dt.Rows.Add(1, "Rajesh", "Male", "[email protected]", "India", "Hyderabad");
- dt.Rows.Add(2, "Vijay", "Male", "[email protected]", "India", "Bengluru");
- dt.Rows.Add(3, "Rekha", "Female", "[email protected]", "India", "Pune");
- dt.Rows.Add(4, "Kiran", "Female", "[email protected]", "India", "Mumbai");
- dt.Rows.Add(5, "Suraj", "Male", "[email protected]", "India", "Chennai");
- grdBulk.DataSource = dt;
- ViewState["vsCustomer"] = dt;
- grdBulk.DataBind();
- }
- protected void btnSubmit_Click(object sender, EventArgs e)
- {
- if (grdBulk.Rows.Count > 0)
- {
- DataTable dt = ViewState["vsCustomer"] as DataTable;
- if (dt != null)
- {
- if (dt.Rows.Count > 0)
- {
- string CustomerXML = DatatableToXml(dt);
- if (CustomerXML != null)
- {
- using (SqlConnection con = new SqlConnection("Data Source=.;Trusted_Connection=true;Database=test"))
- {
- using (SqlCommand cmd = new SqlCommand())
- {
- cmd.Connection = con;
- cmd.CommandType = CommandType.StoredProcedure;
- cmd.CommandText = "Pr_SaveCustomer";
- cmd.Parameters.Add("@CustomerXml", SqlDbType.Xml, -1).Value = CustomerXML;
- con.Open();
- int i = cmd.ExecuteNonQuery();
- con.Close();
- if (i > 0)
- {
- ScriptManager.RegisterStartupScript(this, this.GetType(), "alert", "alert('Record Saved Successfully')", true);
- }
- }
- }
- }
- }
- }
- }
- }
- public string DatatableToXml(DataTable dt)
- {
- MemoryStream ms = new MemoryStream();
- dt.WriteXml(ms, true);
- ms.Seek(0, SeekOrigin.Begin);
- StreamReader sr = new StreamReader(ms);
- string strXML;
- strXML = sr.ReadToEnd();
- return (strXML);
- }
- }
- }
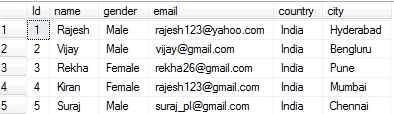
Yes, the bulk records are inserted into the table.
I hope you like this article and understood how to insert bulk data into SQL Server using OPENXML in ASP.NET.
Karthikeyan KPosted Aug 23, 2015, 11:26 PM
Good one sir..
Gopi ChandPosted Aug 23, 2015, 1:49 PM
Well done
Gowtham KPosted Aug 23, 2015, 1:34 PM
Good one
Ano MepaniPosted Aug 23, 2015, 1:17 PM
nice article
Santhakumar MunuswamyPosted Aug 23, 2015, 11:29 AM
Thanks for Nice article
Mohammed IbrahimPosted Aug 23, 2015, 9:49 AM
nice
Sibeesh VenuPosted Aug 23, 2015, 3:47 AM
Nice Share
Rajeesh MenothPosted Aug 23, 2015, 2:47 AM
Nice Share
RakeshPosted Aug 23, 2015, 1:27 AM
Good one