

Introduction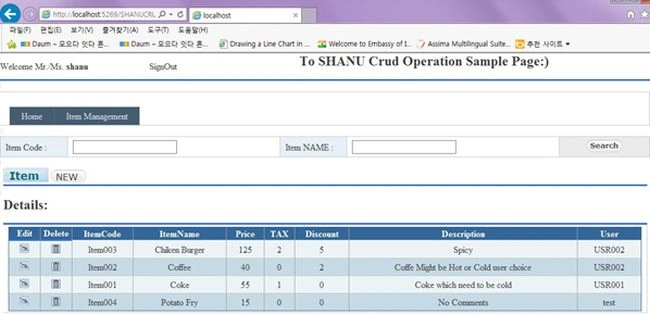
Before we create our ASP.NET web applications there are few questions that beginners ask frequently.
- How to create a Login page?
- How to check valid user from Login and redirect to main page?
- How to display Logged in user name in all pages?
- How to bind data to Grid?
- How to search data and display in Grid?
- How to Insert/Select/Update and delete data from grid to database?
- How to write an N-Teir application for ASP.Net?
- How to create a simple ASP.Net Web Application?
- Authentication and Authorization
For all the preceding questions I thought to create a simple ASP.Net application with Login and Main Page that has simple Create, Read, Update and Delete (CRUD) operations and has search results, JavaScript validation and Stored Procedures, all that using N-Teir Architecture.
First let's start with what CRUD is. CRUD Stands for:
- Create (insert/add): Insert data into the database.
- Read (select): Select data from the database.
- Update (edit/update): update data to the database.
- Delete: Delete data from the database.
Why we need CRUD and where to use it
In application development there are two kinds of development, one is frontend and the other one is backend. A frontend is an application that can be a Web, Desktop or Mobile application. The application can be developed using any one of the languages like C#, VB.Net, Java and and so on. A backend is a database like Microsoft Access, MySQL, SQL Server, Oracle and and so on.
A frontend is used to present data and a backend stores the data. To connect the backend, for example SQL Server, with a frontend, such as ASP.NET, we use ADO.Net. Using ADO.NET objects like Connection, Command, DataSet, DataAdapter and and so on we can perform CRUD operations.
Let's consider now we have connected our SQL Database and ASP.NET application using ADO.Net. Will we get data automatically from the DB to the application? We need to select the data from the database and display it in our application, we need to insert the data of user input into the database, we need to update the user data to our database and we need to delete the data of the user from the database. All these create, insert, delete and select operations from the Db to the application are CRUD operations.
N-Teir Architecture
In application development the Tier is called a layer. Let's see the following image: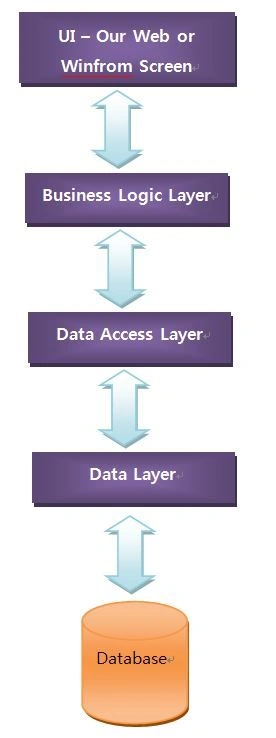
Here the layers are nothing but a class.
- UI: User Interface where the user enters their input to be stored and perform some business logic.
- Business logic Layer: Here the Business logic layer is a class. From the UI (our code behind) we pass all our input from the user to the Business Logic class as objects.
- Data Access Layer: From the Business logic Layer we pass all the object parameters to this Data Access Layer Class. This class will use the ADO.Net objects like Command (Select), Command Type (Query type is text or Stored Procedure), ExceuteNonQuery (perform Insert/Update and Delete), ExecuteDataset (return select statement ) and ExecuteScalar (to return single data). For example if we need to find a Max value of our ID and return to the UI then we can use ExecuteScalar.
Authentication and Authorization
Authentication: Check for the Valid User. Here the question is how to check that a user is valid or not. When a user comes to a website for the first time he will register for that website. All his information, like user name, password, email and so on will be stored in the website database. When a user enters his userID and password, the information will be checked with the database. If the user has entered the same userID and Password as in the database then his or she is a valid user and will be redirected to the website home page. If the user enters a UserID and/or Password that does not match the database then the login page will give a message, something like “Enter valid Name or Password”. The entire process of checking whether the user is valid or not for accessing the website is called Authentication.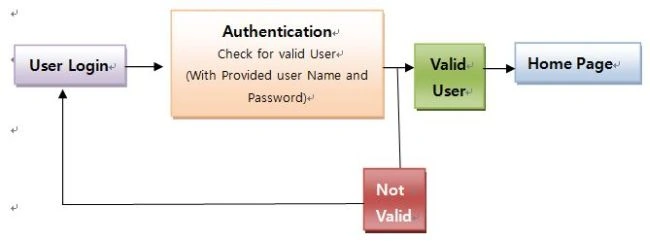
In ASP.NET we can use any one Authentication method to verify the user.
- Windows Authentication: the local Windows user is used to check whether the user is valid or not.
- Forms Authentication: Using form authentication we can write our own code and check for the valid user. The Authenticated user's details will be stored as a cookie in the local computer.
In this article I have used the Forms Authentication. To use the Form Authentication in Web.Config file we set the authentication mode to “Forms”.
Here we set the website Login Page URL and Default page URL.
defaultUrl -> From the Login Page after the user is authenticated it will be redirected to the defaultURL page. For example here I have used “Default.ASPX”. Once the user is authenticated in my demo site he will be redirected to the main page.
- <authentication mode="Forms"><forms defaulturl="Default.aspx" loginurl="~/Account/Login.aspx" slidingexpiration="true" timeout="2880" /></authentication>
Passport authentication: Passport authentication is based on Microsoft Passport based on a website like Hotmail and and so on. Here the user's authentication will be verified from the Passport.
Authorization: Once the user is authenticated he needs to be redirected to the appropriate page by his role. For example when an Admin is logged in then he is to be redirected to the Admin Page. If an Accountant is logged in then he is to be redirected to his Accounts page. If an End User is logged in then he is to be redirected to his page. In ASP.NET we can use the Authorization to redirect to the appropriate page by the user's role.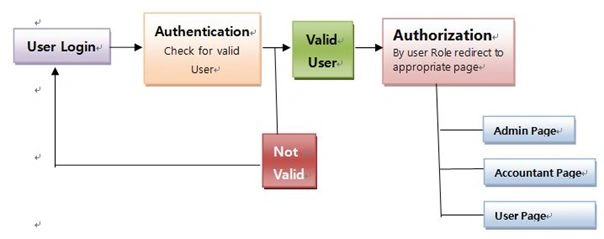
ASP.Net default Login System
The attached sample program has been developed using Visual Studio 2010. When we create a new website from Visual Studio 2010 we can see the screens as in the following in the Solution Explorer. By default we can see the Microsoft ASP.NET default login and the User Registration pages. We can use this login page and user registration page to develop our website. Here we can see now the App_Data Folder is empty since there is no local database created by default.
Web.Config File: In the Web.Config file we can see in the connection string in AttachedDBFileName we can see there is an aspnetdb.mdf. This file will be locally created in your App_Data folder when we use ASP.NET Membership or other services.
Once we execute our ASP.Net website and click on user Login and User Registration we create a new user for our website. We can see there will be a new aspnetdb.mdf created in our App_Data Folder. In this aspnetdb.mdf all the user information is stored.
It will be good to use the ASP.Net Default login system. Then when we develop our own custom login system the ASP.Net login system is a more secure way to store and retrieve user's information and password.
aspnetdb in SQL Server DB
We can also create aspnetdb in our SQL Server and use that instead of local DB.
Here are a few links that explain how to create an aspnetdb in our SQL Server.
- Creating the Application Services Database for SQL Server.
- Create ASPNETDB database using aspnet_regsql tool.
Using the code
Create your ASP.Net web application. For my demo I used Visual Studio 2010.
We need to add all our Business Class, DAL Class and Helper Class inside the App_Code Folder of our website. When we create a new web project we need to create a new folder. Since App_Code is inside this folder you can create a sub-folder and add all our classes.
For a simple understanding in our demo I created a BIZ folder and a DAL folder. Here I used 2 layers, one is a Biz layer and the other is a DAL Layer.
In the DAL folder, I have:
- SQLHelper Class: which is our DAL Class where we can perform CRUD functions.
- BixBase Class: This class will be inherited in our Business Class to add and get the SQL parameters to array.
For example I created two classes, one for the Login page and another one for the main page.
We will see in more detail how to use this class below in the code section.
The next step is to create our tables in the database to perform our CRUD operations.
For a demo I have created the table Item Masters.
Connection String: For your other table database you can set the connection string. In the Shanu Connection string provide the SQL Server db connection string for where you create this ItemMasters Table.
- <connectionStrings><add name="shanu" connectionString="Data Source=YOURServer;Initial Catalog=YOURDB;Persist Security Info=True;User ID=YOURUID;Password=yourpwd" providerName="System.Data.SqlClient"/>
- <add name="ApplicationServices" connectionString="data source=.\SQLEXPRESS;Integrated Security=SSPI;AttachDBFilename=|DataDirectory|\aspnetdb.mdf;User Instance=true" providerName="System.Data.SqlClient"/>
- <!--<add name="ApplicationServices" connectionString="Data Source=YOURServer;Initial Catalog=aspnetdb;user id=YOURUID;password=yourpwd;Integrated Security=True" providerName="System.Data.SqlClient"/>--></connectionStrings>
We will create a User Master table to be used for login verification.
- -- Create Table Item Master - this table will be used in for Complete CRUD Sample
- CREATE TABLE [dbo].[ItemMasters](
- [Item_Code] [varchar](20) NOT NULL,
- [Item_Name] [varchar](100) NOT NULL,
- [Price] Int NOT NULL,
- [TAX1] Int NOT NULL,
- [Discount] Int NOT NULL,
- [Description] [varchar](200) NOT NULL,
- [IN_DATE] [datetime] NOT NULL,
- [IN_USR_ID] [varchar](50) NOT NULL,
- [UP_DATE] [datetime] NOT NULL,
- [UP_USR_ID] [varchar](50) NOT NULL,
- CONSTRAINT [PK_ItemMasters] PRIMARY KEY CLUSTERED
- (
- [Item_Code] ASC
- )WITH (PAD_INDEX = OFF, STATISTICS_NORECOMPUTE = OFF, IGNORE_DUP_KEY = OFF, ALLOW_ROW_LOCKS = ON, ALLOW_PAGE_LOCKS = ON) ON [PRIMARY]
- ) ON [PRIMARY]
- -- insert sample data to Item Master table
- INSERT INTO [ItemMasters] ([Item_Code],[Item_Name],[Price],[TAX1],[Discount],[Description],[IN_DATE]
- ,[IN_USR_ID],[UP_DATE],[UP_USR_ID])
- VALUES
- ('Item001','Coke',55,1,0,'Coke which need to be cold',GETDATE(),'root'
- ,GETDATE(),'root')
- INSERT INTO [ItemMasters] ([Item_Code],[Item_Name],[Price],[TAX1],[Discount],[Description],[IN_DATE]
- ,[IN_USR_ID],[UP_DATE],[UP_USR_ID])
- VALUES
- ('Item002','Coffee',40,0,2,'Coffe Might be Hot or Cold user choice',GETDATE(),'root'
- ,GETDATE(),'root')
- INSERT INTO [ItemMasters] ([Item_Code],[Item_Name],[Price],[TAX1],[Discount],[Description],[IN_DATE]
- ,[IN_USR_ID],[UP_DATE],[UP_USR_ID])
- VALUES
- ('Item003','Chiken Burger',125,2,5,'Spicy',GETDATE(),'root'
- ,GETDATE(),'root')
- INSERT INTO [ItemMasters] ([Item_Code],[Item_Name],[Price],[TAX1],[Discount],[Description],[IN_DATE]
- ,[IN_USR_ID],[UP_DATE],[UP_USR_ID])
- VALUES
- ('Item004','Potato Fry',15,0,0,'No Comments',GETDATE(),'root'
- ,GETDATE(),'root')
Here is my simple login screen. You can design your own login screen now.
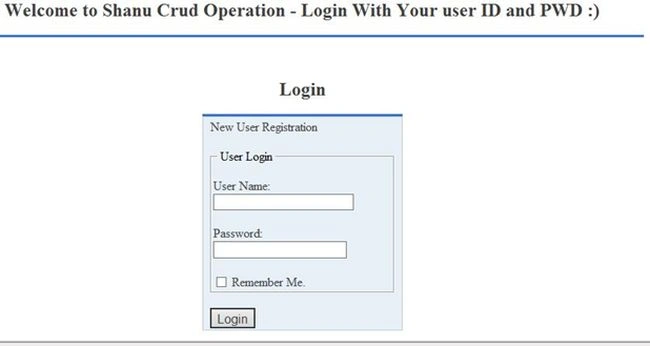
I have used the ASP.NET default login page. Here we can see a New User registration link. When the user clicks on this link the User Registration page will be opened.

Once the user is registered his or her information will be stored in the aspnetdb.mdf file.
Main page
Now we have completed our Login page and let's design our Main page.
Here is how my Simple Main page looks.
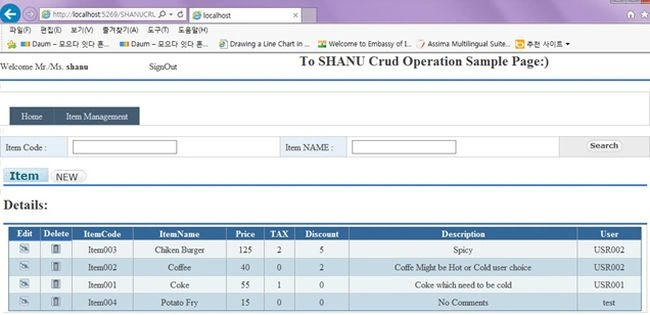
I have used an ASP.NET Master Page to add the top details to be displayed in all pages. In the Master page I have used the ASP.Net LoginName and LoginStatus. This will be used to display the Authenticated username in all the pages.
In the Master page I have added the two Menus “Home” and “Item Management”.
In the Item Management page the user can search for items and insert, edit and delete items from the database.
Item Management Search
In the page init method we first check the authentication of the user. If the user is not authenticated then he or she is redirected to the Login Page.
- protected override void OnInit(EventArgs e)
- {
- base.OnInit(e);
- if (!this.Page.User.Identity.IsAuthenticated)
- {
- FormsAuthentication.RedirectToLoginPage();
- }
- }
Search/Select
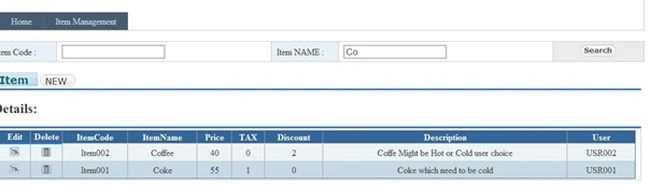
In the Search Button Click: the Login page is the same as here, we pass our parameters to our BIZ class and from the BIZ class to the DAL Class and get the result as a dataset and bind it to our GridView.
Here the user can search by Item code or by Item Name. If both of the input is empty, I will return all the records from the database using the executeDataset.
- protected void btnSearch_Click(object sender, ImageClickEventArgs e)
- {
- SelectList();
- }
- //This Method is used for the search result bind in Grid
- private void SelectList()
- {
- SortedDictionary<string, string=""> sd = new SortedDictionary<string, string="">() { };
- sd.Add("@pTYPE", "S1");
- sd.Add("@Item_Code", txtSitemCDE.Text.Trim());
- sd.Add("@Item_Name", txtSItemNme.Text.Trim());
- DataSet ds = new DataSet();
- ds = new ShanuCRUDBizClass().SelectList(sd);
- GridView1.DataSource = ds;
- GridView1.DataBind();
- }
- </string,></string,>
For the main page I created a single SP to perform all our CRUD Operations. We can pass the necessary parameters to the SP with its type:
- pType=”S1”: is for a select search.
- pType=”S2”: is to Find the next Item code and return the value.
- pType=”I3”: is for inserting records.
- pType=”U4”: is for updating the record.
- pType=”D5”: is for deleting the record.
- -- Author : Shanu
- -- Create date : 2014-12-10
- -- Description : To Check valid User
- -- Tables used : userMasters
- -- Modifier : Shanu
- -- Modify date : 22014-12-10
- -- =============================================
- -- exec USP_Item_CRUD 'S1','','Coffee'
- -- exec USP_Item_CRUD 'S2'
- ---- exec USP_Item_CRUD 'I3','Item009','Coffee',100,10,1,'test','SHANU'
- -- =============================================
- Alter PROCEDURE [dbo].[USP_Item_CRUD]
- (
- @pTYPE VARCHAR(02) = '',
- @Item_Code VARCHAR(50) = '',
- @Item_Name VARCHAR(50) = '',
- @Price INT=0 ,
- @TAX1 INT=0 ,
- @Discount INT=0 ,
- @Description VARCHAR(50) = '',
- @USR_Name VARCHAR(50) = ''
- )
- AS
- BEGIN
- Declare @maxItemCode varchar(30)='';
- IF @pTYPE = 'S1' GOTO S1_RTN -- Select Query
- ELSE IF @pTYPE = 'S2' GOTO S2_RTN -- Select for ExceuteScalar Query
- ELSE IF @pTYPE = 'I3' GOTO I3_RTN -- Insert Query
- ELSE IF @pTYPE = 'U4' GOTO U4_RTN -- Update Query
- ELSE IF @pTYPE = 'D5' GOTO D5_RTN -- Delete Query
- RETURN
- --Select
- S1_RTN:
- BEGIN
- Select Item_Code,
- Item_Name,
- Price,
- TAX1,
- Discount,
- Description,
- UP_USR_ID as user_Name
- FROM
- ItemMasters
- WHERE
- Item_Code like @Item_Code +'%'
- AND Item_Name like @Item_Name +'%'
- ORDER BY
- Item_Name,
- Item_Code
- RETURN
- END
- --Select
- S2_RTN:
- BEGIN
- Set @maxItemCode='Item00' + Convert(Varchar(10),(Select MAX(RIGHT(ITEM_CODE, 3))+1 from itemMasters))
- select @maxItemCode ItemCODE
- RETURN
- END
- --Insert
- I3_RTN:
- BEGIN
- IF NOT EXISTS (SELECT * FROM ItemMasters WHERE Item_Name=@Item_Name)
- BEGIN
- INSERT INTO [ItemMasters]
- ([Item_Code],[Item_Name],[Price],[TAX1],[Discount],[Description],[IN_DATE]
- ,[IN_USR_ID],[UP_DATE],[UP_USR_ID])
- VALUES
- (@Item_Code,@Item_Name,@Price,@TAX1,@Discount,@Description,GETDATE(),@USR_Name
- ,GETDATE(),@USR_Name)
- SET @Item_Code='';
- SET @Item_Name='';
- GOTO S1_RTN
- END
- ELSE
- BEGIN
- Select 'Exists'
- END
- RETURN
- END
- --Update
- U4_RTN:
- BEGIN
- IF EXISTS (SELECT * FROM ItemMasters WHERE Item_Code=@Item_Code)
- BEGIN
- UPDATE [ItemMasters]
- SET [Item_Name]=@Item_Name,
- [Price]=@Price,
- [TAX1]=@TAX1,
- [Discount]=@Discount,
- [Description]=@Description,
- [UP_DATE]=GETDATE(),
- [UP_USR_ID]=@USR_Name
- WHERE
- Item_Code=@Item_Code
- SET @Item_Code='';
- SET @Item_Name='';
- GOTO S1_RTN
- END
- RETURN
- END
- --Delete
- D5_RTN:
- BEGIN
- DELETE FROM [ItemMasters]
- WHERE
- Item_Code=@Item_Code
- END
- END
New item Add /Insert: the user can enter their input to store the new record to the database.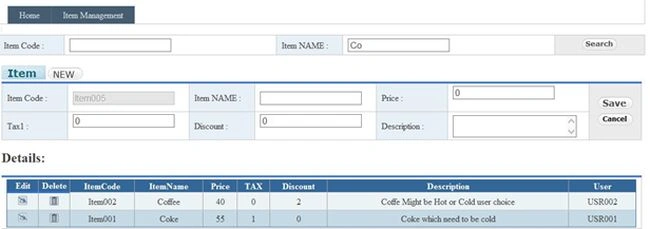
When the user clicks on the New Button I will generate the next ItemCode from the database and return a single value using the ExecuteScalar. By default I will hide the New and Edit tables from the user and when the user clicks on the New button I will make the the table visible to add or edit items.
- //Here used the Datareader to get the max itemCode and display in Item Code Textbox
- protected void btnAdd_Click(object sender, ImageClickEventArgs e)
- {
- if (hidsaveType.Value == "Edit")
- {
- return;
- }
- txtitemCode.Text = new ShanuCRUDBizClass().SelectScalar("S2");
- tdADD.Visible = true;
- }
In the Save Button Click we get all the input and pass the parameters to our BAL and from the BAL to the DAL to insert the new record using ExecuteNonQuery.
- //Save Button Click
- protected void btnSave_Click(object sender, ImageClickEventArgs e)
- {
- if (hidsaveType.Value == "Add")
- {
- InsertCall("I3");
- }
- else if(hidsaveType.Value == "Edit")
- {
- UpdateCall("U4");
- }
- }
- //This method is used for both Insert and Update Funtionc
- private void InsertCall(String PTYPE)
- {
- SortedDictionary<string, string=""> sd = new SortedDictionary<string, string="">() { };
- sd.Add("@pTYPE", PTYPE);
- sd.Add("@Item_Code", txtitemCode.Text.Trim());
- sd.Add("@Item_Name", txtitemName.Text.Trim());
- sd.Add("@Price", txtPrice.Text.Trim());
- sd.Add("@TAX1", txtTax.Text.Trim());
- sd.Add("@Discount", txtDiscount.Text.Trim());
- sd.Add("@Description", txtdescription.Text.Trim());
- sd.Add("@USR_Name", User.Identity.Name);
- DataSet ds = new DataSet();
- ds = new ShanuCRUDBizClass().SelectList(sd);
- if (ds.Tables.Count > 0)
- {
- if (ds.Tables[0].Rows[0].ItemArray[0].ToString() == "Exists")
- {
- Page.ClientScript.RegisterClientScriptBlock(this.GetType(), "alert", "alert('Item already Exist !')", true);
- txtitemName.Focus();
- }
- }
- else
- {
- GridView1.DataSource = ds;
- GridView1.DataBind();
- clearControls();
- }
- }
- private void UpdateCall(String PTYPE)
- {
- SortedDictionary<string, string=""> sd = new SortedDictionary<string, string="">() { };
- sd.Add("@pTYPE", PTYPE);
- sd.Add("@Item_Code", txtitemCode.Text.Trim());
- sd.Add("@Item_Name", txtitemName.Text.Trim());
- sd.Add("@Price", txtPrice.Text.Trim());
- sd.Add("@TAX1", txtTax.Text.Trim());
- sd.Add("@Discount", txtDiscount.Text.Trim());
- sd.Add("@Description", txtdescription.Text.Trim());
- sd.Add("@USR_Name", User.Identity.Name);
- DataSet ds = new DataSet();
- ds = new ShanuCRUDBizClass().SelectList(sd);
- GridView1.DataSource = ds;
- GridView1.DataBind();
- clearControls();
- }
- </string,></string,></string,></string,>
In our code behind it looks very simple because we have separated our Business logic and database connection into a separate class.
In my GridView I used the TemplateFiled to add, edit and delete the image buttons. Using the Gridview RowCommand, I will check for which button is clicked and perform the action.
Here we can see in the GridVie Rowcommand I check for the command name for Edit or Delete. If the edit image button is clicked then I will get the clicked row index. Using GridViewRow get all the row items and display it in the TextBox for user modification.
- // Grid Row command to do Edit and delete Operations
- protected void GridView1_RowCommand(object sender, GridViewCommandEventArgs e)
- {
- clearControls();
- if (e.CommandName == "edits")
- {
- hidsaveType.Value = "Edit";
- // To get the Current Row Number
- GridViewRow row = (GridViewRow)((Control)e.CommandSource).NamingContainer;
- int rowIndex = row.RowIndex;
- txtitemCode.Text = row.Cells[2].Text;
- txtitemName.Text = row.Cells[3].Text;
- txtPrice.Text = row.Cells[4].Text;
- txtTax.Text = row.Cells[5].Text;
- txtDiscount.Text = row.Cells[6].Text;
- txtdescription.Text = row.Cells[7].Text;
- tdADD.Visible = true;
- btnAdd.ImageUrl = "~/Images/btnEdit.jpg";
- }
- else if (e.CommandName == "deletes")
- {
- // To get the Current Row Number
- GridViewRow row = (GridViewRow)((Control)e.CommandSource).NamingContainer;
- int rowIndex = row.RowIndex;
- DeleteItem(row.Cells[2].Text);
- }
- }
Delete Record
The same as for edit, in the GridView “RowCommand” check for the Delete command being clicked and if so then call the function to perform the delete operation.
- // This method will delete the selected Rocord from DB
- private void DeleteItem(String ItemCode)
- {
- ShanuCRUDBizClass obj = new ShanuCRUDBizClass();
- obj.CRUD_Deletes(ItemCode);
- SelectList();
- }
Delete Biz Class method: Here I used ExecuteNonQuery to delete the record from the DB. In my deleteItems method after a delete I called the SelectList method to rebind the result to the GridView.
- public void CRUD_Deletes(string ItemCode)
- {
- try
- {
- SqlParameter[] paramArray = new SqlParameter[] { };
- AddParameter(ref paramArray, "@pTYPE", "D5");
- AddParameter(ref paramArray, "@Item_Code", ItemCode);
- SqlHelper.ExecuteNonQuery(ConnectionString, CommandType.StoredProcedure, "USP_Item_CRUD", paramArray);
- }
- catch (Exception ex)
- {
- throw ex;
- }
- }
Note: To run my application, kindly create a table and insert sample data into your SQL Server. You can find the table creation and insert SQL script from this article and also I have provided the table creation script files in my Zip file. After creating tables, in my ASP.Net project you can find the WEB.Config file, you need to change it to your DB server name, your database name and your database UserName and Password in the WEB.Config Connection string.
Procedure to run the program : unzip the file.
- Open Visual Studio. Go to File and click Open Web site.
In the File System select the "\SHANUCRUDV1.2" folder and you can see all the files in Solution Explorer.
- Run all the Database scripts in your SQL Server.
- In your ASP.Net open the "Web.Config" file then change the Database Connection string to your local database connection.
- Run the program. I hope this will help you.
Former memberPosted Mar 20, 2015, 6:19 AM
i guess the tier and layer is not same but you said "In application development the Tier is called a layer. " when we have different layer (BL, DL) etc in same solution then it is called N-Layer architecture but when we run each layer separately in same pc or in different pc then it is called N-tier apps. in multi layer apps all layer found in same solution as different project and when one layer need to talk to other then they do not have to cross process boundary but in N-tier architecture each layer run separately and for communication purpose each need to cross their process boundary to talk to other layer. if i am not right then please share your views. thanks
Syed ShanuPosted Feb 25, 2015, 12:44 PM
Thank you Rahul.
Rahul Kumar SaxenaPosted Feb 25, 2015, 12:30 PM
Nice Work...
wael adelPosted Feb 24, 2015, 9:13 AM
Thank you !
Syed ShanuPosted Feb 21, 2015, 1:56 PM
Thank you :)
satish GPosted Feb 21, 2015, 12:48 PM
Good one.. Thank you for the article
Syed ShanuPosted Feb 21, 2015, 4:20 AM
Apply to all job site.prepare for interview.hope you will get soon.All the best.
ROHAN PANDEYPosted Feb 21, 2015, 3:37 AM
HELLO I NEED JOBS CAN YOU HELP ME
Syed ShanuPosted Feb 21, 2015, 3:29 AM
Thank You :)
ROHAN PANDEYPosted Feb 21, 2015, 3:23 AM
nice work great done