

What is ARM template all about?
ARM template is a way to declare the Azure resources with its name, types & properties. You can directly create and install the defined resources in ARM template using Powershell. So the steps we will use are:
- Get the pre-requisite WDPs for the specific Sitecore version
- Create and upload WDPs in an Azure Blob storage
- Get the ARM template and fill the WDPs in the parameter file
- Create a self-signed certificate
- Run the Powershell command to execute the ARM template and create the Azure resources
Get the pre-requisite WDPs for the specific Sitecore version
Before starting, choose the Sitecore version you want to proceed with. In our case, we are heading with Sitecore 9.2.0 XP.
- Download the WDPs for Azure deployment of Sitecore 9.2.0 XP.
- Visit here
- Go to “Sitecore Experience Platform 9.2 Initial Release” download option.
- Search for “Download options for Azure AppService” where you will get the WDPs for Azure PaaS.
- Options will be there for both XP Single and XP Scaled. Single is for development purposes and scaled is for production purposes. Download XP Single as we are proceeding for XP Single only.
- Download Sitecore Identity installation files.
- Get an active Sitecore license file.
Create and upload WDPs in an Azure Blob Storage Account
Log on to your Azure portal to create a storage account. Click on the “Create resource” link and search for “Storage Account”. While creating, choose your subscription and resource group and a unique name for the same. Set account type as “Blob storage” with “Hot” access tier.
After successful creation of the storage account, go to your storage account and select “Blob” under “Blob Service”. The container name we are using is named “mnmsitecoredeployables”.
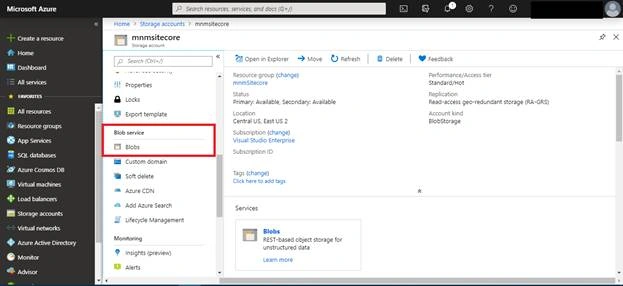
Create a new container. You can set the access level to public or private. In the case of public you don’t need to generate a SaaS URL to access, it can be accessed directly.
Now unzip the WDP container file and upload all the zip files into this container. Both Sitecore XP 9.0.2 Single & Identity files. You also need to upload your active Sitecore license file.
Get the ARM template and fill the WDPs in a parameter file
Now it’s time to get the ARM templates from GitHub. To get all the ARM templates provided by Sitecore click here. You will get all the templates which can be deployed in Azure PaaS mode. As we are going for Sitecore 9.2.0 XP Single. We have to download this. Download all the files available over there and keep this in a separate folder.
There are two main files, one is azuredeploy.json which is containing the templates and the second one azuredeploy.parameters.json which needs to be filled up with the part of WDPs. We don’t need to touch the first file as this is only the template of the deployment process.
Before you start editing, upload all the downloaded template files into your Azure blob storage. You can put these in the same container with a separate folder. We named it as “XP”.
Open the azuredeploy.parameters.json file and start editing it as follows.
- {
- "$schema": "https://schema.management.azure.com/schemas/2015-01-01/deploymentParameters.json#",
- "contentVersion": "1.0.0.0",
- "parameters": {
- "templateLinkBase": {
- "value": "<your storage account URL>/mnmsitecoredeployables/XP/"
- },
- "deploymentId": {
- "value": "<name of your deployment>"
- },
- "location": {
- "value": "<desired Azure location>"
- },
- "licenseXml": {
- "value": "<your storage account URL>/mnmsitecoredeployables/license.xml"
- },
- "sitecoreadminpassword":{
- "value":"<your strong password>"
- },
- "sqlServerLogin": {
- "value": "<your username>"
- },
- "sqlServerPassword": {
- "value": "<your strong password>"
- },
- "siMsDeployPackageUrl": {
- "value": "<your storage account URL>/mnmsitecoredeployables/Sitecore.IdentityServer.3.0.0-r00211.scwdp.zip"
- },
- "singleMsDeployPackageUrl": {
- "value": "<your storage account URL>/mnmsitecoredeployables/Sitecore 9.2.0 rev. 002893 (Cloud)_single.scwdp.zip"
- },
- "xcSingleMsDeployPackageUrl": {
- "value": "<your storage account URL>/mnmsitecoredeployables/Sitecore 9.2.0 rev. 002893 (Cloud)_xp0xconnect.scwdp.zip"
- },
- "authCertificateBlob": {
- "value": ""
- },
- "authCertificatePassword": {
- "value": "secret"
- },
- "allowInvalidClientCertificates": {
- "value": true
- }
- }
- }
Put all the data as described in the template.
- templateLinkBase - Put the path where all your ARM templates are stored in the cloud.
- deploymentId - Put the name of the deployment process. Your web app will be named before this. Like if you are putting “SitecoreDemo92” the web apps will be created like sitecoredeo92-single.azurewebsites.net.
- location - Set the location where you want to deploy, Like East US, Central India, etc.
- licenseXML - Path of your active Sitecore license file (.xml).
- sitecreadminpassword - Set your Sitecore admin password. Please use a strong password so that the deployment doesn’t get interrupted.
- sqlServerLogin - Set a username for your SQL servers.
- sqlServerPassword - Set a strong SQL Server password.
- siMsDeployPackageUrl - Set the path of Sitecore.IdentityServer.3.0.0-r00211.scwdp.zip from your downloaded zips.
- singleMsDeployPackageUrl - Set the path of Sitecore 9.2.0 rev. 002893 (Cloud)_single.scwdp.zip
- xcSingleMsDeployPackageUrl - Set the path of Sitecore 9.2.0 rev. 002893 (Cloud)_xp0xconnect.scwdp.zip
- authCertificateBlob - We have to create a new self-signed certificate and paste the blob of the same.
- authCertificatePassword - Keep it as “secret”.
- allowInvalidClientCertificates - Put this one as true, as we are using a self-signed certificate. You need to add this in your azuredeloyment.json file.
- "allowInvalidClientCertificates": {
- "type": "bool",
- "defaultValue": false
- }
Now, save the files and create a new self-signed certificate for our deployment.
Create a self-signed certificate
To create a new self-signed certificate open your Powershell command prompt and execute the below command.
- ## Create the Certificate
- $thumbprint = (New-SelfSignedCertificate `
- -Subject "CN=$env:COMPUTERNAME @ Sitecore, Inc." `
- -Type SSLServerAuthentication `
- -FriendlyName "$env:USERNAME Certificate").Thumbprint
- $certificateFilePath = "D:\Temp\$thumbprint.pfx"
- Export-PfxCertificate `
- -cert cert:\LocalMachine\MY\$thumbprint `
- -FilePath "$certificateFilePath" `
- -Password (Read-Host -Prompt "Enter password that would protect the certificate" -AsSecureString)
- ## To generate Base64 file [System.Convert]::ToBase64String([System.IO.File]::ReadAllBytes('D:\temp\SitecoreRootCert.pfx'))
The last line will provide you a blob string of the generated certificate. Copy the string and paste it in your azuredeploy.parameter.json file. Place it as a value of authCertificateBlob.
Run Powershell to deploy the Azure resources
Follow the below steps to run the Powershell scripts,
- Run Add-AzureRmAccount. It will open a popup. Provide the Azure credentials and login into your account.
- Run Set-AzureRmContext -SubscriptionName "<your subscription name>"
- Test your template whether it is correct or not.
This statement will return nothing and execute normally if all the parameters in the template are okay.- Test-AzureRmResourceGroupDeployment -ResourceGroupName mnmsitecorearm1 -TemplateFile "<your storage account URL>/mnmsitecoredeployables/xp/azuredeploy.json" -TemplateParameterFile "<your storage account URL>/mnmsitecoredeployables/xp/azuredeploy.parameters.json"
- After testing the template it’s time to run the query to deploy the solutions in Azure.
It will take about 30-40 minutes. Just keep yourself calm during this period, as you will not be notified by any updates through command prompt.- New-AzureRmResourceGroupDeployment -ResourceGroupName mnmsitecorearm1 -TemplateFile "<your storage account URL>/mnmsitecoredeployables/xp/azuredeploy.json" -TemplateParameterFile ""<your storage account URL>/mnmsitecoredeployables/xp/azuredeploy.parameters.json"
But in your Azure portal, you will track all the updates. Go to your resource group and there, you can see how many resources have been processed and how many are in progress.
After successful installation, in the command prompt, you can see the details of all the created resources.
Go to the web app service in your Azure account. Open the web app and you can see the welcome page of Sitecore. By default, the Sitecore admin username will be “admin”. Login with the credentials and enjoy.
Ghanendra SinghPosted Dec 4, 2019, 12:09 AM
Hi, Is there a way to install Sitecore modules e.g. JSS also while installing Sitecore using Arm templates on Azure PaaS?