

Introduction
Ad-mob is a mobile advertising company. It gives advertisement opportunities for mobile applications and generates revenue to the developer, as the maximum number of free mobile apps is running Ad-mob advertisements and making money. Ad-mob supports both Android and iOS applications.
Ad-mob provides different types of advertisement units in our platform:
-
Banner Ad
-
Interstitial Ad
-
Rewarded Ad
-
Native advanced Ad
By reading this article, you will learn how to integrate Ad-mob banner ads in Android applications.
Prerequisites
-
Android Studio (Updated version)
-
Ad-mob account
-
Browser
-
Virtual or physical Android device
-
Stable internet connection
-
Data cable (If you're using a physical Android device).
We are moving with three stages to integrate ads in our applications, each stage contains the following steps:
-
Creating Ad-unit in Ad-mob portal
-
Developing Android Application and integrate Ad-mob ad
-
Testing our application
Creating Ad-unit in Ad-mob portal
Step 1
Login to Ad-mob using your Google account.
Step 2
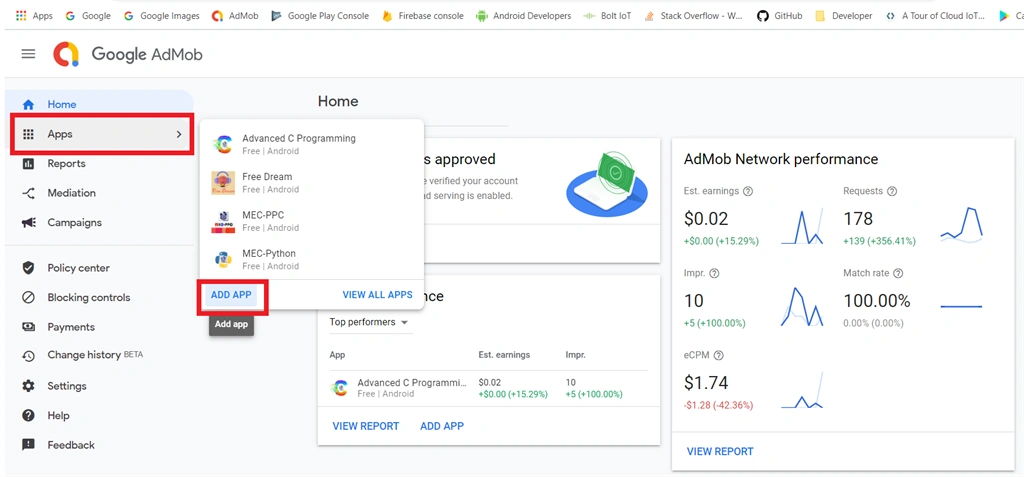
After logging in, the home page will be opened. Now we can add a new app for creating an advertisement unit. Click “Apps” from the left side pane and then click “Add APP”.
Step 3
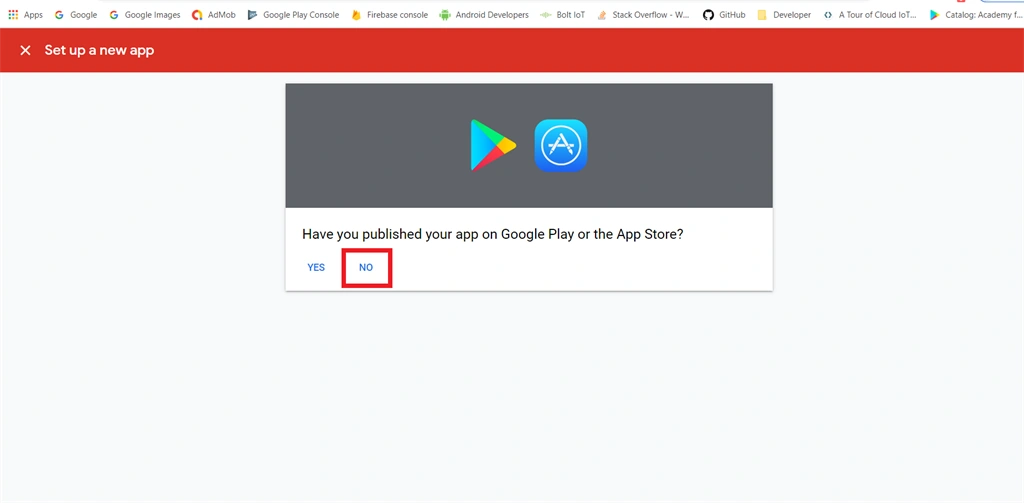
On the next page, click the “No” option if our application is not published in App markets.
Step 4
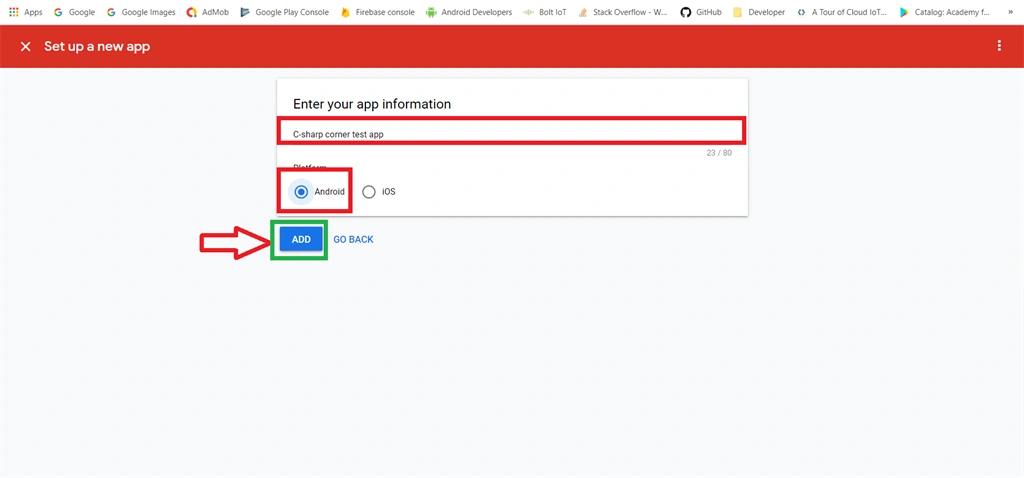
Next, fill in your application name, platform in the given field and then click the “Add” button.
Step 5
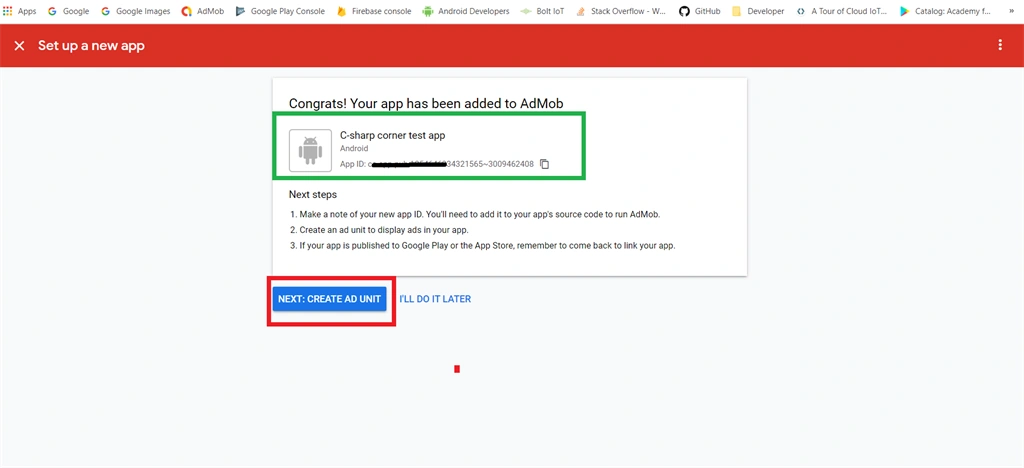
Now our application is added in Ad-mob and an app id will be created and displayed on that page. Next, we create an “Ad unit” in our application. Copy the App id in any text editors.
Step 6
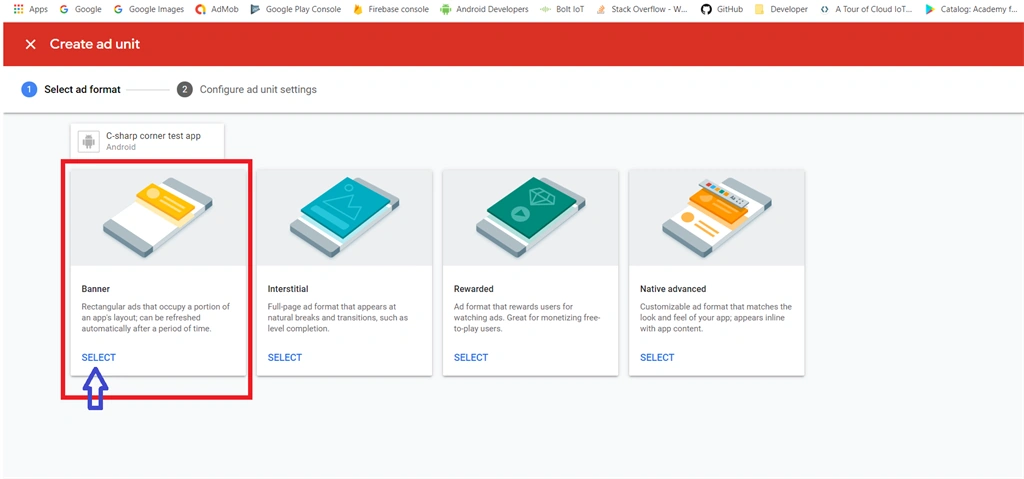
In the AD unit page, click the “Select” option under “Banner Ad”.
Step 7
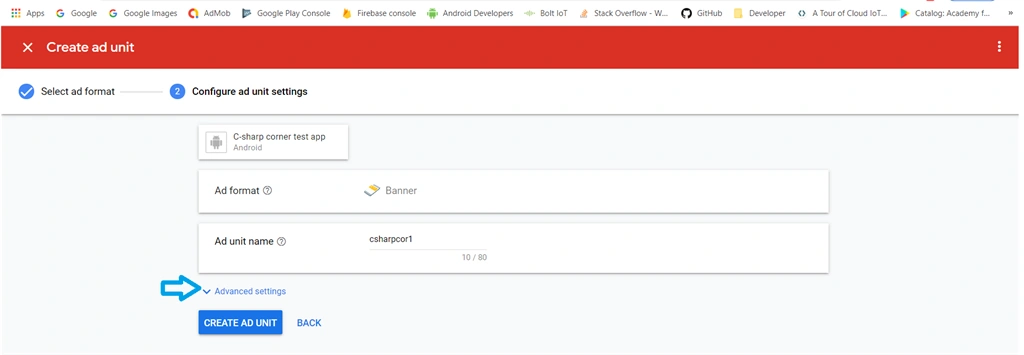
In the Ad configuration page, click the “Advanced Settings” option.
Step 8
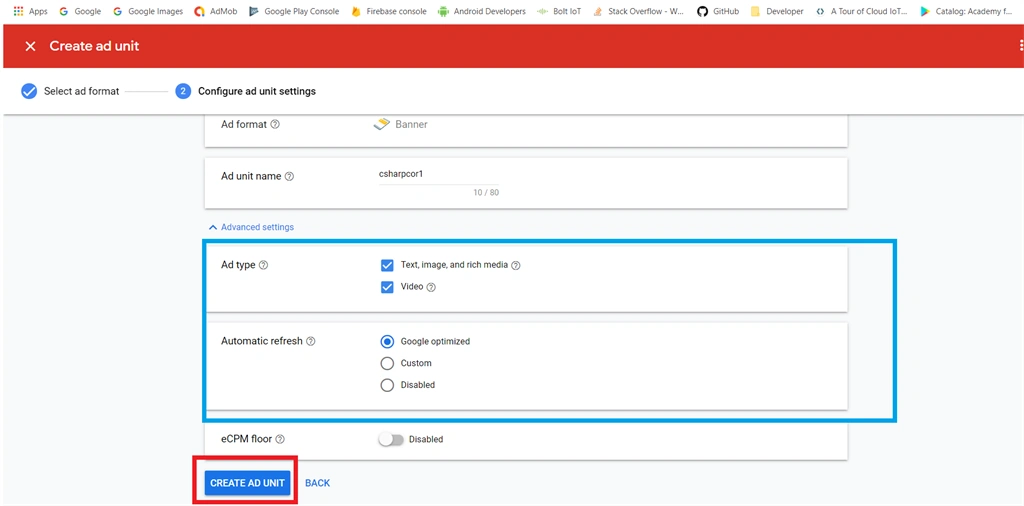
Fill the given fields, Ad unit name, Ad type and automatic refresh options and then click the “Create Ad unit” button.
Step 9
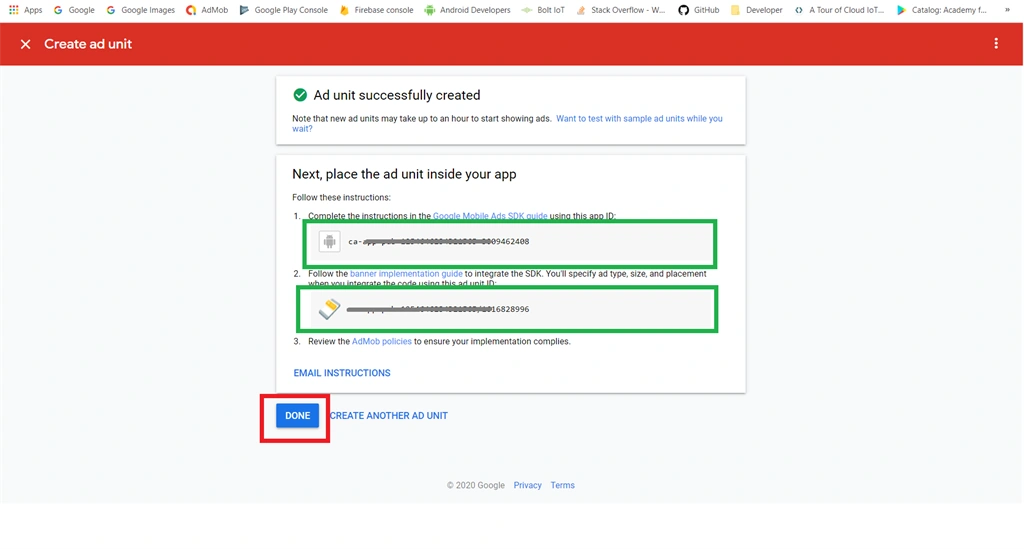
On the next page, our Ad unit is successfully created and our APP id and AD UNIT ID will be generated in Ad-mob platform. Click the “Done” button to view our Ad units.
Step 10
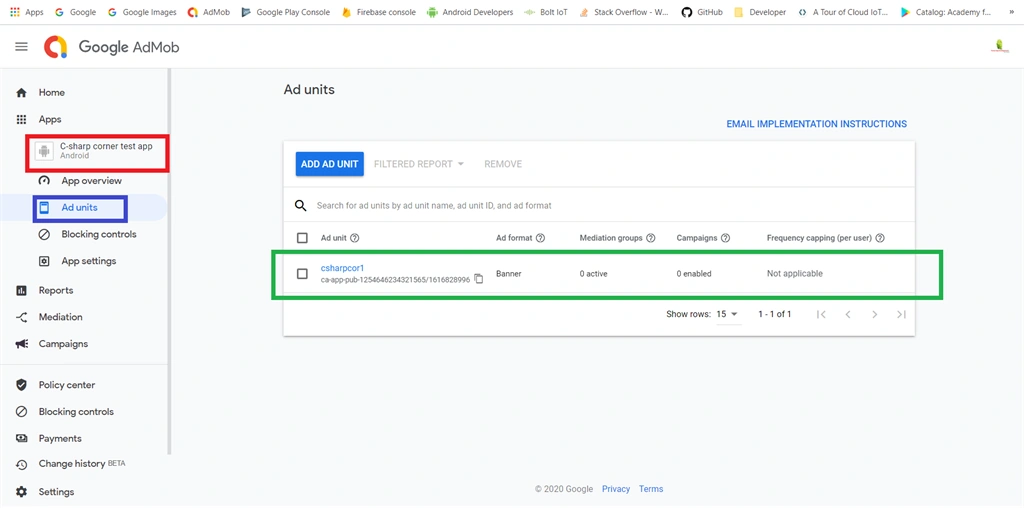
Our Ad unit name is displayed and it's listed in the created application name part. Details are displayed at the left side pane.
Developing Android Applications and Integrating Ad-mob Ads
Step 1
Create a new Android application project. In my previous article, I demonstrated how to create an Android application project in Android studio. Click to read
Step 2
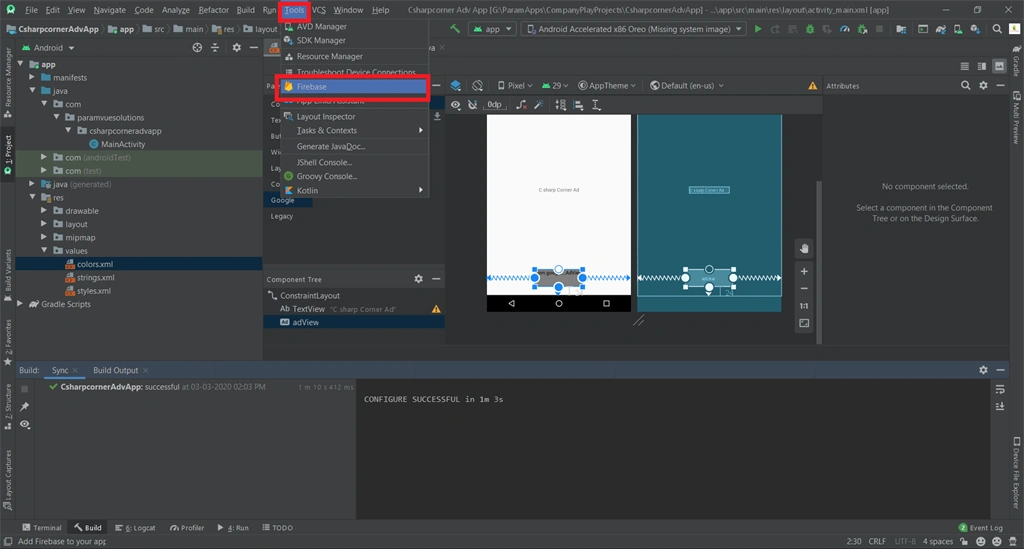
Next, connect our Android application with firebase. Click “Tools” -> “firebase” from the top of the menu bar.
Step 3
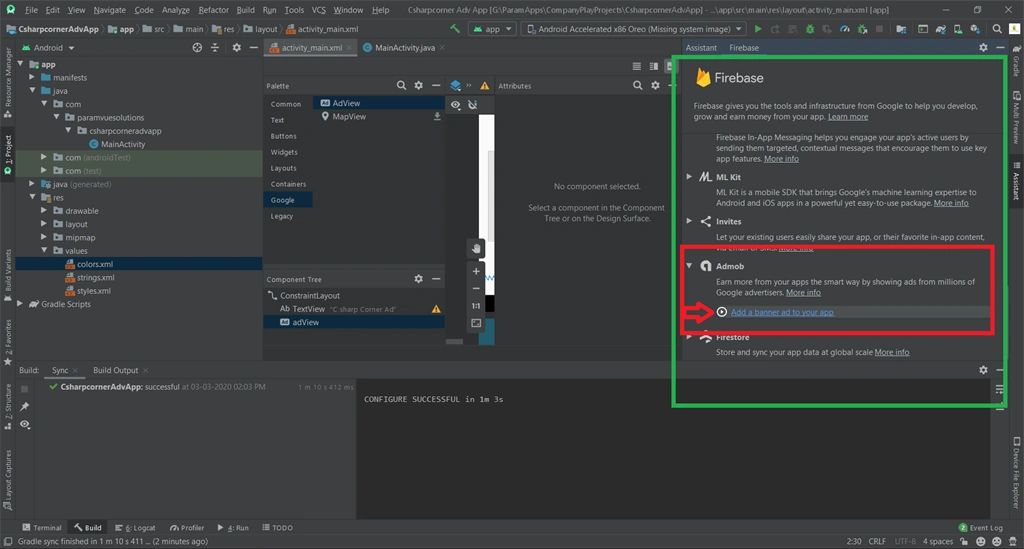
After clicking the firebase option, assistant pane opens on the right side of the Android studio. In the assistance pane choose “Ad-mob” and then click the “Add a banner ad to your app”.
Step 4
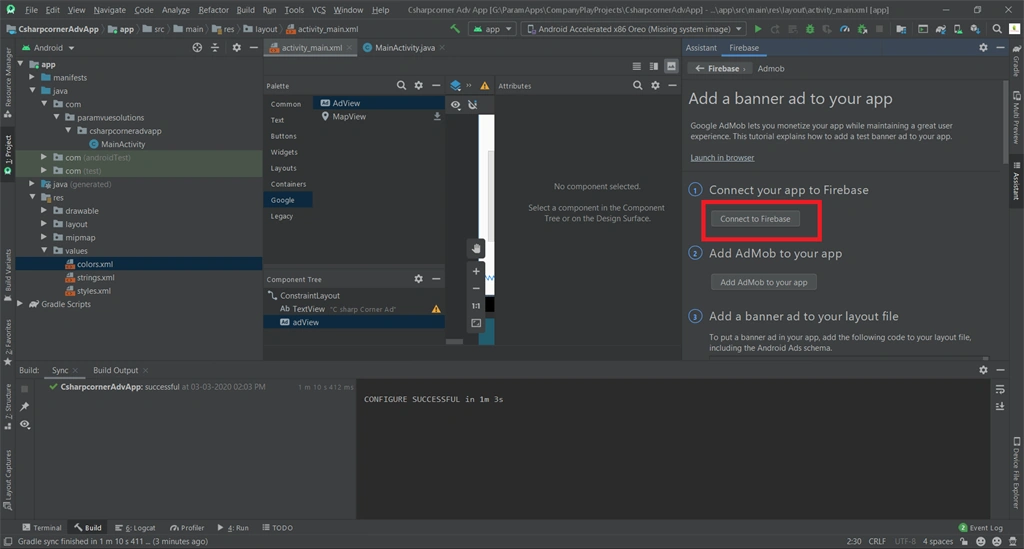
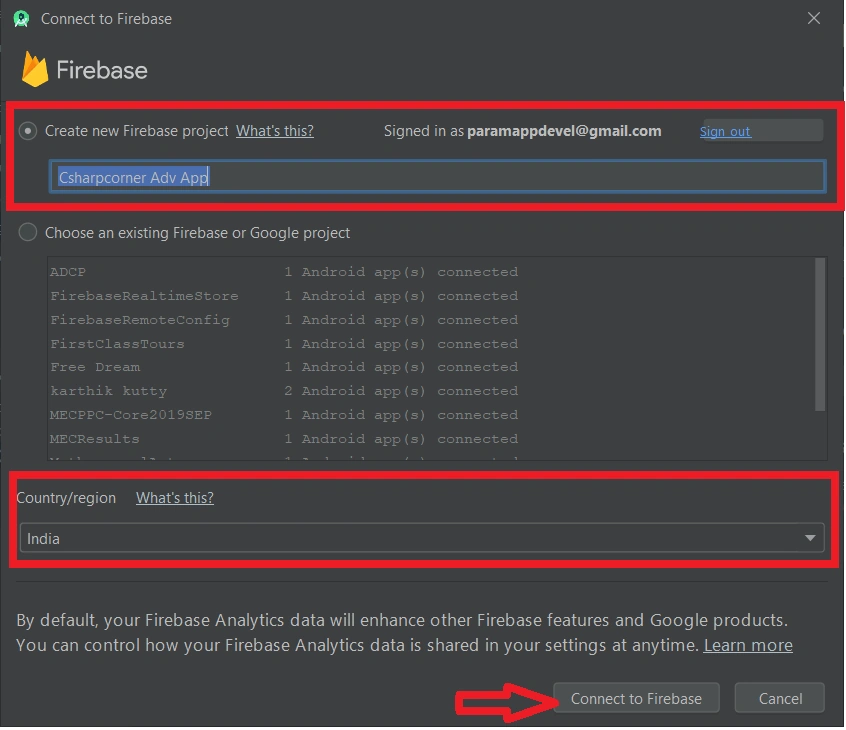
Click the “Connect to firebase” button. Connect to the firebase window will be opened.
Step 5
Give application project name and location and then click the “connect to firebase” button.
Our application connects within a few minutes.
Step 6
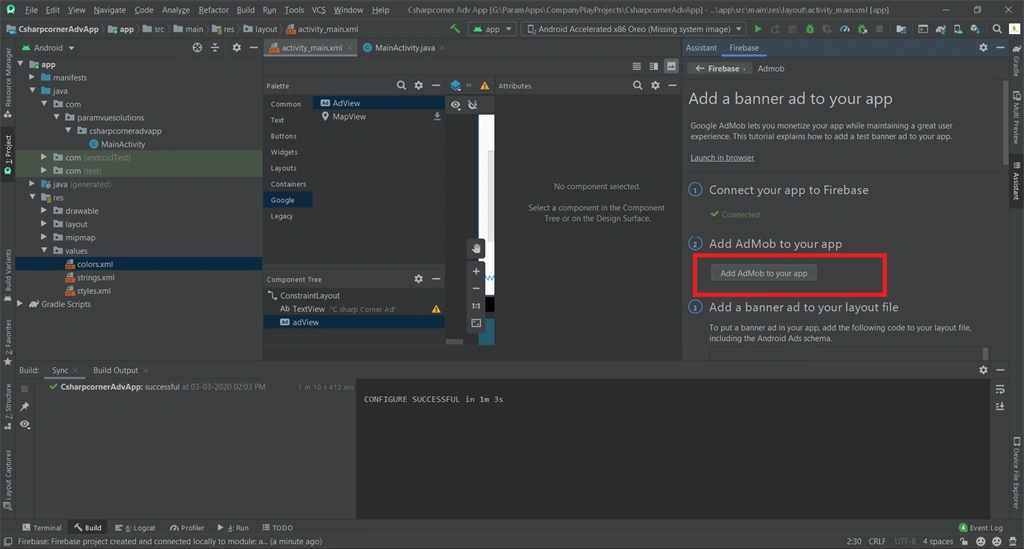
After successfully connecting, click the “Add Ad-Mob to your app” button to add dependencies to our application. Now Android studio syncs the newly-added dependencies in our application.
Step 7
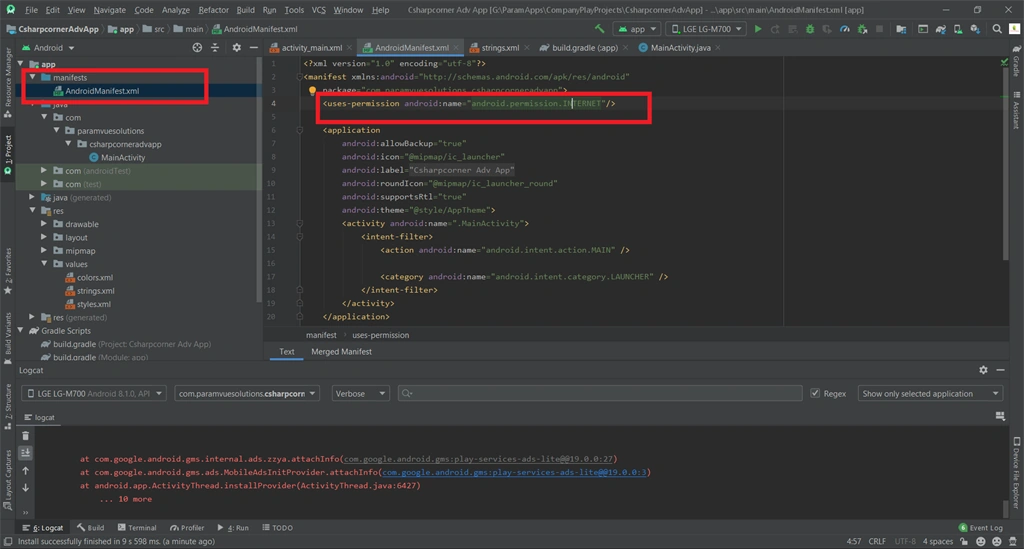
Next, we are writing the code, in the left side project directory pane choose app -> manifests-> open “AndroidManifest.xml” file and then add an internet permission to our application.
Copy and paste the below code:
- <uses-permission android:name="android.permission.INTERNET" />
Step 8
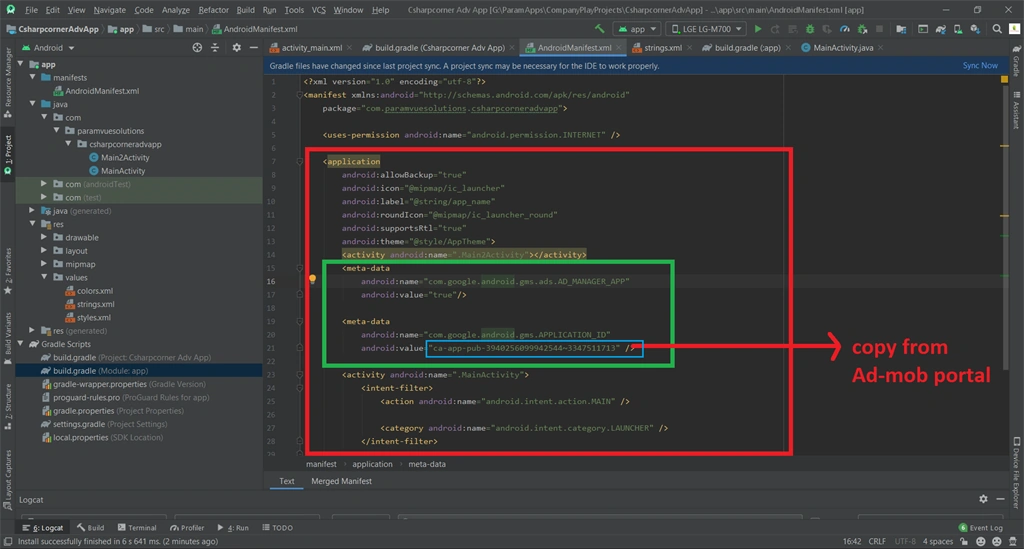
Copy and paste the below code in AndroidManifest.xml file inside of <application> tag. Paste the APPLICATION ID, it can copy that id during the creation of Ad unit in Ad mob.
- <meta-data
- android:name="com.google.android.gms.ads.AD_MANAGER_APP"
- android:value="true"/>
- <meta-data
- android:name="com.google.android.gms.APPLICATION_ID"
- android:value="ca-app-pub-3940256099942544~3347511713" />
Step 9
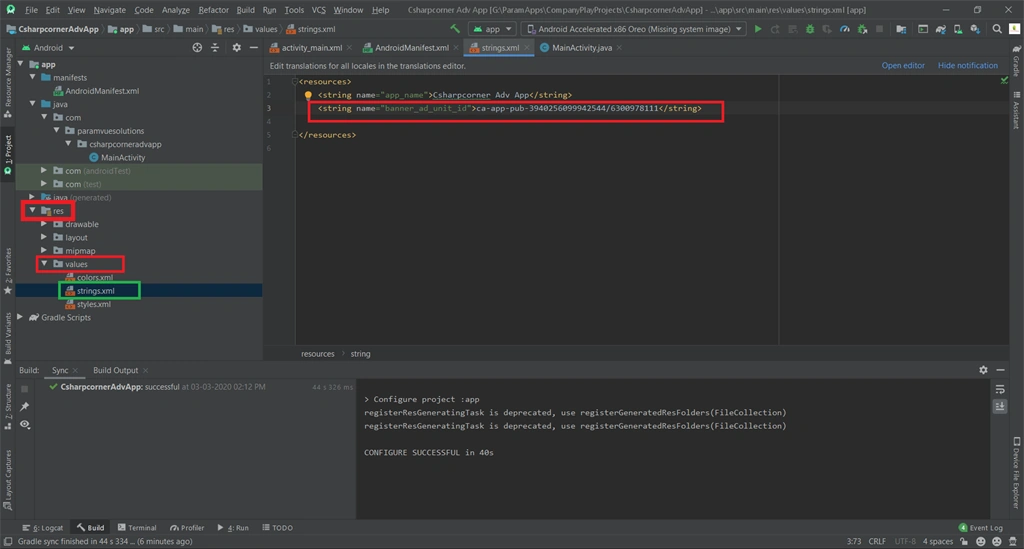
Copy and paste the below code in “strings.xml” file. It’s found in app --> res --> values -->strings.xml.
- <string name="banner_ad_unit_id">ca-app-pub-3940256099942544/6300978111</string>
Note
Above the code contains “test AD UNIT ID” It's used for testing purposes. If you are now publishing your App in any marketplace get AD UNIT ID from Ad-mob.
Step 10
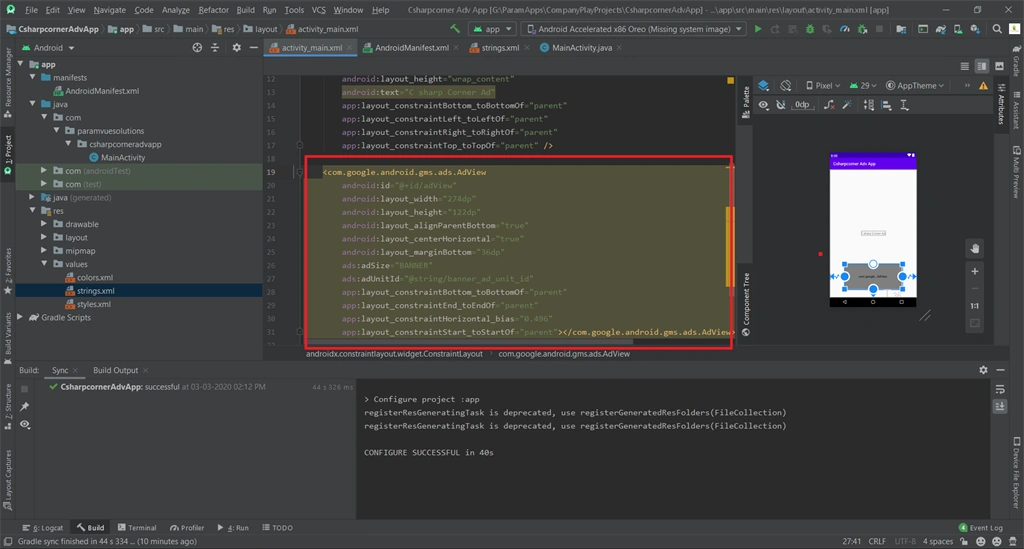
Next, we can add an Ad-mob UI component to display ads in our application. Open the “activity_main.xml” file and then copy and paste the below XML code.
- <?xml version="1.0" encoding="utf-8"?>
- <androidx.constraintlayout.widget.ConstraintLayout xmlns:android="http://schemas.android.com/apk/res/android"
- xmlns:app="http://schemas.android.com/apk/res-auto"
- xmlns:tools="http://schemas.android.com/tools"
- android:layout_width="match_parent"
- android:layout_height="match_parent"
- xmlns:ads="http://schemas.android.com/apk/res-auto"
- tools:context=".Main2Activity">
- <TextView
- android:id="@+id/textView"
- android:layout_width="wrap_content"
- android:layout_height="wrap_content"
- android:text="C sharp Corner Ad"
- app:layout_constraintBottom_toBottomOf="parent"
- app:layout_constraintLeft_toLeftOf="parent"
- app:layout_constraintRight_toRightOf="parent"
- app:layout_constraintTop_toTopOf="parent" />
- <com.google.android.gms.ads.AdView
- android:id="@+id/adView"
- android:layout_width="274dp"
- android:layout_height="122dp"
- android:layout_alignParentBottom="true"
- android:layout_centerHorizontal="true"
- android:layout_marginBottom="36dp"
- ads:adSize="BANNER"
- ads:adUnitId="@string/banner_ad_unit_id"
- app:layout_constraintBottom_toBottomOf="parent"
- app:layout_constraintEnd_toEndOf="parent"
- app:layout_constraintHorizontal_bias="0.496"
- app:layout_constraintStart_toStartOf="parent"/>
- </androidx.constraintlayout.widget.ConstraintLayout>
Step 11
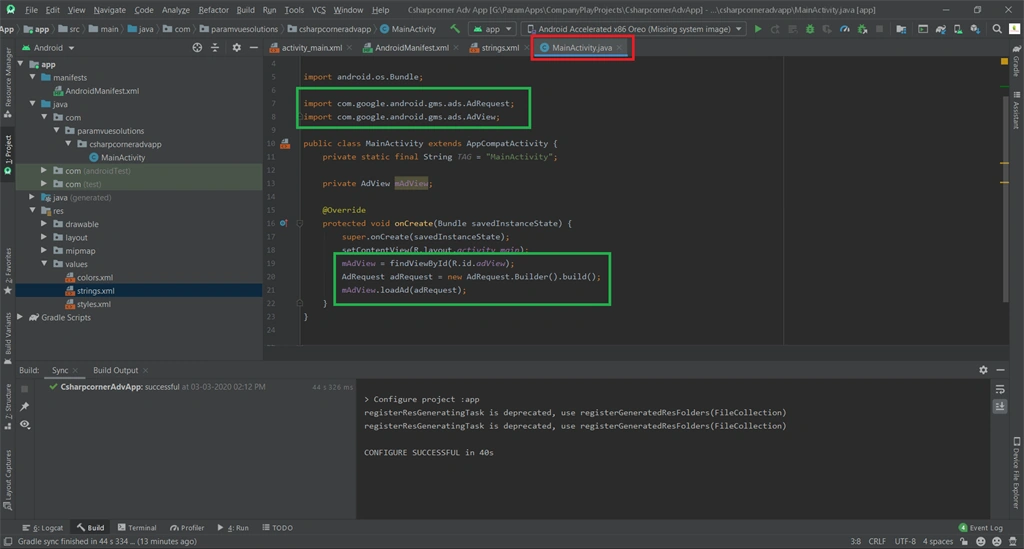
Now our design part is completed, write a Java code for running our ad in our application. Copy and paste the below code in “MainActivity.java” file.
- package com.paramvuesolutions.csharpcorneradvapp;
- import androidx.appcompat.app.AppCompatActivity;
- mport android.os.Bundle;
- import com.google.android.gms.ads.AdRequest;
- import com.google.android.gms.ads.AdView;
- public class MainActivity extends AppCompatActivity {
- private static final String TAG = "MainActivity";
- private AdView mAdView;
- @Override
- protected void onCreate(Bundle savedInstanceState) {
- super.onCreate(savedInstanceState);
- setContentView(R.layout.activity_main);
- mAdView = findViewById(R.id.adView);
- AdRequest adRequest = new AdRequest.Builder().build();
- mAdView.loadAd(adRequest);
- }
- }
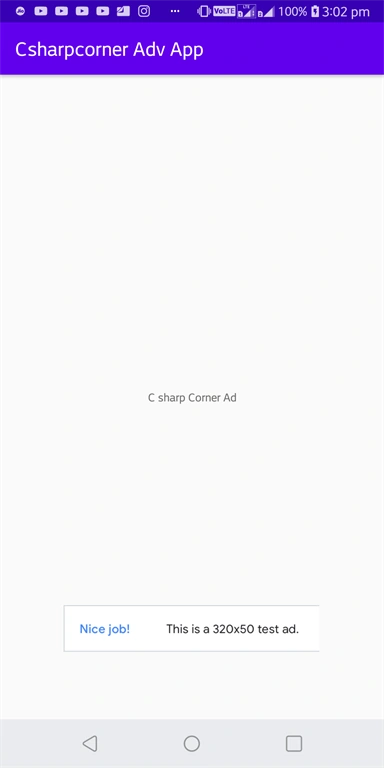
We are completing all the steps successfully. Let's test our application :).
Test our Application
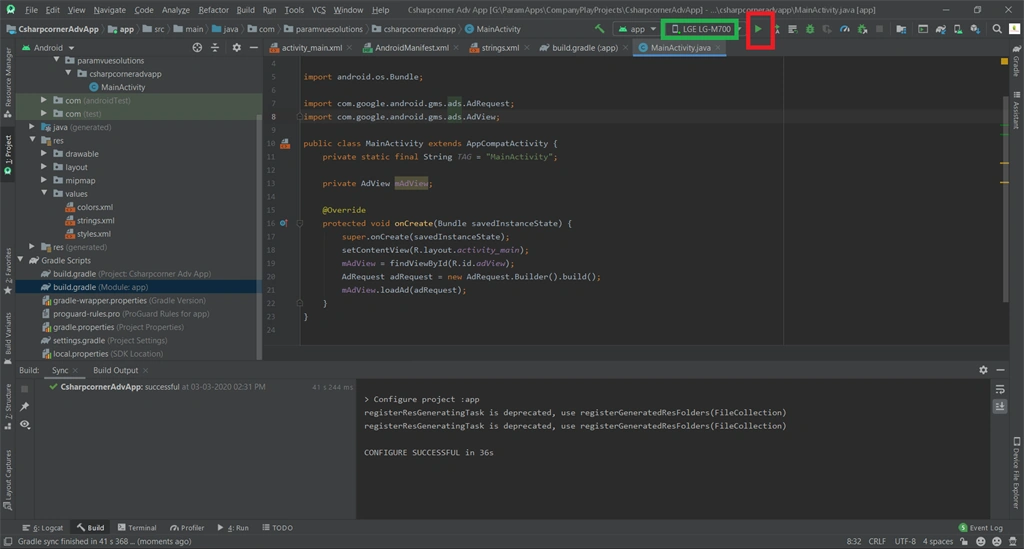
Select our Android device and then click the green color play button, now our app starts to build and install in our mobile.
Summary
Finally, we are successfully integrating an Ad-mob banner in our application.
Dipa MehtaPosted Mar 9, 2020, 8:26 AM
Nice article Naveen, on Android app integration.