

Introduction
Azure Service Bus is a messaging service provided by Microsoft Azure that allows communication between applications and services. It provides a reliable and scalable platform for sending and receiving messages asynchronously. Whether you're building a simple application or a complex distributed system, Azure Service Bus can help you decouple your components and scale your solutions.

What We'll Cover?
In this article, we'll walk through the process of using Azure Service Bus. NET. We'll cover everything from creating a Service Bus instance in the Azure portal to sending and receiving messages using .NET APIs. Here's a brief overview of the topics we'll delve into.
- Setting Up Azure Service Bus in the Azure Portal.
- Setting up queues within the Service Bus.
- Creating APIs in .NET to send messages to the Service Bus.
- Scheduling messages for future delivery and canceling scheduled messages.
- Creating an Azure Function to Receive Messages
Setting Up Azure Service Bus in the Azure Portal
Before we can start using Azure Service Bus to send and receive messages, we first need to create a Service Bus instance in the Azure portal.
Step 1. Go to the Azure Portal.
Open your preferred web browser and navigate to the Azure portal at portal.azure.com.
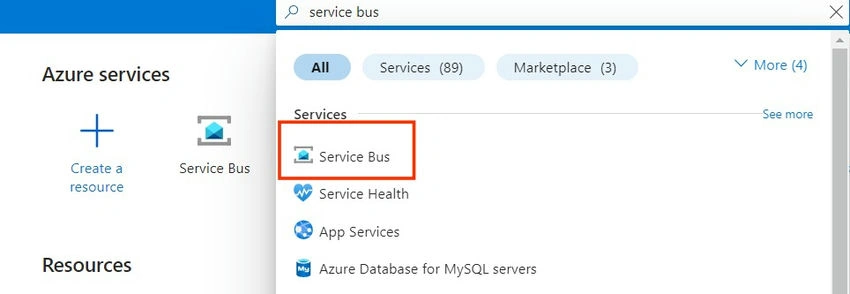
Step 2. Search for Service Bus.
In the search bar at the top, type "Service Bus" and select it from the list of available services.
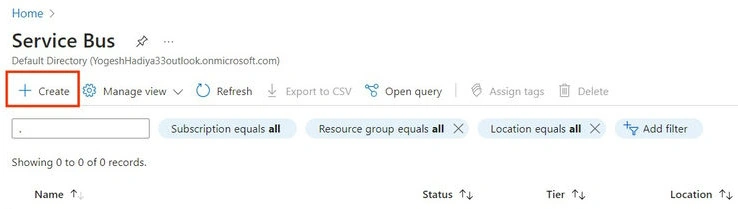
Step 3. Click on the Create Button.
Once you're on the Service Bus page, click on the "Create" button to start configuring your Service Bus instance.
Step 4. Provide Basic Details.
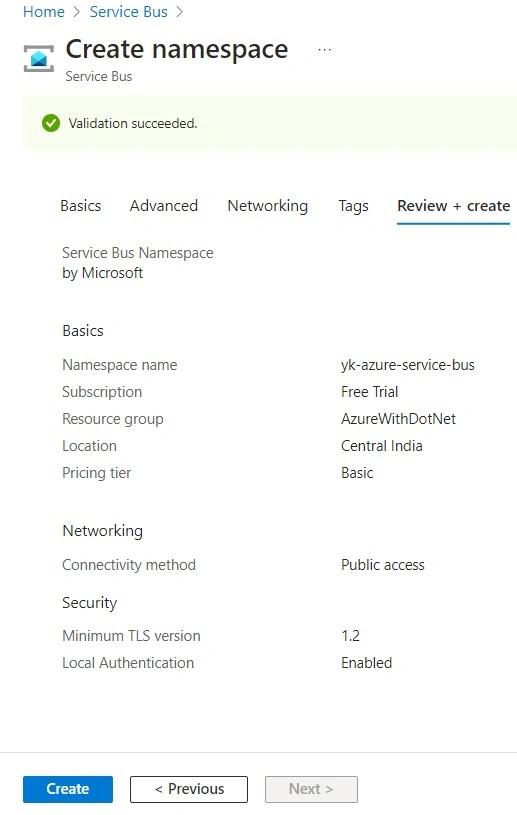
- Subscription: Choose the Azure subscription you want to use.
- Resource Group: Create a new resource group or select an existing one.
- Namespace: Enter a unique name for your Service Bus namespace.
- Location: Select the geographical region where you want your Service Bus to be deployed.
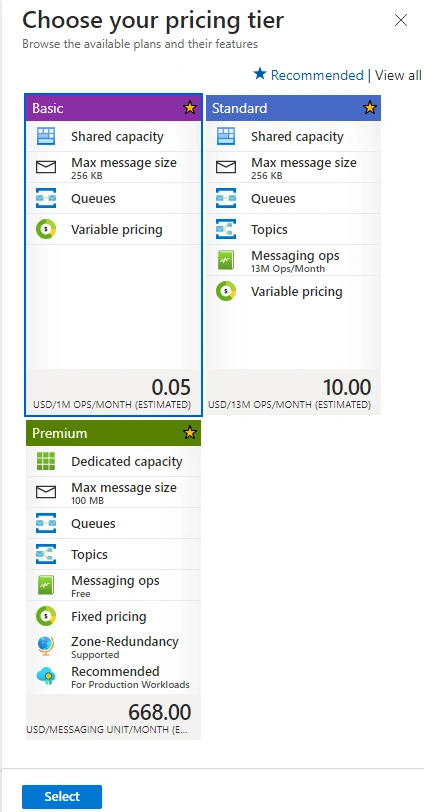
- Pricing Tier: Choose from Basic, Standard, or Premium tier based on your requirements.

Pricing Options
Before finalizing your Service Bus instance, it's essential to understand the pricing options available. Here's a detailed overview of the pricing plan.
Step 5. Additional Options.
Advanced Tab
You can explore advanced options such as Minimum TTL Version and Local Authentication. For most cases, you can leave these as default settings.

Step 6. Networking.
Keep the default networking settings unless you have specific requirements.

Step 7. Review + Create.
Review the summary of all the details you've provided. Once you're satisfied, click on the "Create" button to create the Service Bus instance.
Setting up queues within the Service Bus
Step 1. Select Queue from the Entity Menu.
In the Azure portal, navigate to your Service Bus instance. From the entity menu, choose "Queue."
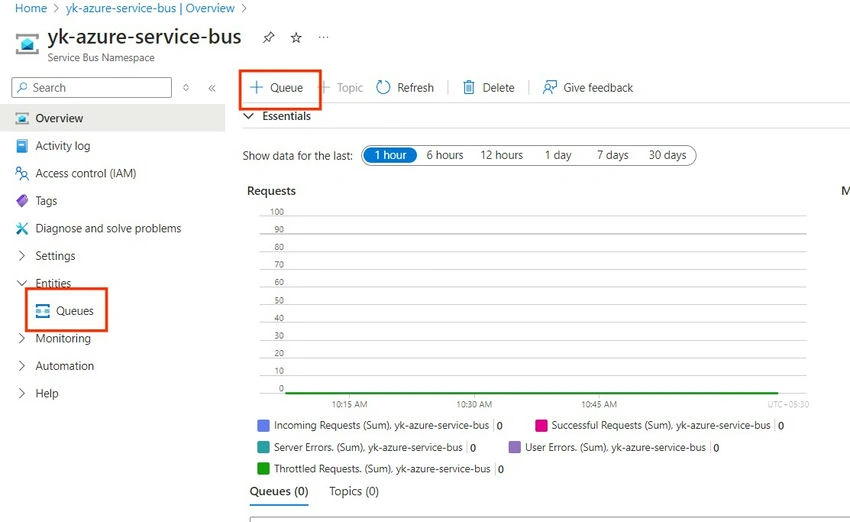
Step 2. Click on New Queue.
Next, click on the "New Queue" button to create a new queue.
Step 3. Provide Queue Details.
- Name: Give your queue a unique name.
- Maximum Queue Size: Decide how big you want your queue to be. This determines the maximum size the queue can reach before it starts rejecting new messages.
- Maximum Delivery Count: Set the maximum number of times a message can be delivered before it's considered undeliverable.
- Message Time to Live: Determine how long a message can stay in the queue before it expires.
- Lock Duration: Set the duration for which a message is locked after being received. After a message is received, it's locked to prevent other receivers from processing it simultaneously. The lock duration determines how long the lock remains active.
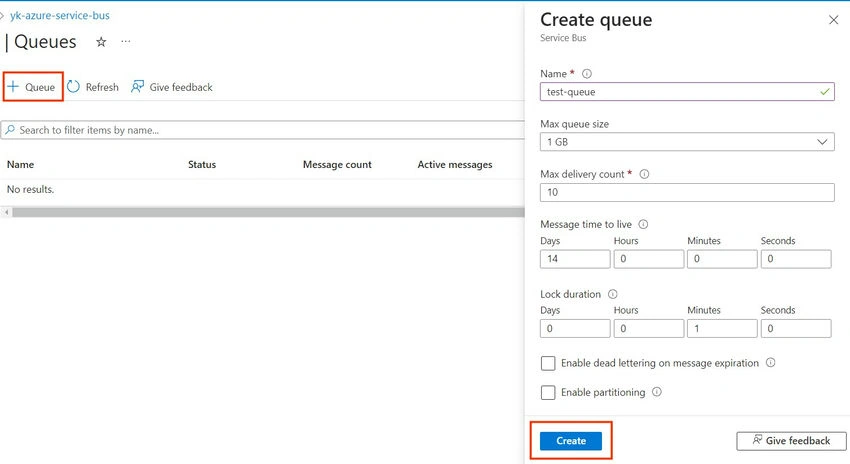
Step 4. Create the Queue.
Once you've filled in the details, click on the "Create" button to create the queue.
Creating an API to Send Messages on the .NET Side
Create a New API Project
Start by creating a new API project in your preferred development environment.
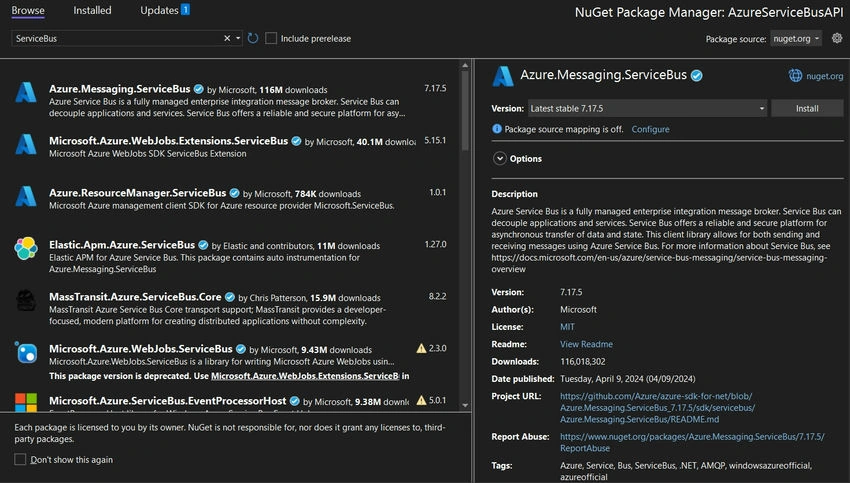
Install Packages, Use the NuGet Package Manager to install the following packages.
- Azure.Messaging.ServiceBus: This package provides functionality for interacting with Azure Service Bus.
- Newtonsoft.Json: This package helps with JSON serialization.

- Get Connection String from Azure Portal: Go to your Azure portal and navigate to your Service Bus instance. Access the "Shared Access Policies" and click on "RootManageSharedAccessKey."
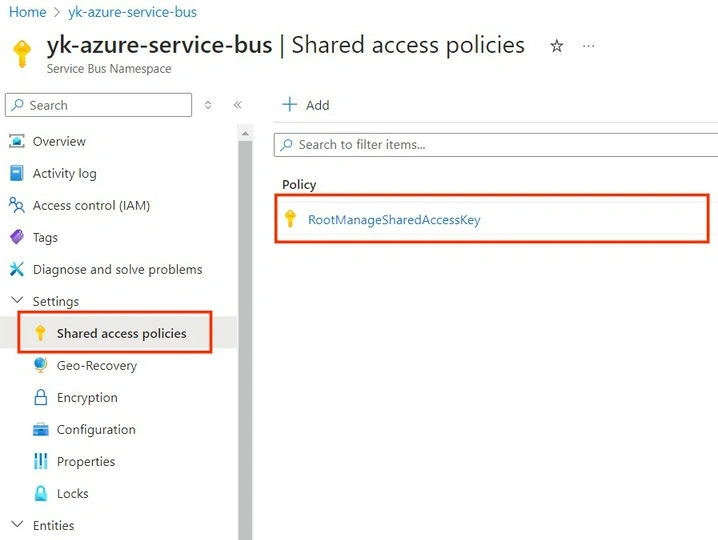
- Copy the primary connection string and Store the Connection String and Queue Name in the App Settings File.
- Store the connection string and queue name in your application's app settings file for easy access.

Create a Controller for Sending Messages
Here I'm creating a new controller called "ServiceBusController". In this controller, I'm going to implement methods for sending messages to the service bus.
using API.Models;
using Azure.Messaging.ServiceBus;
using Microsoft.AspNetCore.Mvc;
using Newtonsoft.Json;

namespace API.Controllers;

[Route("api/[controller]/[action]")]
[ApiController]
public class ServiceBusController : ControllerBase
{
    readonly IConfiguration _configuration;

    public ServiceBusController(IConfiguration configuration)
    {
        _configuration = configuration;
    }

    [HttpPost]
    public async Task<IActionResult> SendMessageAsync([FromBody] EmployeeModel employee)
    {
        string connectionString = _configuration.GetValue<string>("ServiceBusSettings:ConnectionString");
        string queueName = _configuration.GetValue<string>("ServiceBusSettings:QueueName");

        var client = new ServiceBusClient(connectionString);
        var sender = client.CreateSender(queueName);
        string body = JsonConvert.SerializeObject(employee);
        var message = new ServiceBusMessage(body);
        await sender.SendMessageAsync(message);
        return Ok("Message sent to the Service Bus queue successfully");
    }
}
namespace API.Models;

public class EmployeeModel
{
    public string FirstName { get; set; }
    public string LastName { get; set; }
    public string Designation { get; set; }
    public string Department { get; set; }
    public string Note { get; set; }
}
Explanation
- Inject the IConfiguration interface in the constructor to read data from the app setting file.
- In the above action method, I have taken EmployeeModel as a parameter just for getting details from the user side. I have created this model class in the model folder of my API project.
- Read the connection string and queue name from the app setting file using configuration.
- Then create an object of ServiceBusClient by passing the service bus connection string.
- Create a sender by calling the CreateSender method of the client instance.
- Convert employee model to JSON using newton-soft JSON and create queue message using ServiceBusMessage
- Send a message to the queue by calling SendMessageAsync of the sender
Use Dependency Injection for Service Bus Client
We can also create instances of service bus clients using dependency injection. To enable this we first have to make changes in our program.cs file. Register Service Bus Client in your program.cs file by passing the connection string.
builder.Services.AddSingleton<ServiceBusClient>(
    new ServiceBusClient(builder.Configuration.GetValue<string>("ServiceBusSettings:ConnectionString"))
);
For using the Service Bus Client here I'm injecting it into the constructor. I'm also creating a sender in the constructor because I'm using a single queue in this whole controller. If you are going to use multiple queues you can follow a different approach.
using API.Models;
using Azure.Messaging.ServiceBus;
using Microsoft.AspNetCore.Mvc;
using Newtonsoft.Json;

namespace API.Controllers;

[Route("api/[controller]/[action]")]
[ApiController]
public class ServiceBusController : ControllerBase
{
    readonly IConfiguration _configuration;
    readonly ServiceBusClient _serviceBusClient;
    private readonly ServiceBusSender _serviceBusSender;

    public ServiceBusController(IConfiguration configuration,
        ServiceBusClient serviceBusClient)
    {
        _configuration = configuration;
        _serviceBusClient = serviceBusClient;

        string queueName = _configuration.GetValue<string>("ServiceBusSettings:QueueName");
        _serviceBusSender = _serviceBusClient.CreateSender(queueName);
    }

    [HttpPost]
    public async Task<IActionResult> SendMessageWithDIAsync([FromBody] EmployeeModel employee)
    {
        string body = JsonConvert.SerializeObject(employee);
        var message = new ServiceBusMessage(body);
        await _serviceBusSender.SendMessageAsync(message);
        return Ok("Message sent to the Service Bus queue successfully using dependency injection");
    }

}
Explanation
- In the constructor, we inject the IConfiguration interface (for accessing app settings) and the ServiceBusClient instance. This allows us to access the Service Bus client throughout the controller.
- We retrieve the queue name from the app settings and create a ServiceBusSender instance using the injected ServiceBusClient.
- The SendMessageWithDIAsync method then uses the injected ServiceBusSender to send messages to the Service Bus queue.
Scheduling Messages and Canceling Scheduled Messages
Scheduling Messages with Azure Service Bus
Azure Service Bus allows you to schedule messages to be delivered at a future time by specifying the ScheduledEnqueueTime property of the message. This feature provides flexibility in managing message delivery and enables you to design applications that cater to specific timing requirements.
Usage Scenarios
- Delayed Processing: Schedule messages to be processed after a certain delay, allowing for time-sensitive operations or periodic tasks.
- Reminder Services: Implement reminder services by scheduling messages to notify users about upcoming events or tasks.
- Batch Processing: Coordinate batch processing of data by scheduling messages to trigger data processing tasks at predefined intervals.
To schedule a message, you need to set the ScheduledEnqueueTime property of the message to the desired future time.
Here's how you can do it.
    [HttpPost]
    public async Task<IActionResult> ScheduleMessageAsync([FromBody] EmployeeModel employee)
    {
        string body = JsonConvert.SerializeObject(employee);
        var message = new ServiceBusMessage(body);

        // Schedule the message to be sent 5 minutes from now
        message.ScheduledEnqueueTime = DateTimeOffset.UtcNow.AddMinutes(5);

        // Schedule the message
        long sequenceNumber = await _serviceBusSender.ScheduleMessageAsync(message, message.ScheduledEnqueueTime);

        return Ok($"Message scheduled to the Service Bus queue successfully. Sequence number: {sequenceNumber}");
    }
Canceling Scheduled Messages
In addition to scheduling messages, Azure Service Bus also provides the capability to cancel scheduled messages if the need arises. This feature ensures that you maintain control over message delivery and can adjust schedules as required. If you need to cancel a scheduled message, you can do so by providing its sequence number. Here's how you can cancel a scheduled message
    [HttpPost]
    public async Task<IActionResult> CancelScheduledMessageAsync([FromQuery] long sequenceNumber)
    {
        // Cancel the scheduled message using its sequence number
        await _serviceBusSender.CancelScheduledMessageAsync(sequenceNumber);

        return Ok($"Scheduled message with sequence number {sequenceNumber} has been canceled.");
    }
Explanation
- In the ScheduleMessageAsync method, we serialize the EmployeeModel object to JSON and create a ServiceBusMessage with the payload.
- We set the ScheduledEnqueueTime property of the message to the current time plus 5 minutes.
- The message is then scheduled using the ScheduleMessageAsync method, and the sequence number of the scheduled message is returned.
- In the CancelScheduledMessageAsync method, we simply provide the sequence number of the scheduled message to cancel it using the CancelScheduledMessageAsync method.
Creating an Azure Function to Receive Messages
Create a New Azure Function Project
Begin by creating a new Azure Function project in your development environment. You can use Visual Studio or Visual Studio Code for this.
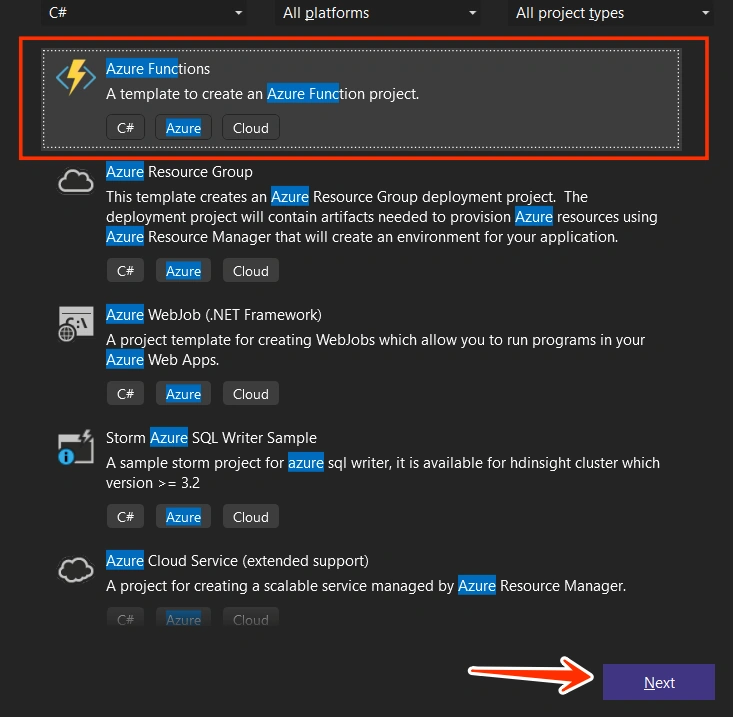
Select Azure Service Bus Trigger
When creating a new function, choose the Azure Service Bus Queue Trigger option. This trigger will automatically execute your function whenever a new message arrives in the specified Service Bus queue.
Add Service Bus Connection Settings
In your Azure Function project, locate the local.settings.json file. This file contains configuration settings for your function.
Add the ServiceBusConnectionString and QueueName settings to this file. These settings will be used by the function to connect to your Service Bus instance and listen to the specified queue.
{
  "IsEncrypted": false,
  "Values": {
    "AzureWebJobsStorage": "UseDevelopmentStorage=true",
    "FUNCTIONS_WORKER_RUNTIME": "dotnet",
    "ServiceBusConnectionString": "YOUR_SERVICE_BUS_CONNECTION_STRING",
    "QueueName": "YOUR_QUEUE_NAME"
  }
}
Implement the Function Logic
In your Azure Function project, locate the function file created by the Azure Function runtime. This file will have a name corresponding to the trigger type you selected (e.g., Function1.cs). Here i have renamed this function for this operation.
Implement the function logic to process incoming messages from the queue. This logic will be executed every time a new message arrives in the queue.
using Azure.Messaging.ServiceBus;
using Microsoft.Azure.Functions.Worker;
using Microsoft.Extensions.Logging;

namespace ServiceBusReceiver;

public class TestQueueReceiver(ILogger<TestQueueReceiver> logger)
{
    [Function(nameof(TestQueueReceiver))]
    public async Task Run(
        [ServiceBusTrigger("%QueueName%", Connection = "ServiceBusConnectionString")] ServiceBusReceivedMessage message,
        ServiceBusMessageActions messageActions)
    {
        logger.LogInformation("Message ID: {id}", message.MessageId);
        logger.LogInformation("Message Body: {body}", message.Body);
        logger.LogInformation("Message Content-Type: {contentType}", message.ContentType);

        // Complete the message
        await messageActions.CompleteMessageAsync(message);
    }
}
Explaination
- The function is defined with the [Function] attribute, specifying the trigger type and function name.
- Inside the function, we access the incoming message using the ServiceBusReceivedMessage object.
- We log details of the message, such as its ID, body, and content type.
- After processing the message, we call CompleteMessageAsync to remove it from the queue.
- Within the function logic, you can access and process the incoming message from the Service Bus queue. This provides an opportunity to perform various tasks based on the message content or metadata.
- After processing the message, you have the option to complete it using the CompleteMessageAsync method to remove it from the queue.
Instead of solely logging the message body, consider
- Processing Data: Extract relevant information from the message body and perform data processing tasks such as validation, transformation, or enrichment.
- Triggering Workflows: Based on the message content, initiate specific workflows or actions within your application or business logic, such as sending notifications, updating databases, or invoking external APIs.
- Monitoring Real-time Events: Monitor and respond to real-time events or updates by reacting to messages as they are received, enabling timely actions and insights.

Output
Conclusion
Azure Service Bus, coupled with .NET, offers a robust messaging solution for building scalable and resilient applications. By leveraging Service Bus queues and Azure Functions triggers, developers can seamlessly integrate asynchronous messaging into their applications, enabling efficient communication and workflow automation.
You can download and access source code from My GitHub. If you find this article helpful, kindly share it with your friends.
Join the conversation! Your thoughts help the community grow.