
Introduction
Approval workflows are a crucial part of managing business processes, ensuring that the right people review and approve important items. With Power Automate, you can easily create automated approval workflows for SharePoint lists. In this guide, we’ll walk you through the process of building an approval workflow from scratch.
Advantages
- Automation of Approvals: The approval process is fully automated, saving time and reducing manual effort for both the task creator and the supervisor.
- Real-Time Status Updates: The 'TaskApprovalStatus' column is automatically updated with 'Approved' or 'Rejected', providing clear and instant feedback on the task's status.
- Easy to Track and Audit: The workflow logs approvals and comments, making it easy to track who approved or rejected a task and when which is useful for future auditing and accountability.
Disadvantage
- Limited Customization: Power Automate offers limited customization in its basic templates. Complex approval workflows may require advanced configurations or even external integrations.
- Dependency on Email: The flow heavily relies on email notifications for approvals and status updates, which may delay the process if email delivery is slow, or recipients don’t check their inbox promptly.
- Limited Workflow Scalability: For more complex approval processes (involving multiple approvers, conditional logic, or parallel approvals), the flow may become difficult to scale or maintain.
Steps to make workflow
Step 1. Create a new list in SharePoint.
The first step in building an approval workflow is to create a new list in SharePoint that will track the tasks and their approval status. This list will contain all the necessary details, including the task creator, task status, priority, and who the task is assigned to.
How to Create the List?
- Open your SharePoint site.
- Click on "New" and select "List".
- Name your list "Tasks".
Add Columns to the List
Required Columns
- Task ID: A unique identifier for each task.
- Task: A short description or title for the task.
- Submission Date: The date the task was submitted.
- Priority: A column to set the priority level (e.g., High, Medium, Low).
- Assigned To: A person or group column to assign the task to a specific individual or team.
- Status: A choice column with the options New, Under Review, Approved, and Rejected, with the default value set to New.
- Created By: Automatically captures the name of the person who created the task.

Step 2. Create a Power Automate Cloud Flow.
Open Power Automate: Go to the Power Automate website and sign in with your credentials.
Create a New Flow
- Click on "Create" from the left-hand menu.
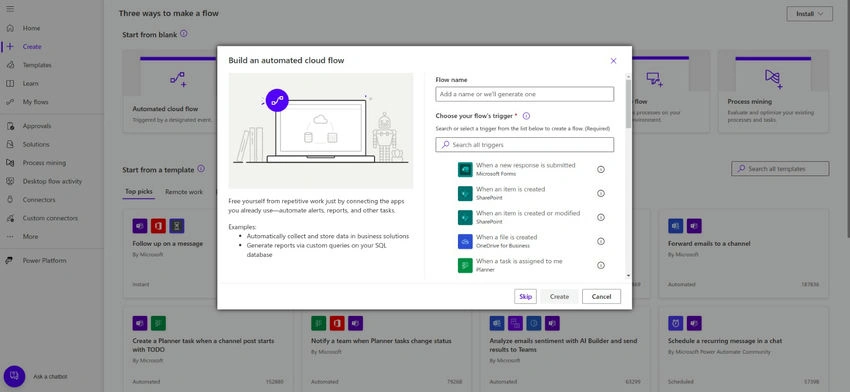
- Select "Automated cloud flow."
- Then you get a page like the one below.
Set the Trigger
- In the "Build an automated flow" window, search for "When an item is created".
- Select "When an item is created" from the SharePoint connectors and click "Create."
- Now click that trigger to add the parameter.
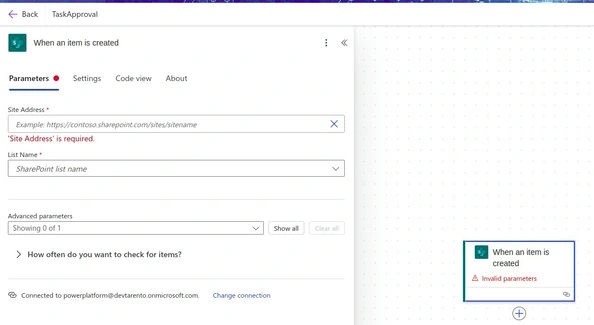
- Choose your SharePoint site and the "Tasks" list.
Update Item Status to Under Review
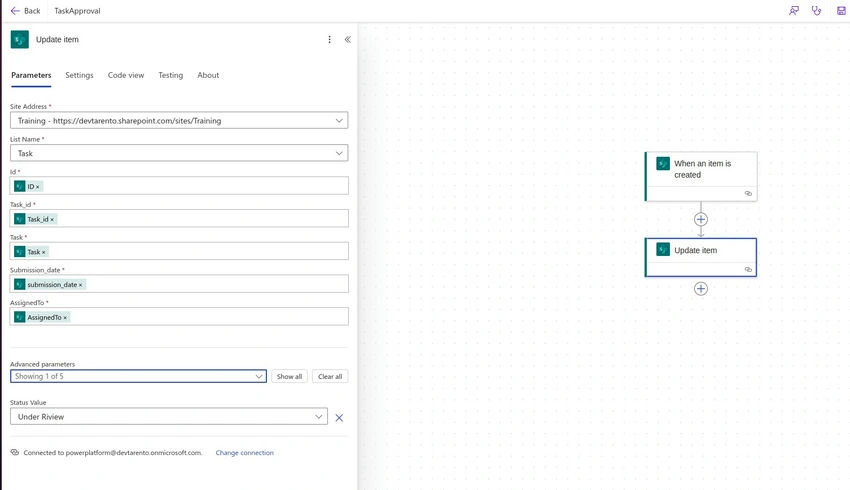
- Add a new step and choose the "Update item" action from SharePoint.
- Give all required fields.
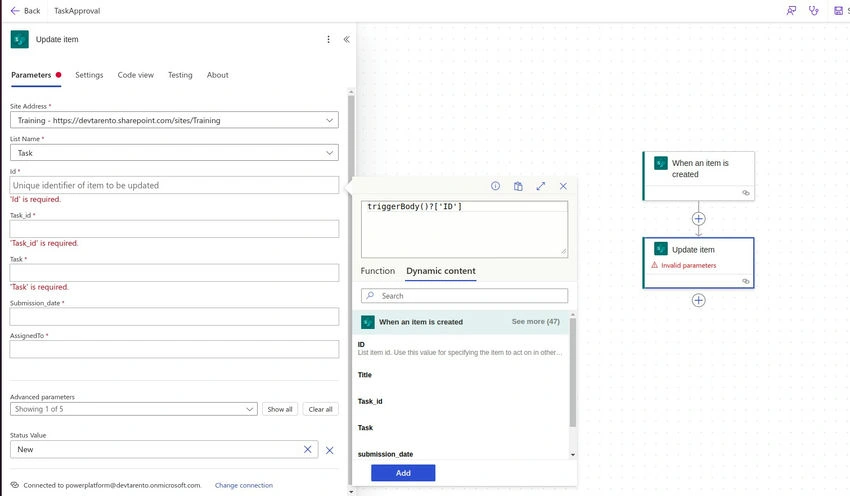
- Configure this action to set the Status column to "Under Review."
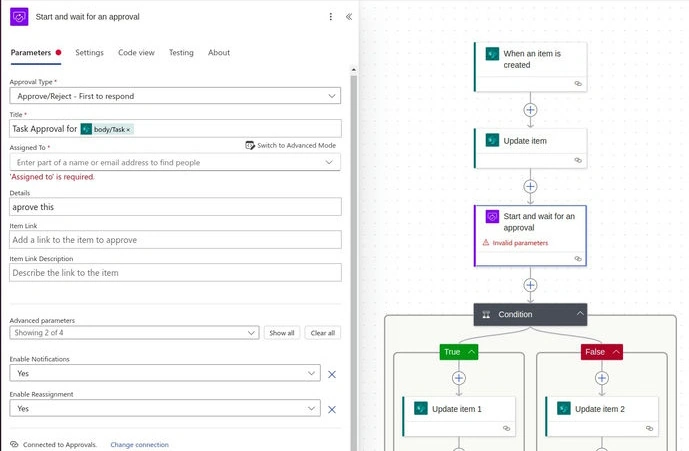
Send Approval Request
- Add a new step and choose the "Start and wait for approval" action.
- Set the approval type (e.g., "Approve/Reject - First to respond").
- In the approval details, provide the Task name and any other relevant information to the approvers.
Add Condition for Approval
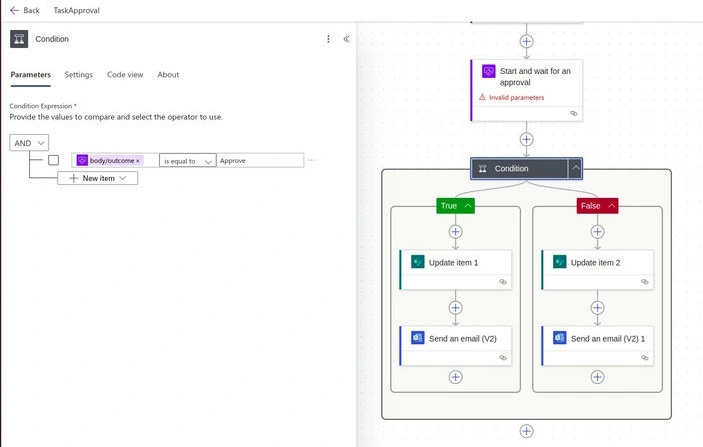
- After the approval action, add a "Condition" action.
- Set the condition to check if the approval outcome is "Approve."
Update Status Based on Approval
- In the "If yes" branch (for approval), add an "Update item" action.
- Set the Status column to "Approved."
- In the "If no" branch (for rejection), add an "Update item" action.
- Set the Status column to "Rejected."
Send a Notification Email to the Task Creator
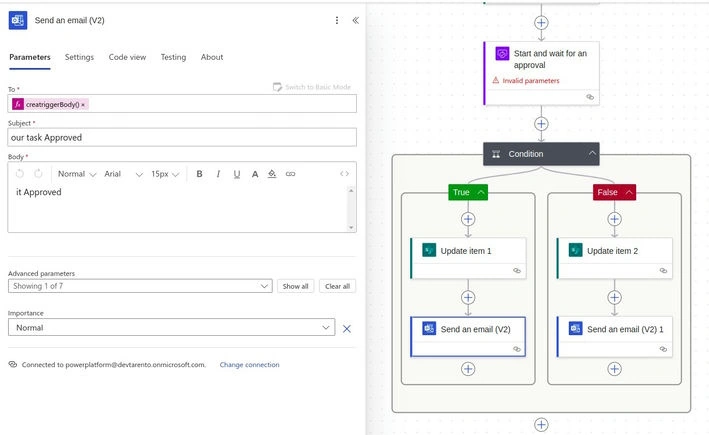
- After both branches (yes and no), add a "Send an email" action (from Outlook).
- Configure the email to notify the task creator:
- Set the recipient to the Created By column.
- Include the subject and body to indicate whether the task was approved or rejected, along with any comments from the approvers if applicable.
Save and Test the Flow
- Click "Save" to store your flow.
- Test the flow by creating a new item in your Tasks list and checking if the flow runs as expected.
By following these steps, you will have set up a Power Automate cloud flow that efficiently manages task approvals, updates statuses, and keeps the task creator informed of the outcomes.
Join the conversation! Your thoughts help the community grow.