

Introduction
Jetpack contains certain package libraries called androidx.* and offers backward compatibility; however, these components update more frequently than the Android platform as promised by Google.
Benefits of Jetpack
- Accelerate development
- Eliminate boilerplate code
- Build high quality, robust applications
Jetpack Components
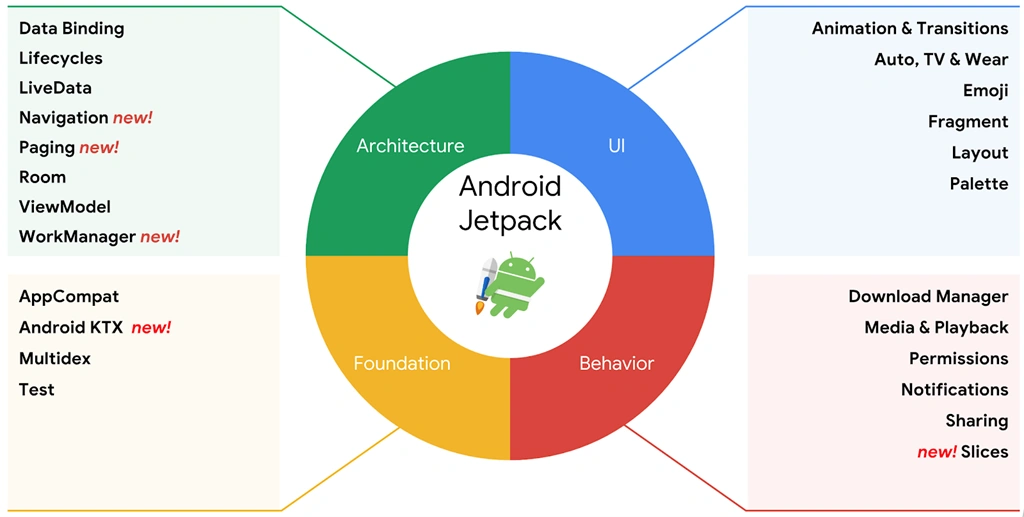
Well, there are four Jetpack components released by Google in the documentation. These components offer some new excellent features to make Kotlin more usable and robust and make the work more productive. The four main components of Jetpack are listed below.
 We can conclude that Jetpack is the most versatile collection of libraries. With the example of data binding library, we saw how powerful Jetpack is. The beauty of the data binding library is that it eliminates the use of various lines of View initialization, like findViewById() etc. Now, data binding takes care of it. Stay tuned for other features. We will be here with more library descriptions and other Jetpack features.
- Foundation
- Architectural
- Behaviour
- UI Component
We won't cover all of these features in this article. Let's take the first one, Data Binding, and let's go through the architecture component,i.e, used in the very first line in the queue.
Data Binding is a library that enables the user to bind UI component without using findViewById(). It binds the data to Views in the layout using declarative format rather than programmatically. Let us see this using some code. Create a simple project and create a blank MainActivity.java. See the code below for better understating. activity_main.xml
Data Binding
- <layout xmlns:android="http://schemas.android.com/apk/res/android"
- xmlns:tools="http://schemas.android.com/tools">
- <!--Step 1-->
- <data>
- <!--Step 2-->
- <variable
- name="dataModel"
- type="<full package name>.DataModel" />
- </data>
- <LinearLayout
- android:layout_width="match_parent"
- android:layout_height="match_parent"
- android:orientation="vertical"
- android:padding="16dp"
- >
- <!--Step 3-->
- <TextView
- android:id="@+id/text_view_name"
- android:layout_width="wrap_content"
- android:layout_height="wrap_content"
- android:text="@{dataModel.Name}"
- android:textColor="@android:color/black"
- android:textSize="24sp" />
- <TextView
- android:id="@+id/text_view_work"
- android:layout_width="wrap_content"
- android:layout_height="wrap_content"
- android:text="@{dataModel.Work}"
- android:textColor="@android:color/black"
- android:textSize="15sp"
- android:layout_marginTop="10dp"
- android:layout_marginStart="20dp"/>
- </LinearLayout>
- </layout>
Now, create a DataModel.java pojo class which contains the name and work. For the sake of simplicity, we are taking only two fields but you can increase your fields whenever you want. DataModel.java
- public class DataModel {
- private String Name;
- private String Work;
- public DataModel(String name, String work) {
- this.Name = name;
- this.Work = work;
- }
- public String getName() {
- return Name;
- }
- public void setName(String name) {
- Name = name;
- }
- public String getWork() {
- return Work;
- }
- public void setWork(String work) {
- Work = work;
- }
- }
Now, see MainActivity.java.
- import android.databinding.DataBindingUtil;
- import android.os.Bundle;
- import android.support.v7.app.AppCompatActivity;
- public class MainActivity extends AppCompatActivity {
- @Override
- protected void onCreate(Bundle savedInstanceState) {
- super.onCreate(savedInstanceState);
- // Before Data Binding
- /* setContentView(R.layout.activity_main);
- TextView textViewName = (TextView) findViewById(R.id.text_view_name);
- TextView textViewWork = (TextView) findViewById(R.id.text_view_work);
- textViewName.setText("Gaurav Kumar");
- textViewWork.setText("Android app developer"); */
- // After Data Binding
- ActivityMainBinding binding = DataBindingUtil.setContentView(this, R.layout.activity_main);
- DataModel dataModel = new DataModel("Gaurav kumar", "Android app developer");
- binding.setDataModel(dataModel);
- }
- }
Clearly, we can see that here the commented code is before data binding, and after data binding you can see the difference. Don't forget to import "import <yourpackage>databinding.ActivityMainBinding " and most importantly, enable binding in gradle -- see code below.
- apply plugin: 'com.android.application'
- android {
- compileSdkVersion 28
- defaultConfig {
- applicationId "yourdomain.databindingproject"
- minSdkVersion 21
- targetSdkVersion 28
- versionCode 1
- versionName "1.0"
- testInstrumentationRunner "android.support.test.runner.AndroidJUnitRunner"
- }
- buildTypes {
- release {
- minifyEnabled false
- proguardFiles getDefaultProguardFile('proguard-android.txt'), 'proguard-rules.pro'
- }
- }
- dataBinding {
- enabled = true
- }
- }
- dependencies {
- implementation fileTree(dir: 'libs', include: ['*.jar'])
- implementation 'com.android.support:appcompat-v7:28.0.0'
- implementation 'com.android.support.constraint:constraint-layout:1.1.3'
- testImplementation 'junit:junit:4.12'
- androidTestImplementation 'com.android.support.test:runner:1.0.2'
- androidTestImplementation 'com.android.support.test.espresso:espresso-core:3.0.2'
- }
Output
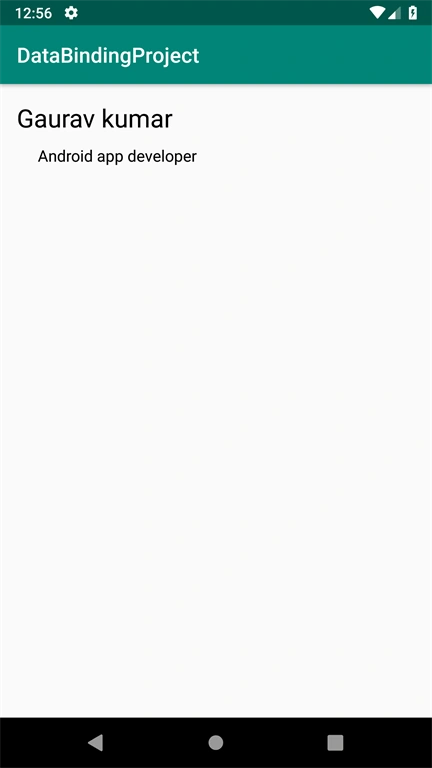 Now see here, without programmatically setting the data to the text view, you can bind the data using this method.
Ashish TiwariPosted Apr 1, 2019, 5:59 AM
Thanks for sharing. keep it up.