
Introduction
In this article, we are going to see how to perform a simple JSON get request in Android using the Volley library.
What is Volley?
Volley is an HTTP library that makes networking for Android apps easier and most importantly,
faster. Google introduced Volley during Google I/O 2013.
Documentation - https://developer.android.com/training/volley
What is Picasso
A powerful image downloading and caching library for Android.
Documentation - https://square.github.io/picasso/
PROJECT SETUP
- Create a new Android project in android studio with the language selected as Java.
- Add the following dependency in Gradle:
For Picasso:
Step 2
- implementation 'com.squareup.picasso:picasso:(insert latest version)'
For Volley:
- implementation 'com.android.volley:volley:1.1.1'
Development Steps
Step 1
Add the list view to the activity_main.xml file by adding this following xml code:
- <?xml version="1.0" encoding="utf-8"?>
- <RelativeLayout xmlns:android="http://schemas.android.com/apk/res/android"
- xmlns:app="http://schemas.android.com/apk/res-auto"
- xmlns:tools="http://schemas.android.com/tools"
- android:layout_width="match_parent"
- android:layout_height="match_parent"
- tools:context=".MainActivity">
- <ListView
- android:layout_width="match_parent"
- android:layout_height="match_parent"
- android:id="@+id/musiclistview"
- />
- </RelativeLayout>
Create a custom layout for our custom listview row by adding a new XML with name customcell.xml in res project folder.
Step 3
Add the following xml code in customcell.xml file:
- <?xml version="1.0" encoding="utf-8"?>
- <RelativeLayout xmlns:android="http://schemas.android.com/apk/res/android"
- android:layout_width="match_parent" android:layout_height="match_parent">
- <ImageView
- android:layout_width="200dp"
- android:layout_height="200dp"
- android:layout_alignParentLeft="true"
- android:layout_alignParentTop="true"
- android:id="@+id/albumcoverimageview"
- android:src="@drawable/ic_launcher_background"/>
- <TextView
- android:layout_width="wrap_content"
- android:id="@+id/albumnamelbl"
- android:layout_height="wrap_content"
- android:layout_alignParentLeft="true"
- android:layout_alignParentTop="true"
- android:layout_centerHorizontal="true"
- android:layout_marginLeft="214dp"
- android:textColor="@android:color/black"
- android:layout_marginTop="68dp"
- android:text="Album name"
- android:textSize="30sp" />
- </RelativeLayout>
We have created the below layout for our custom cell for our list view:
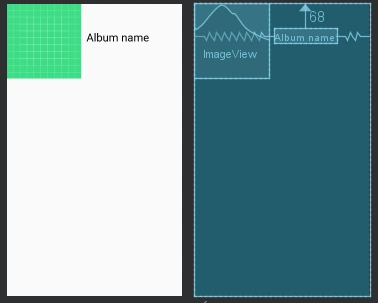
Step 4
Create a new Java class named Album.java which acts as a data model for our list view data source.
Step 5
Add the following code:
- public class Albums {
- public String albumname;
- public String albumcoverurl;
- Albums(String albumname,String albumcoverurl)
- {
- this.albumname = albumname;
- this.albumcoverurl = albumcoverurl;
- }
- public String getAlbumcoverurl() {
- return albumcoverurl;
- }
- public String getAlbumname() {
- return albumname;
- }
- }
The next step is to create a custom ArrayAdapter that can be used to provide our custom cell layout to our Custom listview.
Step 7
Create a new Java class called MyAdapter.java which extends the ArrayAdapter class.
Step 8
Add the following code:
Here we override a method getView which returns a view that has our inflated custom cell layout.
- package com.enigmacoder.jsonget;
- import android.content.Context;
- import android.view.LayoutInflater;
- import android.view.View;
- import android.view.ViewGroup;
- import android.widget.ArrayAdapter;
- import android.widget.ImageView;
- import android.widget.TextView;
- import androidx.annotation.NonNull;
- import androidx.annotation.Nullable;
- import com.squareup.picasso.Picasso;
- import java.util.List;
- public class MyAdapter extends ArrayAdapter<Albums> {
- Context context;
- int resource;
- List<Albums> albumsList;
- MyAdapter(Context context,int resource,List<Albums> albumsList)
- {
- super(context,resource,albumsList);
- this.context = context;
- this.resource = resource;
- this.albumsList = albumsList;
- }
- @NonNull
- @Override
- public View getView(int position, @Nullable View convertView, @NonNull ViewGroup parent) {
- LayoutInflater inflater = LayoutInflater.from(context);
- View view = inflater.inflate(resource,null,false);
- TextView aname = view.findViewById(R.id.albumnamelbl);
- ImageView aimage = view.findViewById(R.id.albumcoverimageview);
- Albums album = albumsList.get(position);
- aname.setText(album.getAlbumname());
- Picasso.with(context).load(album.getAlbumcoverurl()).into(aimage);
- return view;
- }
- }
Step 9
Open MainActivity.java and add the following Java code:
- package 'YOUR_PACKAGE_NAME';
- import androidx.appcompat.app.AppCompatActivity;
- import android.os.Bundle;
- import android.widget.ListView;
- import android.widget.Toast;
- import com.android.volley.Request;
- import com.android.volley.RequestQueue;
- import com.android.volley.Response;
- import com.android.volley.VolleyError;
- import com.android.volley.toolbox.JsonArrayRequest;
- import com.android.volley.toolbox.Volley;
- import org.json.JSONArray;
- import org.json.JSONObject;
- import java.util.ArrayList;
- import java.util.List;
- public class MainActivity extends AppCompatActivity {
- ListView musiclist;
- final String url = "https://rallycoding.herokuapp.com/api/music_albums";
- List<Albums> alist;
- MyAdapter adapter;
- RequestQueue requestQueue;
- @Override
- protected void onCreate(Bundle savedInstanceState) {
- super.onCreate(savedInstanceState);
- setContentView(R.layout.activity_main);
- musiclist = findViewById(R.id.musiclistview);
- alist = new ArrayList<>();
- requestQueue = Volley.newRequestQueue(this);//This will take care of
- //background newtwork activities
- getdata();
- adapter = new MyAdapter(this,R.layout.customcell,alist);
- musiclist.setAdapter(adapter);
- }
- private void getdata()
- {
- JsonArrayRequest jsonArrayRequest = new JsonArrayRequest(Request.Method.GET, url, null, new Response.Listener<JSONArray>() {
- @Override
- public void onResponse(JSONArray response) {
- JSONArray jsonArray = response;
- try {
- for(int i=0;i<jsonArray.length();i++)
- {
- JSONObject jsonObject = jsonArray.getJSONObject(i);
- String albumname = jsonObject.getString("title");
- String albumimageurl = jsonObject.getString("image");
- alist.add(new Albums(albumname,albumimageurl));
- }
- adapter.notifyDataSetChanged();//To prevent app from crashing when updating
- //UI through background Thread
- }
- catch (Exception w)
- {
- Toast.makeText(MainActivity.this,w.getMessage(),Toast.LENGTH_LONG).show();
- }
- }
- }, new Response.ErrorListener() {
- @Override
- public void onErrorResponse(VolleyError error) {
- Toast.makeText(MainActivity.this,error.getMessage(),Toast.LENGTH_LONG).show();
- }
- });
- requestQueue.add(jsonArrayRequest);
- }
- }
MAKE SURE YOU PLACE YOUR PACKAGE NAME IN THE FIRST LINE OF THE CODE.
In the above Java code, we create a request queue that can handle all the background network activities.
For more information about a get request using Volley, refer the documentation
https://developer.android.com/training/volley/request
Step 10
The next step is to add required permissions for our app in the AndroidManifest.xml file:
- <uses-permission android:name="android.permission.INTERNET"/>
You will see the following output:
The app makes a GET request to the server and retrieves the data in JSON format which displays it in the list view
AFAQUE JAYAPosted Jun 30, 2021, 10:21 AM
Can you share the API response please.