

In the previous article, we learned how to use Policy-Based Authorization to protect API endpoints based on claims such as a user's membership level.
Policies work well when the rule is simple—for example:
User must be an Admin.
User must have a Premium membership.
User must belong to a specific department.
But real business applications often require more complex rules.
For example:
A customer can cancel an order only if it hasn't been shipped.
A trainer can edit only their own courses.
An employee can approve leave requests only for their department.
A manager can access reports only during business hours.
These rules cannot be implemented using built-in role or claim checks alone.
This is where Custom Authorization Handlers become useful.
In this article, you'll learn how custom authorization works, when to use it, and how to implement your own authorization handler in ASP.NET Core.
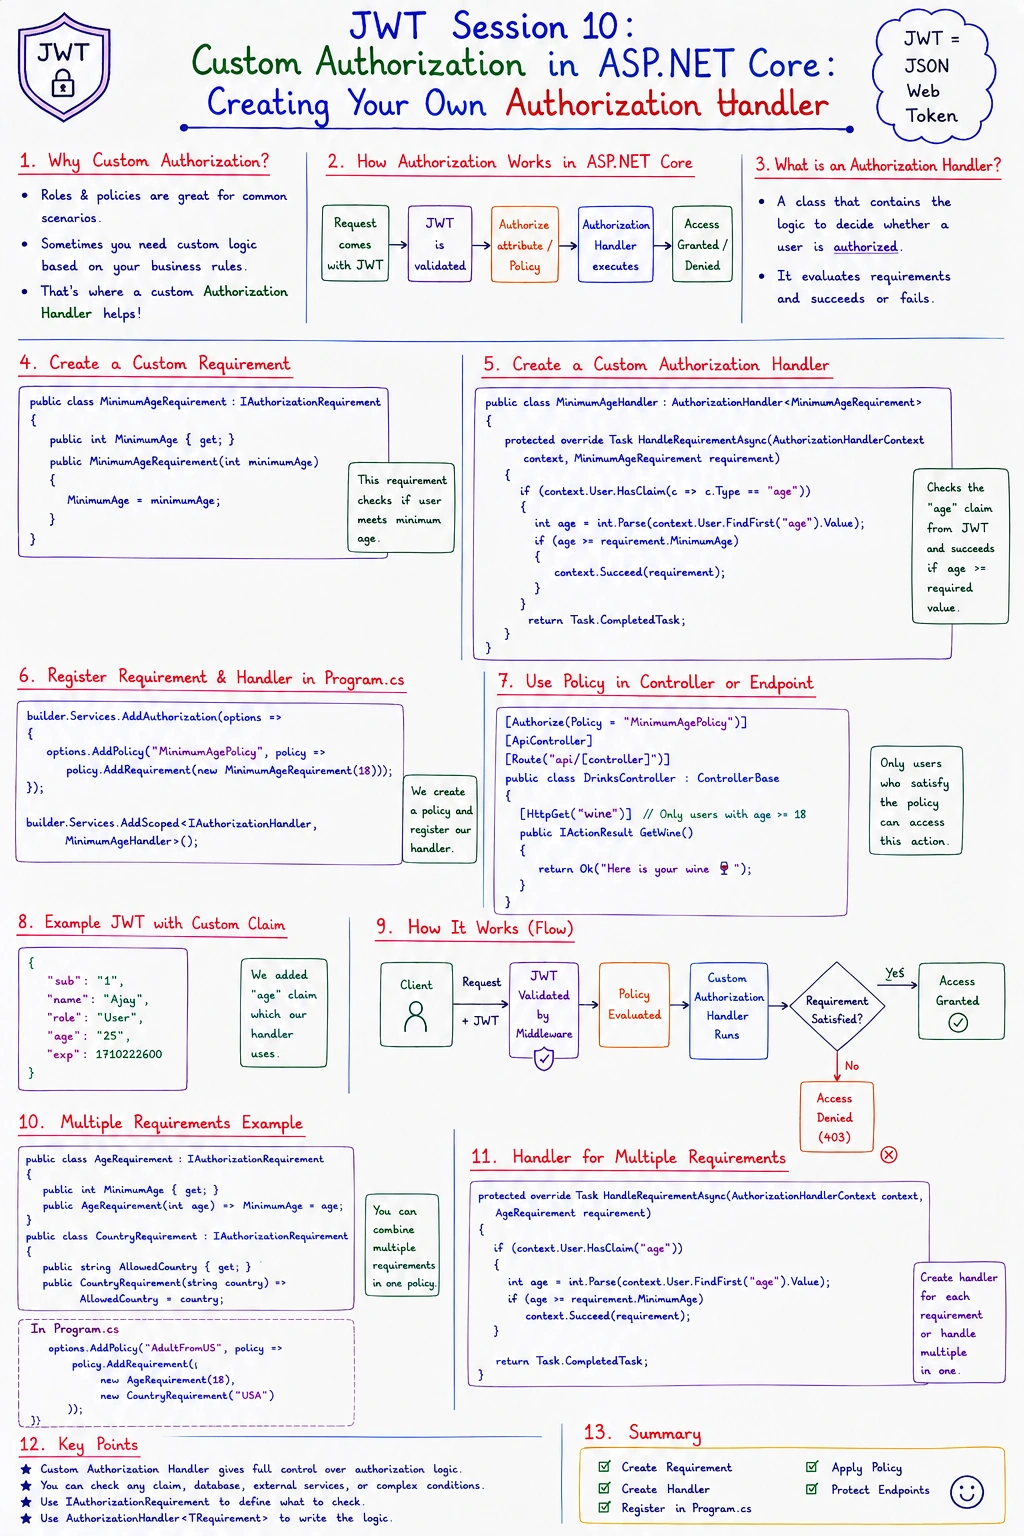
What Is a Custom Authorization Handler?
A Custom Authorization Handler allows you to write your own authorization logic.
Instead of checking only a role or claim, your code decides whether the current user is allowed to perform a specific action.
Think of it as creating your own security rule.
ASP.NET Core simply asks:
"Does this request satisfy the custom requirement?"
Your handler provides the answer.
Why Do We Need Custom Authorization?
Let's continue with our SecureShop API.
Suppose customers are allowed to cancel orders.
However, the business introduces a new rule:
Orders can only be cancelled before they are shipped.
Can we solve this using roles?
❌ No.
Can we solve this using claims?
❌ No.
The decision depends on the current order's status, which is business data.
This is exactly the type of problem that a custom authorization handler is designed to solve.
How Custom Authorization Works
A custom authorization solution has three parts.
Authorization Requirement
          │
          ▼
Authorization Handler
          │
          ▼
Authorization Policy
          │
          ▼
Protected Endpoint
Each part has a different responsibility.
| Component | Responsibility |
|---|---|
| Requirement | Defines what needs to be checked |
| Handler | Contains the business logic |
| Policy | Connects the requirement to ASP.NET Core |
Step 1: Create an Authorization Requirement
A requirement represents a rule.
Create a new class.
using Microsoft.AspNetCore.Authorization;

public class CanCancelOrderRequirement : IAuthorizationRequirement
{
}
Notice that the class doesn't contain any code.
Its purpose is simply to represent the authorization requirement.
Step 2: Create the Authorization Handler
Now create the handler.
using Microsoft.AspNetCore.Authorization;

public class CanCancelOrderHandler
    : AuthorizationHandler<CanCancelOrderRequirement>
{
    protected override Task HandleRequirementAsync(
        AuthorizationHandlerContext context,
        CanCancelOrderRequirement requirement)
    {
        var orderStatus =
            context.User.FindFirst("OrderStatus")?.Value;

        if (orderStatus == "Pending")
        {
            context.Succeed(requirement);
        }

        return Task.CompletedTask;
    }
}
The important part is:
context.Succeed(requirement);Calling this method tells ASP.NET Core:
The authorization requirement has been satisfied.
If it isn't called, authorization fails automatically.
Step 3: Register the Policy
Open Program.cs.
Register the policy.
builder.Services.AddAuthorization(options =>
{
    options.AddPolicy("CancelOrderPolicy", policy =>
    {
        policy.Requirements.Add(
            new CanCancelOrderRequirement());
    });
});
This tells ASP.NET Core which requirement belongs to the policy.
Step 4: Register the Authorization Handler
Next, register the handler.
builder.Services.AddSingleton<
    IAuthorizationHandler,
    CanCancelOrderHandler>();
Now ASP.NET Core knows which handler should evaluate the requirement.
Step 5: Protect the Endpoint
Apply the policy to an endpoint.
[Authorize(Policy = "CancelOrderPolicy")]
[HttpDelete("{id}")]
public IActionResult CancelOrder(int id)
{
    return Ok("Order Cancelled");
}
Before executing this action, ASP.NET Core automatically invokes the custom authorization handler.
Internal Authorization Flow
Let's see what happens internally.
Client
   │
   │ JWT
   ▼
Authentication Middleware
   │
   ▼
Validate JWT
   │
   ▼
ClaimsPrincipal
   │
   ▼
Policy Evaluation
   │
   ▼
Custom Authorization Handler
   │
   ▼
Business Rule Satisfied?
      │
 Yes  │ No
      │
      ▼
Controller Executes
Unlike role or claim checks, the decision is made entirely by your own code.
Practical Example
Let's continue with the SecureShop API.
Suppose two customers attempt to cancel an order.
Customer 1
Order Status : PendingThe handler checks:
Pending == PendingThe requirement succeeds.
↓
API returns:
200 OKCustomer 2
Order Status : ShippedThe handler checks:
Shipped == PendingThe requirement fails.
↓
API returns:
403 ForbiddenAlthough both users are authenticated, only one satisfies the business rule.
Real-World Use Cases
Custom authorization handlers are commonly used for rules such as:
Users can edit only their own records.
Trainers can update only assigned batches.
Employees can access only their department's data.
Orders can be modified only before shipping.
Documents can be viewed only by their owners.
Managers can approve requests only within their reporting hierarchy.
Whenever authorization depends on application data or business logic, a custom handler is usually the right choice.
Common Mistakes
Mistake 1: Putting Authorization Logic Inside Controllers
Some developers write code like this:
if(order.Status != "Pending")
{
    return Forbid();
}
This scatters authorization rules across multiple controllers.
Instead, move the rule into a custom authorization handler so it can be reused.
Mistake 2: Using Custom Handlers for Simple Role Checks
If the rule is simply:
User must be an Admin
then use:
[Authorize(Roles = "Admin")]Don't create a custom handler for something that ASP.NET Core already supports.
Mistake 3: Mixing Business Logic and Authorization Logic
A handler should decide whether a user can perform an action.
It should not update the database, modify orders, or send emails.
Keep authorization focused on access decisions only.
Mistake 4: Forgetting to Register the Handler
Creating the requirement and handler isn't enough.
If the handler isn't registered with Dependency Injection, ASP.NET Core will never execute it.
Key Takeaways
Custom Authorization Handlers allow you to implement business-specific authorization rules.
A custom authorization solution consists of a Requirement, Handler, and Policy.
The handler contains the logic that determines whether authorization succeeds.
Policies connect authorization requirements to API endpoints.
Custom handlers are ideal when authorization depends on business data rather than simple roles or claims.
Keep authorization logic separate from controller actions for better maintainability and reuse.
At this point, our SecureShop API supports authentication, role-based authorization, policy-based authorization, and custom authorization rules. In the next article, we'll begin integrating a real database by replacing our hardcoded login with Entity Framework Core, allowing users to authenticate using data stored in SQL Server.
Join the conversation! Your thoughts help the community grow.