

In the previous article, we replaced our hard-coded login with Entity Framework Core and authenticated users from a SQL Server database.
Although this was a significant improvement, our authentication system still had a major weakness.
We were storing passwords in plain text and manually comparing them during login.
user.Password == request.PasswordThis approach is not suitable for production applications.
Fortunately, ASP.NET Core provides a complete membership system called ASP.NET Core Identity. It manages users, securely hashes passwords, validates credentials, handles roles, and integrates seamlessly with JWT authentication.
In this article, we'll replace our custom login logic with ASP.NET Core Identity while continuing to use JWT for API authentication.
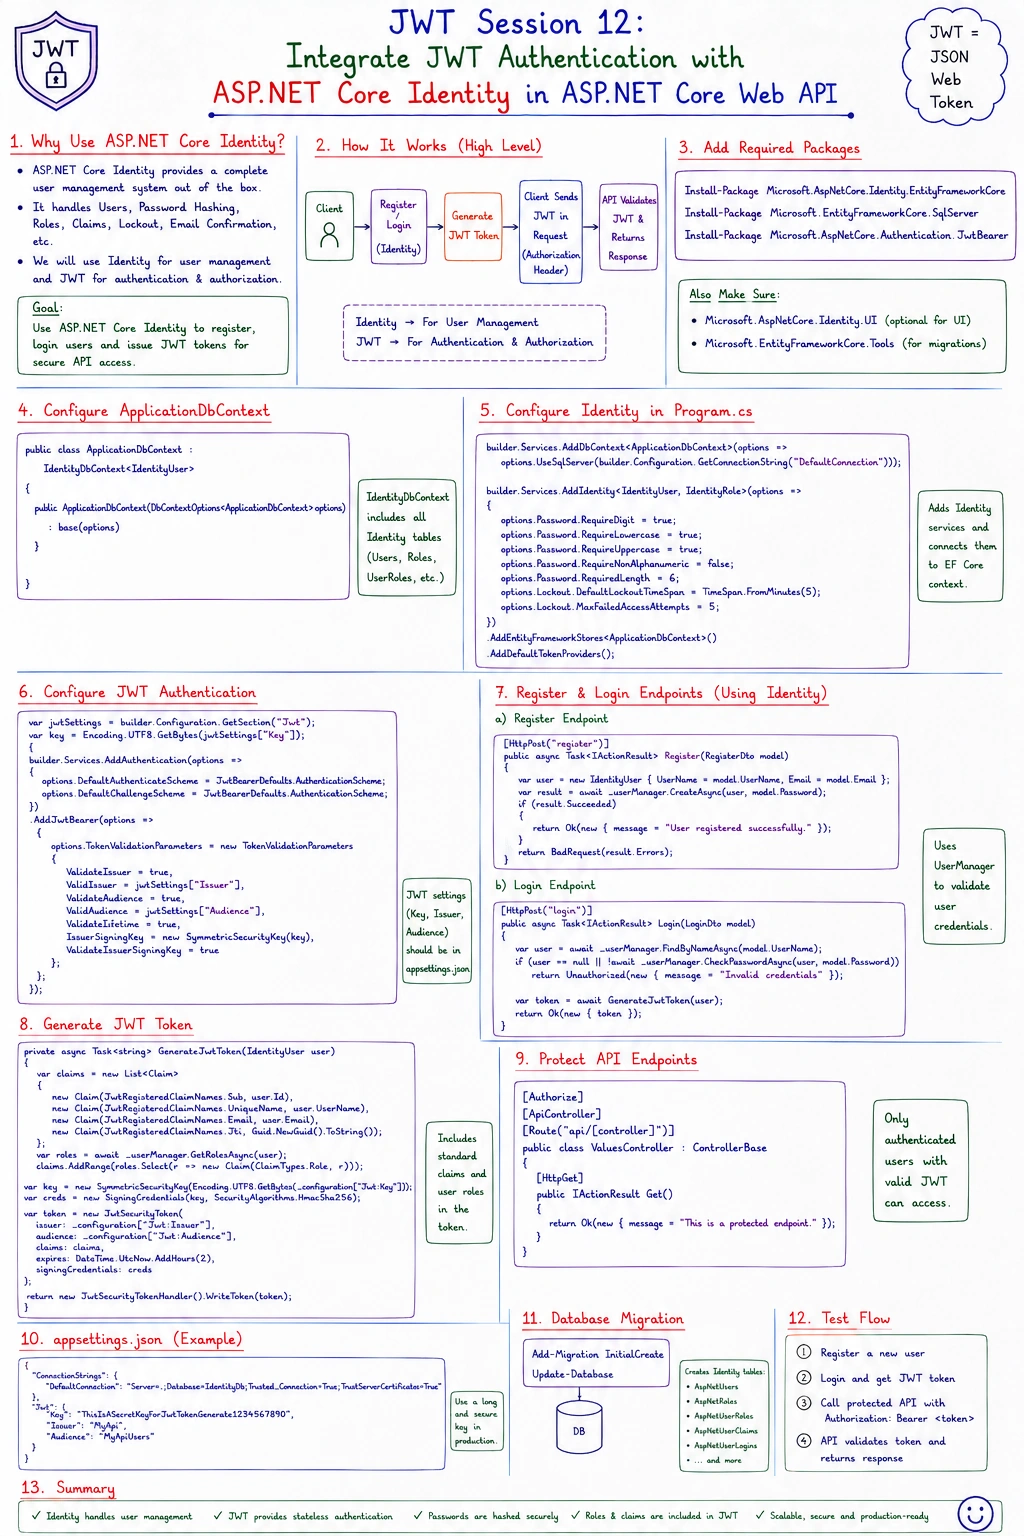
What Is ASP.NET Core Identity?
ASP.NET Core Identity is Microsoft's built-in membership framework for ASP.NET Core applications.
Instead of creating your own authentication system, Identity provides ready-made features such as:
User Management
Password Hashing
Secure Password Verification
Role Management
User Validation
Account Lockout
Email Confirmation
Password Reset
Rather than building these features from scratch, you can focus on your application's business logic.
Why Use Identity?
Let's continue with our SecureShop API.
Currently, our login process looks like this:
Client
   │
   ▼
Controller
   │
   ▼
ApplicationDbContext
   │
   ▼
Compare Plain Password
This works, but every authentication feature must be implemented manually.
With Identity, the flow becomes:
Client
   │
   ▼
Controller
   │
   ▼
UserManager
   │
   ▼
Identity Database
   │
   ▼
Password Verification
   │
   ▼
Generate JWT
Identity handles the difficult security tasks while our application simply requests authentication.
Identity Components
The most commonly used Identity services are:
| Component | Responsibility |
|---|---|
| UserManager<TUser> | Manage users |
| SignInManager<TUser> | Handle sign-in operations |
| RoleManager<TRole> | Manage roles |
| IdentityDbContext | Identity database context |
In this article, we'll primarily work with UserManager.
Step 1: Install Identity Packages
Install the required packages.
dotnet add package Microsoft.AspNetCore.Identity.EntityFrameworkCore
 dotnet add package Microsoft.EntityFrameworkCore.SqlServer
These packages integrate ASP.NET Core Identity with Entity Framework Core.
Step 2: Create the Identity User
Instead of our custom ApplicationUser class, inherit from IdentityUser.
using Microsoft.AspNetCore.Identity;

public class ApplicationUser : IdentityUser
{
    public string FullName { get; set; } = string.Empty;
}
Notice that IdentityUser already contains properties like:
Id
UserName
Email
PasswordHash
PhoneNumber
SecurityStamp
We only add properties specific to our application.
Step 3: Create the Identity Database Context
Replace the existing database context.
using Microsoft.AspNetCore.Identity.EntityFrameworkCore;
using Microsoft.EntityFrameworkCore;

public class ApplicationDbContext
    : IdentityDbContext<ApplicationUser>
{
    public ApplicationDbContext(
        DbContextOptions<ApplicationDbContext> options)
        : base(options)
    {
    }
}
IdentityDbContext automatically creates all the required Identity tables.
Step 4: Configure Identity
Open Program.cs.
Register Identity.
builder.Services
    .AddIdentity<ApplicationUser, IdentityRole>()
    .AddEntityFrameworkStores<ApplicationDbContext>()
    .AddDefaultTokenProviders();
This registers all Identity services with Dependency Injection.
After this step, services such as UserManager become available throughout the application.
Step 5: Apply Database Migrations
Create a migration.
dotnet ef migrations add AddIdentityUpdate the database.
dotnet ef database updateInstead of creating only a Users table, Identity creates several tables automatically.
Examples include:
| Table | Purpose |
|---|---|
| AspNetUsers | Stores users |
| AspNetRoles | Stores roles |
| AspNetUserRoles | Maps users to roles |
| AspNetUserClaims | Stores user claims |
| AspNetRoleClaims | Stores role claims |
Identity manages these tables automatically.
Step 6: Register a User
Creating a new user becomes simple.
var user = new ApplicationUser
{
    UserName = request.Email,
    Email = request.Email,
    FullName = request.FullName
};

var result = await _userManager.CreateAsync(
    user,
    request.Password);
Notice something important.
We're passing the plain password.
Identity automatically:
Hashes the password
Stores only the hash
Never stores the original password
This makes user registration much more secure.
Step 7: Authenticate the User
Now replace the manual login logic.
var user = await _userManager.FindByEmailAsync(request.Email);

if (user is null)
{
    return Unauthorized();
}

var isValidPassword =
    await _userManager.CheckPasswordAsync(
        user,
        request.Password);

if (!isValidPassword)
{
    return Unauthorized();
}

var token = _jwtTokenService.GenerateToken(user);
Instead of comparing passwords manually, Identity securely verifies them for us.
Internal Authentication Flow
The login process now looks like this.
Client
   │
   │ Login Request
   ▼
AuthController
   │
   ▼
UserManager
   │
   ▼
Find User
   │
   ▼
Verify Password Hash
   │
      ├── Invalid → 401 Unauthorized
      │
      ▼
Generate JWT
   │
   ▼
Return Access Token
Notice that our controller no longer knows how password verification works internally.
Identity handles it automatically.
Practical Example
Let's continue with the SecureShop API.
Suppose John has already registered.
Identity stores:
Email : [email protected]

PasswordHash :
AQAAAAEAACcQAAAA...
Notice that the original password is not stored.
John sends:
POST /api/auth/login{
"email":"[email protected]",
"password":"Password@123"
}Identity verifies the password hash.
↓
Verification succeeds.
↓
JWT generated.
↓
Client receives:
{
    "accessToken":"eyJhbGciOiJIUzI1NiIs..."
}
The login process remains the same for the client, but it is now much more secure internally.
Benefits of ASP.NET Core Identity
Using Identity provides several advantages.
Secure password hashing
Built-in user management
Built-in role management
Easy JWT integration
Account lockout support
Password reset support
Email confirmation support
Security best practices maintained by Microsoft
These features significantly reduce the amount of authentication code you need to write.
Common Mistakes
Mistake 1: Storing Passwords Yourself
After adopting Identity, never create your own password column or hashing logic.
Identity already stores passwords securely using the PasswordHash field.
Mistake 2: Comparing Passwords Manually
Avoid code like this:
user.Password == request.Password
Always use:
_userManager.CheckPasswordAsync(...)
Mistake 3: Modifying Identity Tables Directly
Identity manages its own tables.
Avoid manually updating tables such as AspNetUsers or AspNetRoles unless you fully understand the implications.
Use UserManager and RoleManager whenever possible.
Mistake 4: Assuming Identity Generates JWTs
Identity authenticates users, but it does not generate JWTs automatically.
Your application is still responsible for creating the JWT after successful authentication.
Key Takeaways
ASP.NET Core Identity is Microsoft's built-in authentication and membership framework.
Identity securely stores passwords using hashing instead of plain text.
UserManagerprovides methods for creating users and validating passwords.IdentityDbContextautomatically creates the required authentication tables.Identity works seamlessly with Entity Framework Core and SQL Server.
After successful authentication, your application can continue generating JWTs exactly as before.
Join the conversation! Your thoughts help the community grow.