

In the previous article, we integrated ASP.NET Core Identity with our SecureShop API. Identity now manages user registration, password hashing, and user authentication.
After a successful login, we generate a JWT and return it to the client.
However, there is still one missing piece.
Although Identity stores user roles in the database, those roles are not automatically included in the JWT.
As a result, endpoints protected with attributes like:
[Authorize(Roles = "Admin")]will not work correctly unless the JWT contains the user's role.
In this article, we'll retrieve roles from ASP.NET Core Identity and include them in the JWT so that Role-Based Authorization works seamlessly.
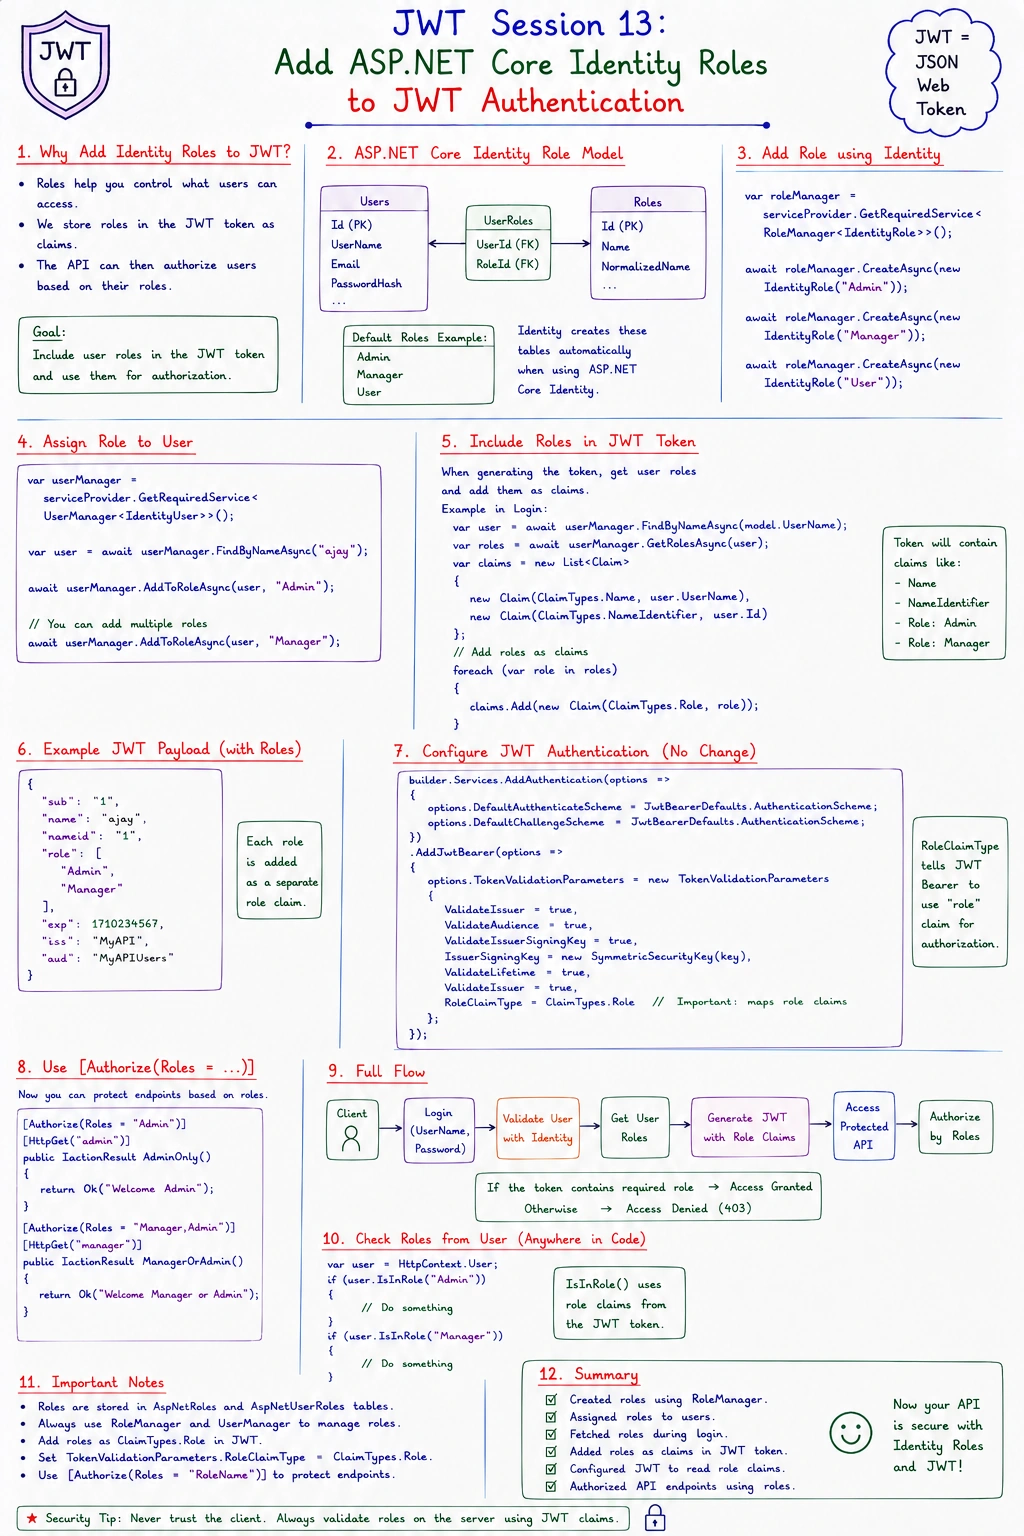
Why Add Roles to the JWT?
Let's continue with our SecureShop API.
Suppose Sarah is an administrator.
Identity stores this information in its database.
User : Sarah
 Role : Admin
After Sarah logs in, the API generates a JWT.
If the role is not included in the token, ASP.NET Core has no way to determine that Sarah is an administrator during later requests.
The solution is to include the user's roles as claims inside the JWT.
How the Flow Changes
Previously, the login process looked like this.
Login
   │
   ▼
Validate User
   │
   ▼
Generate JWT
Now an additional step is introduced.
Login
   │
   ▼
Validate User
   │
   ▼
Load User Roles
   │
   ▼
Generate JWT
This small change enables Role-Based Authorization across the application.
Step 1: Create Identity Roles
Before assigning roles, they must exist in the database.
Common roles for SecureShop are:
Admin
Customer
Manager
These roles are stored in the AspNetRoles table.
Step 2: Assign a Role to a User
After creating a user, assign a role using UserManager.
await _userManager.AddToRoleAsync(user, "Customer");For an administrator:
await _userManager.AddToRoleAsync(user, "Admin");Identity stores this relationship automatically.
Step 3: Retrieve User Roles
During login, load the user's roles.
var roles = await _userManager.GetRolesAsync(user);This returns a collection such as:
Adminor
CustomerThese roles will be added to the JWT.
Step 4: Add Roles to JWT Claims
While generating the token, include each role as a claim.
var claims = new List<Claim>
{
    new Claim(JwtRegisteredClaimNames.Sub, user.Id),
    new Claim(ClaimTypes.Name, user.FullName),
    new Claim(ClaimTypes.Email, user.Email!)
};

foreach (var role in roles)
{
    claims.Add(new Claim(ClaimTypes.Role, role));
}
If the user belongs to multiple roles, each role becomes a separate claim inside the JWT.
Step 5: Generate the JWT
Generate the JWT exactly as before.
var token = new JwtSecurityToken(
    claims: claims,
    expires: DateTime.UtcNow.AddMinutes(30),
    signingCredentials: credentials);
The difference is that the JWT now contains role claims.
Internal Authentication Flow
Here's what happens after a login request.
Client
   │
   ▼
AuthController
   │
   ▼
UserManager
   │
   ▼
Validate User
   │
   ▼
Get User Roles
   │
   ▼
Create Role Claims
   │
   ▼
Generate JWT
   │
   ▼
Return Access Token
Every future request carries the user's roles inside the JWT.
Practical Example
Suppose Sarah logs in.
Identity contains:
Name : Sarah
 Role : Admin
The generated JWT includes:
Name : Sarah
 Role : Admin
Now Sarah requests:
POST /api/productsThe endpoint is protected with:
[Authorize(Roles = "Admin")]ASP.NET Core validates the JWT.
↓
Reads the role claim.
↓
Finds:
Role = Admin↓
Authorization succeeds.
↓
The controller executes.
If the JWT contained:
Role = CustomerASP.NET Core would return:
403 ForbiddenCommon Mistakes
Mistake 1: Forgetting to Add Roles to the JWT
Identity stores roles in the database, but they are not automatically included in the token.
Always add role claims when generating the JWT.
Mistake 2: Assuming Authentication Includes Authorization
A valid JWT proves that the user is authenticated.
It does not automatically grant access to role-protected endpoints.
Authorization depends on the role claims inside the token.
Mistake 3: Not Refreshing the Token After a Role Change
Suppose a user is promoted from Customer to Admin.
Existing JWTs still contain the old role.
The user must log in again (or obtain a new token) so the updated role is included.
Mistake 4: Using Hardcoded Role Names Everywhere
Instead of repeating strings like "Admin" throughout the application, consider defining role constants or an enum-like static class to reduce typing mistakes and improve maintainability.
Key Takeaways
ASP.NET Core Identity stores user roles separately from user information.
Retrieve roles using
UserManager.GetRolesAsync().Add each role as a
ClaimTypes.Roleclaim when generating the JWT.Role claims enable
[Authorize(Roles = "...")]to work correctly.If a user's roles change, a new JWT must be issued to reflect those changes.
Our SecureShop API now has a complete, production-ready JWT authentication system integrated with ASP.NET Core Identity, including secure password management and role-based authorization. From here, you can extend the system with features such as Refresh Tokens, Email Confirmation, Password Reset, Two-Factor Authentication, or External Login Providers depending on your application's requirements.
Join the conversation! Your thoughts help the community grow.