

In the previous article, we followed the complete JWT authentication flow—from user login to accessing a protected API. We learned that after validating the user's credentials, the API generates a JWT and returns it to the client.
Now it's time to build that flow.
By the end of this article, you'll have a working ASP.NET Core Web API that authenticates a user and generates a JWT. We'll keep the implementation simple so you understand each step clearly before adding advanced features in later articles.
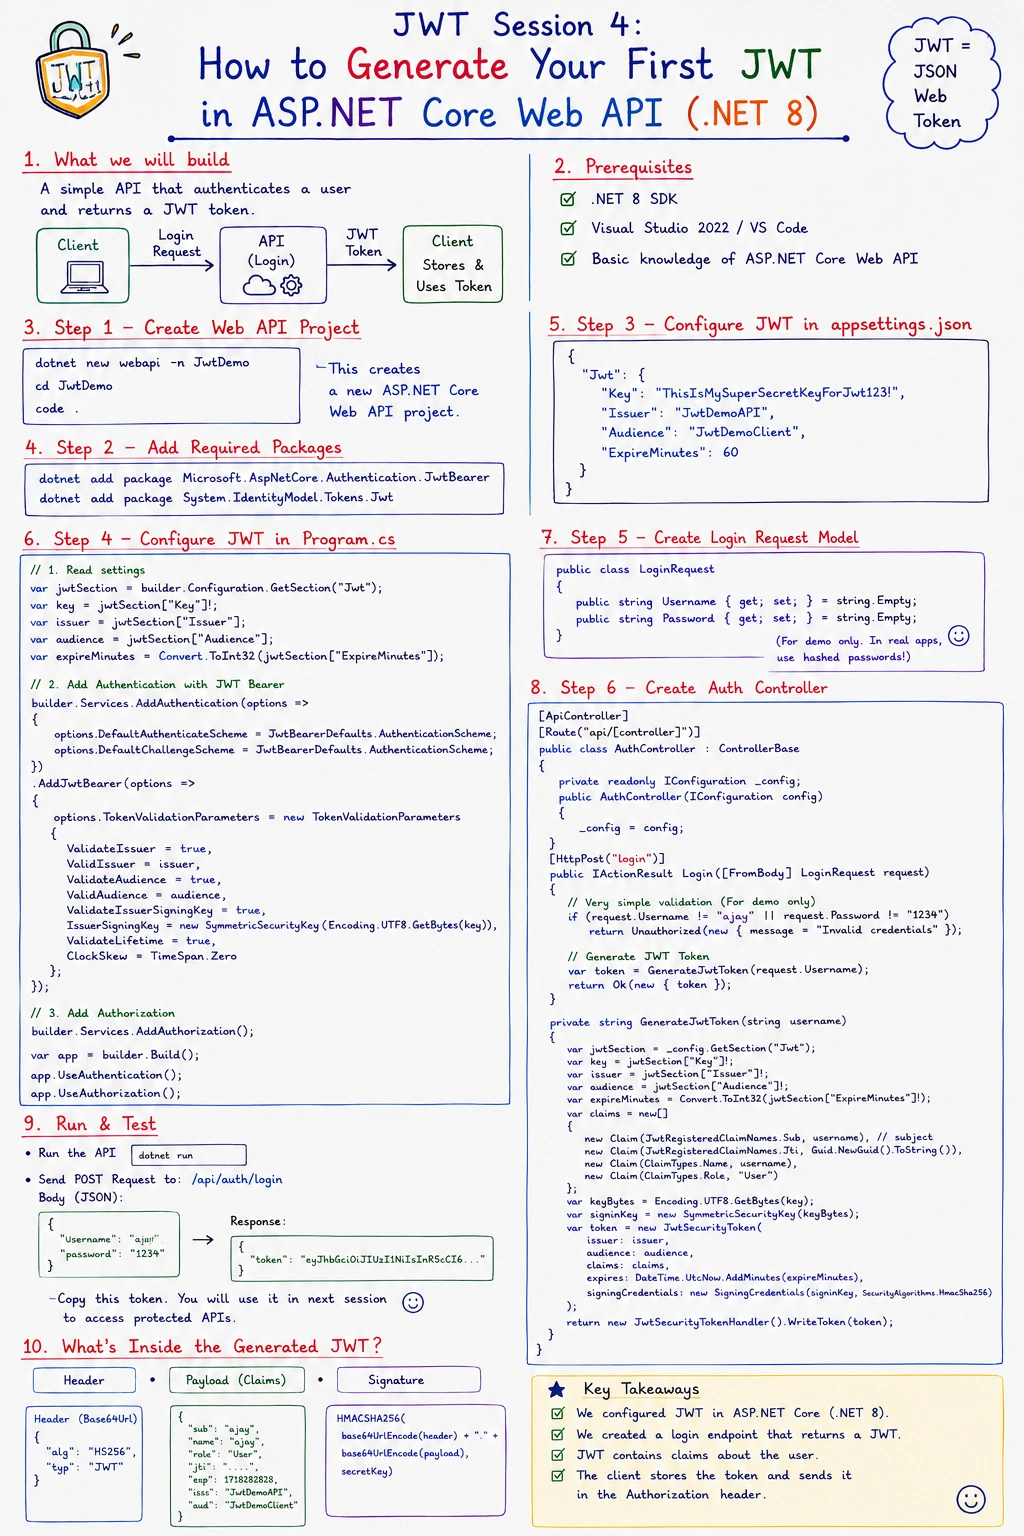
What Are We Building?
We'll continue using our SecureShop API.
Our goal is simple:
User sends email and password.
API validates the credentials.
API generates a JWT.
API returns the token.
The flow looks like this:
POST /api/auth/login
        │
        ▼
Validate Credentials
        │
        ▼
Generate JWT
        │
        ▼
Return Access Token
In this article, we are focusing only on token generation. Token validation and protected APIs will be covered in the next articles.
Why Do We Need a Token Service?
A common beginner mistake is generating JWTs directly inside the controller.
For example:
// Don't do this
public IActionResult Login()
{
    // 100+ lines of JWT generation code
}
Although this works, it mixes authentication logic with HTTP request handling.
A better approach is to separate responsibilities.
Controller
      │
      ▼
JWT Token Service
      │
      ▼
Generate Token
This makes the code cleaner, reusable, and easier to test.
Step 1: Create a New ASP.NET Core Web API
Create a new project.
dotnet new webapi -n SecureShop.Api

cd SecureShop.Api
Install the JWT package.
dotnet add package Microsoft.AspNetCore.Authentication.JwtBearerAlthough we won't configure authentication middleware yet, this package provides the classes required to create JWTs.
Step 2: Configure JWT Settings
Open appsettings.json and add a new section.
{
  "Jwt": {
    "Key": "ThisIsMyVerySecretKeyForDevelopment12345",
    "Issuer": "SecureShop.Api",
    "Audience": "SecureShop.Client",
    "ExpiryMinutes": 30
  }
}
These settings control how our tokens are generated.
| Setting | Purpose |
|---|---|
| Key | Secret used to sign the token |
| Issuer | Application that creates the token |
| Audience | Application that will use the token |
| ExpiryMinutes | Token lifetime |
Note: Never store production secrets inside
appsettings.json. We'll discuss secure secret management later in this series.
Step 3: Create a Strongly Typed Configuration Class
Create a folder named Configurations.
Add JwtOptions.cs.
namespace SecureShop.Api.Configurations;

public sealed class JwtOptions
{
    public const string SectionName = "Jwt";

    public required string Key { get; init; }

    public required string Issuer { get; init; }

    public required string Audience { get; init; }

    public int ExpiryMinutes { get; init; }
}
Why do we use this class?
It provides strongly typed configuration.
It avoids hardcoded values.
Configuration becomes easy to maintain.
Step 4: Create Login Models
Create a Contracts folder.
LoginRequest.cs
public sealed record LoginRequest(
    string Email,
    string Password);
LoginResponse.cs
public sealed record LoginResponse(
    string AccessToken,
    DateTime ExpiresAtUtc);
We're using records because these classes only carry data between the client and the API.
Step 5: Create a User Model
Create Models/ApplicationUser.cs
namespace SecureShop.Api.Models;

public sealed class ApplicationUser
{
    public int Id { get; init; }

    public required string Name { get; init; }

    public required string Email { get; init; }

    public required string Role { get; init; }
}
For simplicity, we're using a basic model.
Later in this series, we'll replace it with Entity Framework Core and ASP.NET Core Identity.
Step 6: Create the JWT Service
Create a folder named Services.
First, create the interface.
using SecureShop.Api.Models;

public interface IJwtTokenService
{
    string GenerateToken(ApplicationUser user);
}
Now implement it.
using System.IdentityModel.Tokens.Jwt;
using System.Security.Claims;
using System.Text;
using Microsoft.Extensions.Options;
using Microsoft.IdentityModel.Tokens;
using SecureShop.Api.Configurations;
using SecureShop.Api.Models;

public sealed class JwtTokenService : IJwtTokenService
{
    private readonly JwtOptions _options;

    public JwtTokenService(IOptions<JwtOptions> options)
    {
        _options = options.Value;
    }

    public string GenerateToken(ApplicationUser user)
    {
        var claims = new[]
        {
            new Claim(JwtRegisteredClaimNames.Sub, user.Id.ToString()),
            new Claim(ClaimTypes.Name, user.Name),
            new Claim(ClaimTypes.Email, user.Email),
            new Claim(ClaimTypes.Role, user.Role)
        };

        var key = new SymmetricSecurityKey(
            Encoding.UTF8.GetBytes(_options.Key));

        var credentials = new SigningCredentials(
            key,
            SecurityAlgorithms.HmacSha256);

        var token = new JwtSecurityToken(
            issuer: _options.Issuer,
            audience: _options.Audience,
            claims: claims,
            expires: DateTime.UtcNow.AddMinutes(_options.ExpiryMinutes),
            signingCredentials: credentials);

        return new JwtSecurityTokenHandler().WriteToken(token);
    }
}
Why is it written this way?
Claims identify the authenticated user.
SymmetricSecurityKey creates the signing key.
SigningCredentials digitally sign the JWT.
JwtSecurityToken builds the token.
WriteToken() converts the token into the string sent to the client.
Notice that the service has only one responsibility—creating JWTs.
Step 7: Register the Service
Open Program.cs.
Register the configuration and service.
builder.Services.Configure<JwtOptions>(
    builder.Configuration.GetSection(JwtOptions.SectionName));

builder.Services.AddScoped<IJwtTokenService, JwtTokenService>();
Now ASP.NET Core's Dependency Injection container knows how to create the service whenever it's required.
Step 8: Create the Login Endpoint
Create AuthController.cs
using Microsoft.AspNetCore.Mvc;
using SecureShop.Api.Contracts;
using SecureShop.Api.Models;
using SecureShop.Api.Services;

[ApiController]
[Route("api/[controller]")]
public class AuthController : ControllerBase
{
    private readonly IJwtTokenService _tokenService;

    public AuthController(IJwtTokenService tokenService)
    {
        _tokenService = tokenService;
    }

    [HttpPost("login")]
    public IActionResult Login(LoginRequest request)
    {
        if (request.Email != "[email protected]" ||
            request.Password != "Admin@123")
        {
            return Unauthorized();
        }

        var user = new ApplicationUser
        {
            Id = 1,
            Name = "John",
            Email = request.Email,
            Role = "Admin"
        };

        var token = _tokenService.GenerateToken(user);

        return Ok(new LoginResponse(
            token,
            DateTime.UtcNow.AddMinutes(30)));
    }
}
For learning purposes, the credentials are hardcoded.
In a real application, you'll retrieve the user from a database and verify the password securely.
Internal Flow
Let's see what happens when the login request arrives.
Client
   │
   │ Email + Password
   ▼
AuthController
   │
   ▼
Validate Credentials
   │
   ▼
JwtTokenService
   │
   ▼
Create Claims
   │
   ▼
Create JWT
   │
   ▼
Return Token
   │
   ▼
Client
Each class has a clear responsibility.
The controller handles the request.
The service generates the JWT.
Test the API
Run the project and send the following request.
POST /api/auth/loginRequest body:
{
    "email":"[email protected]",
    "password":"Admin@123"
}
Response:
{
    "accessToken":"eyJhbGciOiJIUzI1NiIs...",
    "expiresAtUtc":"2026-07-19T16:30:00Z"
}
Congratulations!
You've successfully generated your first JWT in ASP.NET Core.
At this point, the client has a valid token.
However, the API is not validating it yet.
Anyone could send this token, but our API doesn't know how to verify it.
That's exactly what we'll solve next.
Common Mistakes
1. Generating JWTs Inside Controllers
Keep token generation inside a dedicated service.
Controllers should coordinate requests, not implement authentication logic.
2. Hardcoding Configuration Values
Avoid writing secret keys directly inside your code.
Use configuration classes so values can change without modifying the application.
3. Adding Too Many Claims
A JWT should contain only the information required to identify and authorize the user.
Avoid placing unnecessary or sensitive data inside the token.
Key Takeaways
A JWT is generated only after successful authentication.
Keep JWT generation inside a dedicated service.
Store JWT settings in configuration.
Claims describe the authenticated user.
The generated token is returned to the client after login.
At this stage, the API can create a JWT but cannot yet validate one.
In the next article, we'll configure JWT Bearer Authentication in ASP.NET Core. You'll learn how the framework validates incoming tokens, why middleware is required, and what happens internally before a protected API endpoint executes.
Join the conversation! Your thoughts help the community grow.