
Introduction
In this step-by-step tutorial, I will demonstrate how to use the JWT token in your web API .net core 6.0 project. This tutorial covers the following topics.
- How to create a JWT access token
- How to authorize any web API endpoint
Before we start you must be knowing the following concepts - Authentication and Authorization. According to Wikipedia,
- Authentication - is the act of proving an assertion, such as the identity of a computer system user. In contrast with identification, the act of indicating a person or thing's identity, authentication is the process of verifying that identity.
- Authorization - is the function of specifying access rights/privileges to resources, which is related to general information security and computer security, and to access control in particular.
Step 1. Creating a Web API project
Let's start. First, need to open Visual Studio and create a new Project
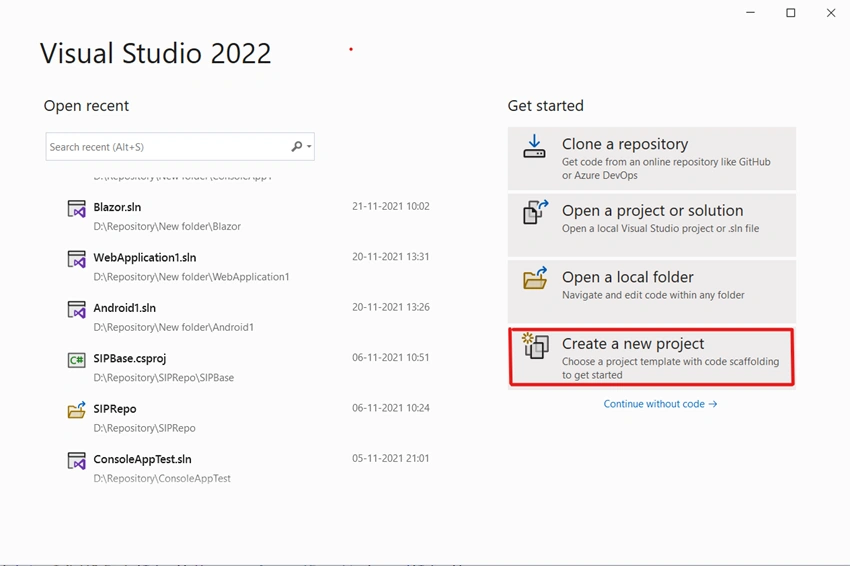
Now Select Web API Template.

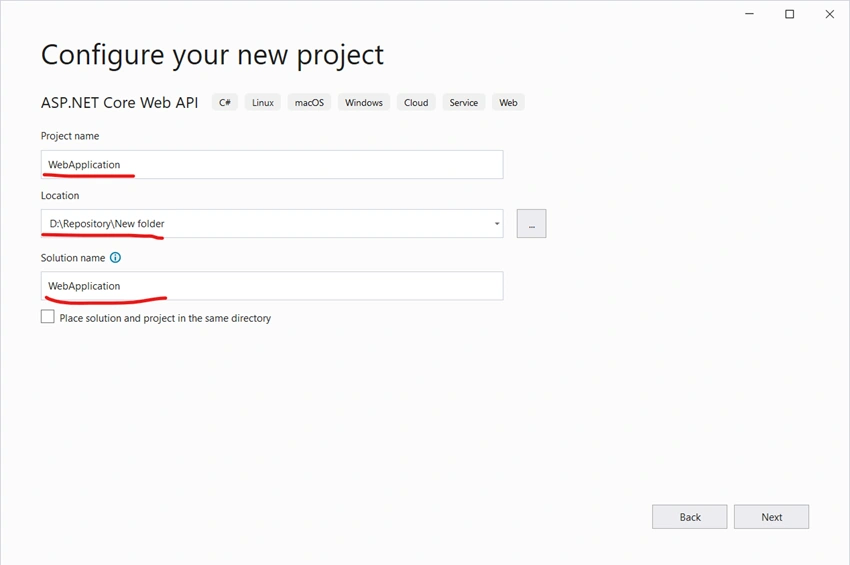
Then give a name to the solution and select the folder where want to place the solution
Chose .net 6 frameworks and Authentication type as None because we are implementing custom JWT Authentications

Step 2. Install Nuget Packages
Then open Nuget Package manager and install latest version of following packages,
- Microsoft.AspNetCore.Authentication.JwtBearer
- Microsoft.IdentityModel.JsonWebTokens
- System.IdentityModel.Tokens.Jwt

Step 3. Add Model and settings
Add a new folder to your project root directory name as “Models” and a new class named “JwtSettings” and “UserTokens”.
JwtSettings.cs file,
namespace WebApplication.Models;
public class JwtSettings {
    public bool ValidateIssuerSigningKey {
        get;
        set;
    }
    public string IssuerSigningKey {
        get;
        set;
    }
    public bool ValidateIssuer {
        get;
        set;
    } = true;
    public string ValidIssuer {
        get;
        set;
    }
    public bool ValidateAudience {
        get;
        set;
    } = true;
    public string ValidAudience {
        get;
        set;
    }
    public bool RequireExpirationTime {
        get;
        set;
    }
    public bool ValidateLifetime {
        get;
        set;
    } = true;
}
UserTokens.cs file
namespace WebApplication.Models;
public class UserTokens {
    public string Token {
        get;
        set;
    }
    public string UserName {
        get;
        set;
    }
    public TimeSpan Validaty {
        get;
        set;
    }
    public string RefreshToken {
        get;
        set;
    }
    public Guid Id {
        get;
        set;
    }
    public string EmailId {
        get;
        set;
    }
    public Guid GuidId {
        get;
        set;
    }
    public DateTime ExpiredTime {
        get;
        set;
    }
}
Then we have to add some settings in app settings so we can globally change the token generation settings from appsettings.json without changing any LOC(Line of code).
Note: Please don’t forget to change the local URL of the valid issuer and valid audience.
"JsonWebTokenKeys": {
    "ValidateIssuerSigningKey": true,
    "IssuerSigningKey": "64A63153-11C1-4919-9133-EFAF99A9B456",
    "ValidateIssuer": true,
    "ValidIssuer": "https://localhost:7168",
    "ValidateAudience": true,
    "ValidAudience": "https://localhost:7168",
    "RequireExpirationTime": true,
    "ValidateLifetime": true
},

The next step is to add JWT Helper class that is used to create a Token and Refresh Token and validation of Token.
To add class first create “JwtHelpers” folder in the root project then create a class.
Add code given below,
using Microsoft.IdentityModel.Tokens;
using System.IdentityModel.Tokens.Jwt;
using System.Security.Claims;
using WebApplication.Models;
namespace WebApplication.JwtHelpers {
    public static class JwtHelpers {
        public static IEnumerable < Claim > GetClaims(this UserTokens userAccounts, Guid Id) {
            IEnumerable < Claim > claims = new Claim[] {
                new Claim("Id", userAccounts.Id.ToString()),
                    new Claim(ClaimTypes.Name, userAccounts.UserName),
                    new Claim(ClaimTypes.Email, userAccounts.EmailId),
                    new Claim(ClaimTypes.NameIdentifier, Id.ToString()),
                    new Claim(ClaimTypes.Expiration, DateTime.UtcNow.AddDays(1).ToString("MMM ddd dd yyyy HH:mm:ss tt"))
            };
            return claims;
        }
        public static IEnumerable < Claim > GetClaims(this UserTokens userAccounts, out Guid Id) {
            Id = Guid.NewGuid();
            return GetClaims(userAccounts, Id);
        }
        public static UserTokens GenTokenkey(UserTokens model, JwtSettings jwtSettings) {
            try {
                var UserToken = new UserTokens();
                if (model == null) throw new ArgumentException(nameof(model));
                // Get secret key
                var key = System.Text.Encoding.ASCII.GetBytes(jwtSettings.IssuerSigningKey);
                Guid Id = Guid.Empty;
                DateTime expireTime = DateTime.UtcNow.AddDays(1);
                UserToken.Validaty = expireTime.TimeOfDay;
                var JWToken = new JwtSecurityToken(issuer: jwtSettings.ValidIssuer, audience: jwtSettings.ValidAudience, claims: GetClaims(model, out Id), notBefore: new DateTimeOffset(DateTime.Now).DateTime, expires: new DateTimeOffset(expireTime).DateTime, signingCredentials: new SigningCredentials(new SymmetricSecurityKey(key), SecurityAlgorithms.HmacSha256));
                UserToken.Token = new JwtSecurityTokenHandler().WriteToken(JWToken);
                UserToken.UserName = model.UserName;
                UserToken.Id = model.Id;
                UserToken.GuidId = Id;
                return UserToken;
            } catch (Exception) {
                throw;
            }
        }
    }
}
Here GetClaims() Method is used to create return claims list from user token details.
 // Get secret key
 var key = System.Text.Encoding.ASCII.GetBytes(jwtSettings.IssuerSigningKey);
 Guid Id = Guid.Empty;
 DateTime expireTime = DateTime.UtcNow.AddDays(1);
Now get byte arrays of specified keys in appsettings and here we define expiry of token as one day from the day when token is generated.
var JWToken = new JwtSecurityToken(issuer: jwtSettings.ValidIssuer, audience: jwtSettings.ValidAudience, claims: GetClaims(model, out Id), notBefore: new DateTimeOffset(DateTime.Now).DateTime, expires: new DateTimeOffset(expireTime).DateTime, signingCredentials: new SigningCredentials(new SymmetricSecurityKey(key), SecurityAlgorithms.HmacSha256));
UserToken.Token = new JwtSecurityTokenHandler().WriteToken(JWToken);
Then we assigned generated security token and access token by using JwtSecurityTokenHandler’s WriteToken() method/ function.
Then we have to do some settings in the program file. We need to inject services to use JWT Token.
In a previous version of .net3.1, we have separated startup files where we have to inject services and use them in your project but the .net6 startup file is no longer exists. So, to inject services let's create a New Class named “AddJWTTokenServicesExtensions” to the separation of concern and without messing off the program.cs first create folder named “Extensions” in your root project. Then create class AddJWTTokenServicesExtensions.
Note
Here we need to make these classes static classes because we need to call that method in program.cs.
using Microsoft.AspNetCore.Authentication.JwtBearer;
using Microsoft.IdentityModel.Tokens;
using WebApplication.Models;
namespace WebApplication.Extensions {
    public static class AddJWTTokenServicesExtensions {
        public static void AddJWTTokenServices(IServiceCollection Services, IConfiguration Configuration) {
            // Add Jwt Setings
            var bindJwtSettings = new JwtSettings();
            Configuration.Bind("JsonWebTokenKeys", bindJwtSettings);
            Services.AddSingleton(bindJwtSettings);
            Services.AddAuthentication(options => {
                options.DefaultAuthenticateScheme = JwtBearerDefaults.AuthenticationScheme;
                options.DefaultChallengeScheme = JwtBearerDefaults.AuthenticationScheme;
            }).AddJwtBearer(options => {
                options.RequireHttpsMetadata = false;
                options.SaveToken = true;
                options.TokenValidationParameters = new Microsoft.IdentityModel.Tokens.TokenValidationParameters() {
                    ValidateIssuerSigningKey = bindJwtSettings.ValidateIssuerSigningKey,
                        IssuerSigningKey = new SymmetricSecurityKey(System.Text.Encoding.UTF8.GetBytes(bindJwtSettings.IssuerSigningKey)),
                        ValidateIssuer = bindJwtSettings.ValidateIssuer,
                        ValidIssuer = bindJwtSettings.ValidIssuer,
                        ValidateAudience = bindJwtSettings.ValidateAudience,
                        ValidAudience = bindJwtSettings.ValidAudience,
                        RequireExpirationTime = bindJwtSettings.RequireExpirationTime,
                        ValidateLifetime = bindJwtSettings.RequireExpirationTime,
                        ClockSkew = TimeSpan.FromDays(1),
                };
            });
        }
    }
}
Add above code to your “AddJWTTokenServicesExtensions.cs” file
Then add the need to call this extension method in the program.cs class.
Add using in the first line of the program.cs
e.g.
using WebApplication.Extensions;
After builder object creation call method AddJWTTokenServices()
e.g.
using WebApplication.Extensions;
var builder = Microsoft.AspNetCore.Builder.WebApplication.CreateBuilder(args);
// Add services to the container.
builder.Services.AddJWTTokenServices(builder.Configuration);
your program. cs file to look like below.

Let's move to the next step that is controller implementations.
Add new WebAPI Controller Named “AccountController”
Here we don’t use any database, we just static values to validate a user and generate Access Token and Authenticate and Authorized Web API Controller
Create add new class Users in models folders
With the following code.
namespace WebApplication.Models {
    public class Users {
        public string UserName {
            get;
            set;
        }
        public Guid Id {
            get;
            set;
        }
        public string EmailId {
            get;
            set;
        }
        public string Password {
            get;
            set;
        }
    }
}
Create add new class UserLogins in models folders with following code.
using System.ComponentModel.DataAnnotations;
namespace WebApplication.Models {
    public class UserLogins {
        [Required]
        public string UserName {
            get;
            set;
        }
        [Required]
        public string Password {
            get;
            set;
        }
        public UserLogins() {}
    }
}
Add new Controller -> API In templates and Rights side Select API Controller -> Empty.

Add following code.
using Microsoft.AspNetCore.Authorization;
using Microsoft.AspNetCore.Http;
using Microsoft.AspNetCore.Mvc;
using WebApplication.Models;
namespace WebApplication.Controllers {
    [Route("api/[controller]/[action]")]
    [ApiController]
    public class AccountController: ControllerBase {
        private readonly JwtSettings jwtSettings;
        public AccountController(JwtSettings jwtSettings) {
            this.jwtSettings = jwtSettings;
        }
        private IEnumerable < Users > logins = new List < Users > () {
            new Users() {
                    Id = Guid.NewGuid(),
                        EmailId = "[email protected]",
                        UserName = "Admin",
                        Password = "Admin",
                },
                new Users() {
                    Id = Guid.NewGuid(),
                        EmailId = "[email protected]",
                        UserName = "User1",
                        Password = "Admin",
                }
        };
        [HttpPost]
        public IActionResult GetToken(UserLogins userLogins) {
            try {
                var Token = new UserTokens();
                var Valid = logins.Any(x => x.UserName.Equals(userLogins.UserName, StringComparison.OrdinalIgnoreCase));
                if (Valid) {
                    var user = logins.FirstOrDefault(x => x.UserName.Equals(userLogins.UserName, StringComparison.OrdinalIgnoreCase));
                    Token = JwtHelpers.JwtHelpers.GenTokenkey(new UserTokens() {
                        EmailId = user.EmailId,
                            GuidId = Guid.NewGuid(),
                            UserName = user.UserName,
                            Id = user.Id,
                    }, jwtSettings);
                } else {
                    return BadRequest($ "wrong password");
                }
                return Ok(Token);
            } catch (Exception ex) {
                throw;
            }
        }
        /// <summary>
        /// Get List of UserAccounts
        /// </summary>
        /// <returns>List Of UserAccounts</returns>
        [HttpGet]
        [Authorize(AuthenticationSchemes = Microsoft.AspNetCore.Authentication.JwtBearer.JwtBearerDefaults.AuthenticationScheme)]
        public IActionResult GetList() {
            return Ok(logins);
        }
    }
}
In the above Account, the controller created a List of Login Details that are valid users. You can use database records to validate user logins. Next, we created a method to validate login credentials and generate tokens with the help of JWT Hepler.
And to check authorization from swagger replace open program.cs
builder.Services.AddSwaggerGen();
with following code
builder.Services.AddSwaggerGen(options => {
    options.AddSecurityDefinition("Bearer", new Microsoft.OpenApi.Models.OpenApiSecurityScheme {
        Name = "Authorization",
            Type = Microsoft.OpenApi.Models.SecuritySchemeType.Http,
            Scheme = "Bearer",
            BearerFormat = "JWT",
            In = Microsoft.OpenApi.Models.ParameterLocation.Header,
            Description = "JWT Authorization header using the Bearer scheme."
    });
    options.AddSecurityRequirement(new Microsoft.OpenApi.Models.OpenApiSecurityRequirement {
        {
            new Microsoft.OpenApi.Models.OpenApiSecurityScheme {
                    Reference = new Microsoft.OpenApi.Models.OpenApiReference {
                        Type = Microsoft.OpenApi.Models.ReferenceType.SecurityScheme,
                            Id = "Bearer"
                    }
                },
                new string[] {}
        }
    });
});
To check web api with swagger we need to add authorization security options in swagger, so used AddSecurityDefination() and AddSecurityRequirement() function to add Security options.
After running the application you will get the result of the swagger just shown below:

Let’s try to get Token by specifying username and password.

You will get tokens as shown below.

Without passing the token result will be shown below it will give a 401 error.

To Validate or pass the token in the header click on validate button paste generated token in the textbox click on login. And close the popup dialog.

Then try to get a list of accounts you will get all details.

Summary
In this article, I discussed how we can create a JWT access token. We also saw how we can authorize the WEB API endpoint.
Sachin SahuPosted Mar 22, 2023, 12:11 PM
Nice code very good
Jorge GambinoPosted Oct 27, 2022, 2:29 PM
Hi. Great tutorial. But I'am getting stucked here in program.cs: using Controller.Extensions; var builder = WebApplication.CreateBuilder(args); builder.Services.AddJWTTokenService(builder.Configuration); I have underlined in red the AddJWTTokenService, with the following error: 'IServiceCollection' does not contain a definition for 'AddJWTTokenService' and no accesible extension method... Can you help me please?
Patrick WooPosted Aug 31, 2022, 3:09 PM
Very good article, It was a guide to know jwt.
Erick VasquezPosted Jul 13, 2022, 11:03 PM
Hello! How can I use the refresh token?
prashanth kPosted Jul 7, 2022, 8:09 PM
Hi, i am not getting response status is 401. please let me know anything i am missing
Abhisar GargPosted May 25, 2022, 10:27 AM
The token lifetime is unlimited, how to make the token expire after 5 mins... I tried every possible value change, but its not happening. Can you guide on this.
Vikash SinghPosted Apr 25, 2022, 7:46 AM
Great! Just a quick question, let's suppose I have another API (a separate microservice) and I want to authenticate that microservice from this main API(that you have described above). How can I do that?
Nicholas ArroyoPosted Apr 12, 2022, 5:16 PM
Hello Avinash, thank you for the wonderful tutorial! I am sadly struggling with the very last part. The GetList function always returns a 401 unauthorized to me, even using the token provided by the GetToken function. I make sure that I have the full token in the authorization without the word "Bearer" but alas. Do you know what potential reasons there could be for this? Thank you in advance!
sanjay rawatPosted Mar 29, 2022, 7:53 AM
We have to apply [Authorize(...)] attribute, before each action method, How to make it by default, apply at all action method without specify this attribute and where I dont want to apply can use [AllowAnonymous] attribute.
Luis ArguelloPosted Mar 26, 2022, 9:57 PM
This is great, refresh token and customised identity framework table continuation will be great to have!! any time soon ?
Peter SchmarewskiPosted Mar 3, 2022, 10:38 PM
The password is not validated in the a GetToken Action - you can login just with the userName
Peter SchmarewskiPosted Feb 25, 2022, 12:55 AM
Great example - What happened to the refresh token - it's not getting created in your code
Jonny LaiPosted Feb 8, 2022, 2:03 AM
Nice article. Thanks and helping me understand.
Lawrence SmithPosted Feb 3, 2022, 9:39 PM
After fixing up the extension method this demo worked great. Well illustrates how to wire up bearer token authentication with easy to see places to hang your own token authentication.
vijay kumarPosted Jan 30, 2022, 1:32 PM
Getting Same IServiceCollection does not contains.. issue even using using directives any body can help? below is code extract first few lines using AuthService.Extensions; var builder = Microsoft.AspNetCore.Builder.WebApplication.CreateBuilder(args); builder.Services.AddJWTTokenServices.(builder.Configuration);
Sibi V GopalPosted Jan 27, 2022, 9:40 AM
'IServiceCollection' does not contain a definition for 'AddJWTTokenServices' and no accessible extension method 'AddJWTTokenServices' accepting a first argument of type 'IServiceCollection' could be found (are you missing a using directive or an assembly reference?) i am using this code in program.cs using WebApplication.Extensions; var builder = Microsoft.AspNetCore.Builder.WebApplication.CreateBuilder(args); builder.Services.AddJWTTokenServices(builder.Configuration);
Maxime MohandiPosted Jan 16, 2022, 1:08 PM
Thanks guys !! It worked like a charm. If I may, I would suggest to explain a bit more some parts like why you chose those properties for the UserToken
Callum SmithPosted Jan 11, 2022, 11:57 AM
Have an issue in that whenever I generate a token when attempting to GET the user list I get told the token is invalid, can't seem to figure out why. Any ideas?
Hamid KhanPosted Jan 9, 2022, 4:18 PM
Very good explanation...
Sachin DPosted Jan 8, 2022, 6:50 AM
Hey, have you implemented manual token expiration logic??
Andrea CPosted Jan 6, 2022, 6:09 PM
Thanks. Very nice article!
Amir KHANPosted Dec 31, 2021, 1:58 AM
Getting this error while adding this line in program.cs builder.Services.AddJWTTokenServices(builder.Configuration); IServiceCollection does not contain a defination for AddJWTTokenServices. Does anyone has any idea Thanks
Vinay AyinapurapuPosted Dec 30, 2021, 6:49 PM
Good article and detailed..
d ePosted Dec 26, 2021, 8:22 PM
Avinash Kunnure Https://localhost:7188/api/Account/GetList seems to still work even when the token has expired. Is there additional logic that needs to be built in to have API calls with expired tokens rejected?
Imran ShahidPosted Dec 25, 2021, 6:45 AM
Hi, Thanks a lot for writing this excellent article. Can you please extend it to include Refresh Token and get a new JWT token based on Refresh Token. Also, how this can be made as an independent authentication service so it can be used in other micro services for authentication purposes.
Hassan ZeitounPosted Dec 24, 2021, 10:08 PM
When putting username and any password, this code will return token !
Omar MohamedPosted Dec 23, 2021, 12:58 PM
Thank you so much
Vivien PipoPosted Dec 23, 2021, 1:42 AM
Thank you , there is a small typo , the correct code is public static void AddJWTTokenServices(this IServiceCollection Services, IConfiguration Configuration)
Hozkar LlanoPosted Dec 22, 2021, 2:42 PM
Thank you so much!
Suraj DubeyPosted Dec 22, 2021, 5:00 AM
Your post is very Helpfull.