

Introduction
In my previous article working with scheduler widget in Kendo UI I explained how to implement the Kendo Scheduler in a web application. From this article we will learn how to remote bind the Kendo Scheduler using ASP.NET WEB PI and Entity Framework.
Remote Binding the Kendo Scheduler
- Open Visual Studio and create a new project.
- Select File, New and then Project.
- Select Web in the installed template and select ASP.NET Web Application.
- Provide the name for the project and click OK, as in the following figures.
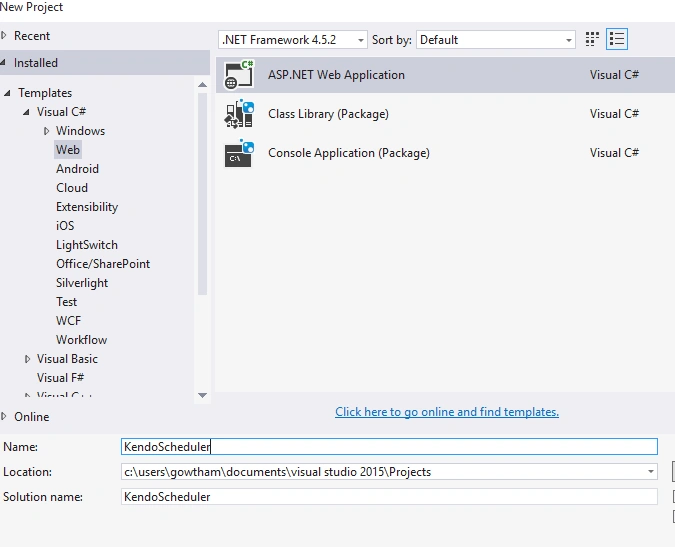
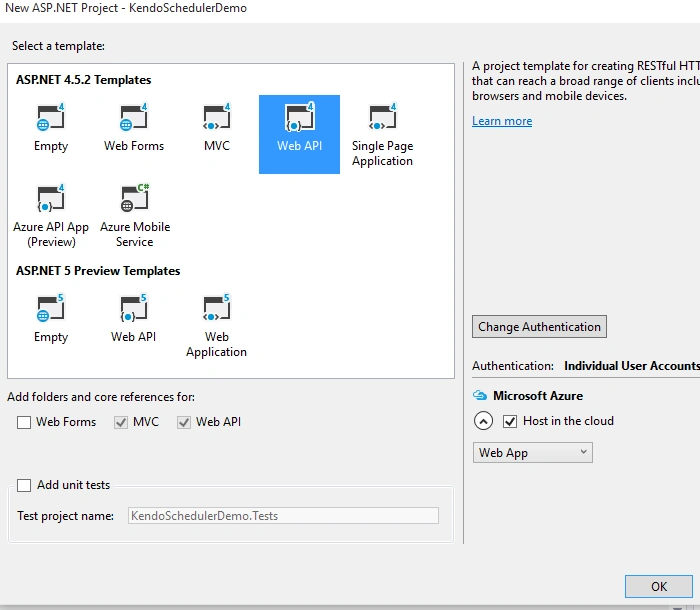
My database schema is as in the following figure:
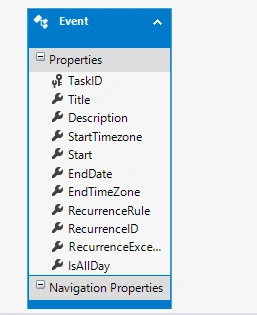
My table structure is as in the following figure:

I am using the Entity Framework with Database First approach, so the Entity Framework builds default model classes and context classes.
Here is my code in EventController Class:
Here is my code in EventController Class:
- public class EventsController : ApiController
- {
- private EventEntities db = new EventEntities();
- // GET: api/Events
- public IQueryable<Event> GetEvents()
- {
- return db.Events;
- }
- // GET: api/Events/5
- [ResponseType(typeof(Event))]
- public IHttpActionResult GetEvent(int id)
- {
- Event @event = db.Events.Find(id);
- if (@event == null)
- {
- return NotFound();
- }
- return Ok(@event);
- }
- // PUT: api/Events/5
- [ResponseType(typeof(void))]
- public IHttpActionResult PutEvent(int id, Event @event)
- {
- if (!ModelState.IsValid)
- {
- return BadRequest(ModelState);
- }
- if (id != @event.TaskID)
- {
- return BadRequest();
- }
- db.Entry(@event).State = EntityState.Modified;
- try
- {
- db.SaveChanges();
- }
- catch (DbUpdateConcurrencyException)
- {
- if (!EventExists(id))
- {
- return NotFound();
- }
- else
- {
- throw;
- }
- }
- return StatusCode(HttpStatusCode.NoContent);
- }
- // POST: api/Events
- [ResponseType(typeof(Event))]
- public IHttpActionResult PostEvent(Event @event)
- {
- if (!ModelState.IsValid)
- {
- return BadRequest(ModelState);
- }
- db.Events.Add(@event);
- db.SaveChanges();
- return CreatedAtRoute("DefaultApi", new { id = @event.TaskID }, @event);
- }
- // DELETE: api/Events/5
- [ResponseType(typeof(Event))]
- public IHttpActionResult DeleteEvent(int id)
- {
- Event @event = db.Events.Find(id);
- if (@event == null)
- {
- return NotFound();
- }
- db.Events.Remove(@event);
- db.SaveChanges();
- return Ok(@event);
- }
- protected override void Dispose(bool disposing)
- {
- if (disposing)
- {
- db.Dispose();
- }
- base.Dispose(disposing);
- }
- private bool EventExists(int id)
- {
- return db.Events.Count(e => e.TaskID == id) > 0;
- }
- }
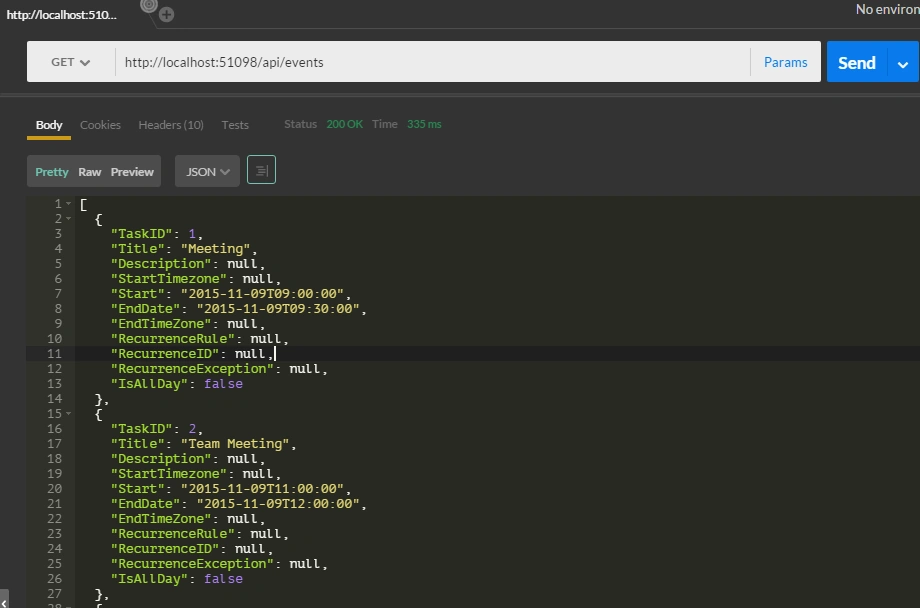
Check the API services using the POSTMAN/Fiddler as in the following figures.
Now it's time for creating a design to consume the service.
Create an HTML page, here is the design,
- <!DOCTYPE html>
- <html>
- <head>
- <title></title>
- <link rel="stylesheet" href="http://kendo.cdn.telerik.com/2015.3.930/styles/kendo.common.min.css">
- <link rel="stylesheet" href="http://kendo.cdn.telerik.com/2015.3.930/styles/kendo.rtl.min.css">
- <link rel="stylesheet" href="http://kendo.cdn.telerik.com/2015.3.930/styles/kendo.default.min.css">
- <link rel="stylesheet" href="http://kendo.cdn.telerik.com/2015.3.930/styles/kendo.mobile.all.min.css">
- <script src="http://code.jquery.com/jquery-1.9.1.min.js"></script>
- <script src="http://kendo.cdn.telerik.com/2015.3.930/js/angular.min.js"></script>
- <script src="http://kendo.cdn.telerik.com/2015.3.930/js/jszip.min.js"></script>
- <script src="http://kendo.cdn.telerik.com/2015.3.930/js/kendo.all.min.js"></script>
- <meta charset="utf-8" />
- </head>
- <body>
- <div id="example">
- <div class="demo-section k-content wide">
- <div>
- <h4>Add an event</h4>
- <div data-role="scheduler"
- data-views="['day']"
- data-bind="source: tasks,
- visible: isVisible,
- style="height: 600px"></div>
- </div>
- <div style="padding-top: 1em;">
- <h4>Console</h4>
- <div class="console"></div>
- </div>
- </div>
- </body>
- </html>
JavaScript
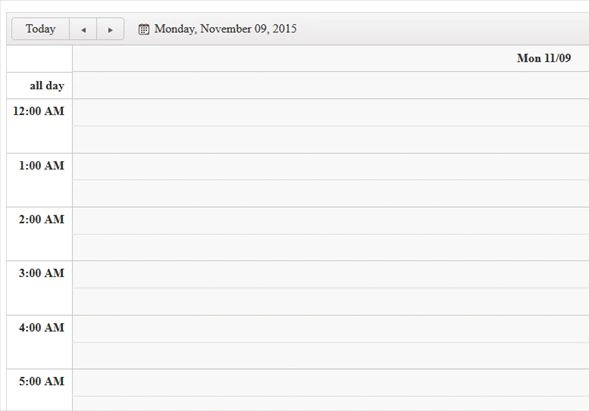
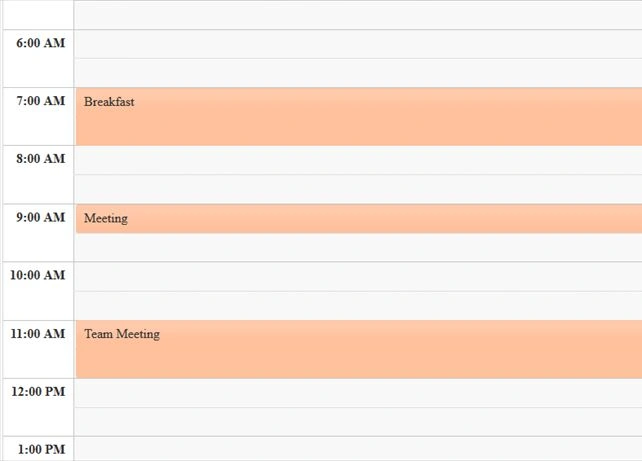
The result in browser
- var viewModel = kendo.observable({
- isVisible: true,
- tasks: new kendo.data.SchedulerDataSource({
- batch: true,
- transport: {
- read: {
- url: "api/Events",
- dataType: "json"
- },
- parameterMap: function(options, operation) {
- if (operation !== "read" && options.models) {
- return {models: kendo.stringify(options.models)};
- }
- }
- },
- schema: {
- model: {
- id: "taskId",
- fields: {
- taskId: { from: "TaskID", type: "number" },
- title: { from: "Title", defaultValue: "No title", validation: { required: true } },
- start: { type: "date", from: "Start" },
- end: { type: "date", from: "EndDate" },
- startTimezone: { from: "StartTimezone" },
- endTimezone: { from: "EndTimezone" },
- description: { from: "Description" },
- recurrenceId: { from: "RecurrenceID" },
- recurrenceRule: { from: "RecurrenceRule" },
- recurrenceException: { from: "RecurrenceException" },
- isAllDay: { type: "boolean", from: "IsAllDay" }
- }
- }
- }
- })
- });
- kendo.bind($("#example"), viewModel);
References
- http://demos.telerik.com/kendo-ui/scheduler/index
- http://docs.telerik.com/kendo-ui/web/scheduler/overview
Conclusion:
From this article we learned how to remote bind the Kendo Scheduler using ASP.NET WEB PI and Entity Framework. In my upcoming article I am going to discuss about how to perform the CRUD operation in Kendo Scheduler and their events.
Arul RPosted Jan 17, 2016, 10:50 AM
Thanks for nice article
Santhakumar MunuswamyPosted Nov 11, 2015, 2:39 AM
Good one
Sibeesh VenuPosted Nov 11, 2015, 12:40 AM
Nice Share
Mukesh KumarPosted Nov 10, 2015, 12:14 AM
Good Work