

Lab Objectives
The goal for this is end-to-end tour of the Blog Site features in SharePoint 2013.
After completing the lab, you will be able to:
- Know when to use Blog Site.
- Collaborate with peers/groups by sharing ideas, information, etc.
- Create Blog Posts
- Create/Save/Publish the Blog Posts.
- Categorize the Blog Posts
- Assigning Permissions (who can create blog posts, who can read posts.).
- Create/Publish blog Posts from MS Word application.
Technologies
- SharePoint 2013
- Microsoft Word 2012
Getting Started
Connect to the Lab environment:
Log on to the SharePoint virtual machine (vm) or the CloudShare environment with relevant credentials.
Exercise 1: Create Blog Site
Tasks:
- Navigate to any of the existing Site collection.
- In the Quick launch, click Site Contents.
- Scroll to the bottom and, in the Subsites area, click new subsite.
- In the Title box, type “SharePoint Blog”.
- In the URL name box, type “SharePointBlog”.
- In the Template Selection, select “Blog” site template.
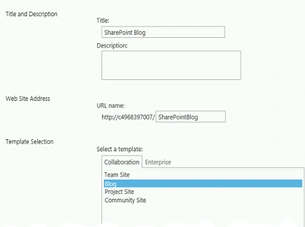
- In Permissions,
- You can go ahead with “use same permissions as parent site” if you want to have the permissions inherited.
- You can select “Use unique permissions” if you want to assign specific permissions to the blog site.
- You can go ahead with “use same permissions as parent site” if you want to have the permissions inherited.
- Rest of the settings, it depends on your needs.
- At the bottom of the page, click Create.
Note: It may take several minutes for processing on the create action to complete.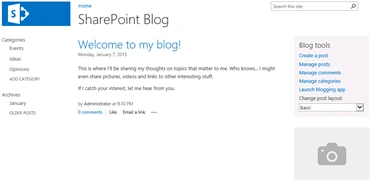
- You should have successfully created the Blog site as in the preceding screenshot.
Exercise 2: Create/Save/Publish Blog Posts (Create Post)
People who are eligible/have relevant access can create blog posts.
Tasks:
- Navigate to the created Blog site.
- In the Blog Tools, click Create a post.
- In the Title box, type “What is a blog?”
- In the Body box, type “A blog is basically a type of website that enables to share idea, information across”.
- In Category, select “Ideas” and click Add button. This basically categorizes the blog post. You need to select relevant category based on the post.
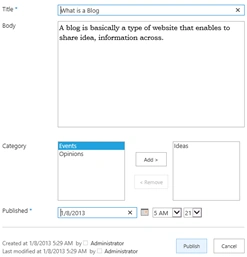
- In Published (date),
- You can leave date and time and click “Save as draft” button in ribbon in order to edit and publish the post at later point of time.
- You can leave date and time as is and click “Publish” button to publish the Post immediately, so that this post is visible for all the targeted audience.
- You can change the date and time and click “Publish” button to publish the post at the defined date and time.
- You can leave date and time and click “Save as draft” button in ribbon in order to edit and publish the post at later point of time.
- At the bottom of the page, click Publish button.
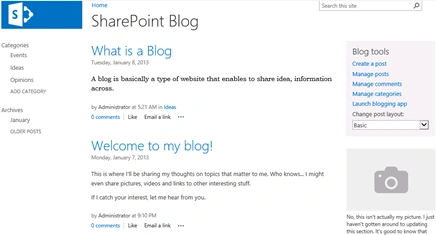
- You should have successfully created the Blog Post.
- Manage posts:
- You can also create a Post by clicking “Manage Posts” in the Blog Tools.
- This will navigate to Posts list and you can add an Item to the list, which will enable you to create a Post.
- Apart from creating Posts, you can also do other list management activities.
- You can also create a Post by clicking “Manage Posts” in the Blog Tools.
Exercise 3: Provide Comments against a Post
People who are eligible/have relevant access can provide comments against blog posts.
Tasks:
- Navigate to the created Blog site.
- Navigate to any of the Post to provide comments.
- Click on “Comments” link below which is available under each Post.
- In Comments box, provide “Blogging is very extensively used in this Internet world”.
- In the end of the page, click “Post” button.
- You will successfully complete providing comments against a post.
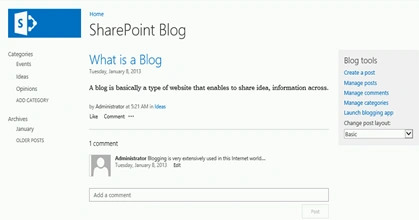
- You can do all list management activities by clicking on Manage Comments link in the Blog Tools.
Exercise 4: Categories (Manage Categories)
People who are eligible/have relevant access can manage categories.
Tasks:
- Navigate to the created Blog site.
- Click on “Manage Categories” link in the Blog Tools.
- This will navigate to “Categories” list and you can perform all management activities over here.
- You can add a new category by clicking “New Item”.
- In the Title box, type “SharePoint 2013”.
- Click Save button to successfully create a category.
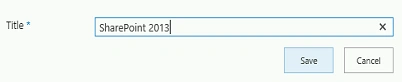
- You can also create a Category by clicking “ADD Category” in the Quick launch.
Exercise 5: Display Posts based on the Category
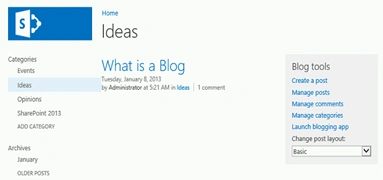
This is to filter the Posts created based on the selected category.
Tasks:
- Click on category “Ideas” to filter out the Posts based on the selected category in the Quick launch.
Exercise 6: Change Post Layout
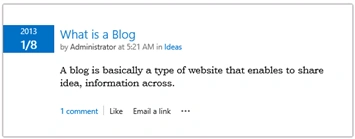
This is to change the display style of the Posts. By default it is “Basic” layout.
Tasks:
- Navigate to the created Blog site.
- Select different layout style “Boxed” from the dropdown list in the Blog Tools.
- This will change the style of the displayed Posts.
Exercise 7: Publishing Posts from Word
You can also create blog Posts and publish them from Word application. To perform this click on the “Launch blogging app” which will open the Word application to provide the Post Title and description and publish.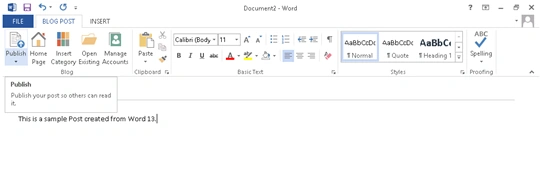
Other Functionalities:
- You can look for archived Posts under Archived section in Quick launch. The Posts are grouped by Months.
- You can click on “Like” link below the Post description if you like the Post.
- You can Email the Blog Post link if you wanted to share the information.
Assignment: Recent Blog Posts (Rollup Web Part)
Tasks:
- Have couple of Blog sites created in one of the site collection.
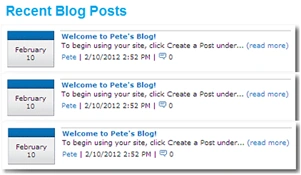
- Create a web part to display the recent blog posts (Blog Posts rollup web part) from all the blog sites.
- This web part has to be placed on the root site to display recent blog posts, recent on the top.
- Clicking on the link of the Title of the blog post should navigate you to the actual blog post site.
- Clicking on the link of (read more) should display the complete blog post information (expanded mode).
- Should have a provision to limit the number of items to display.
ggggg gggPosted Jan 21, 2020, 2:04 PM
Please visit my website for latest technology news https://bit.ly/38pEAUx
Santhakumar MunuswamyPosted Nov 28, 2015, 2:38 AM
Nice share
Vinodh NarayananPosted Nov 26, 2015, 5:53 AM
good one
Mukesh KumarPosted Nov 26, 2015, 12:21 AM
Nice One
Prasham SabadraPosted Nov 25, 2015, 11:22 PM
Thanks for Sharing !!!