

Introduction
This article provides a sample of drawing a Label in HTML.
First, we download the file in the following attachment:
-
Kinectic_beta.js
This file is then added to the project, then use the following procedure.
Step 1
Open Visual Studio 2010 and click "File" -> "New" -> "Website...". A window is opened. In this window, give the name of your application as "Label" and then click "Ok".
Step 2
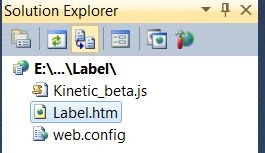
Add the "kinetic_beta.js" file. The project will have then been created; a new window is opened on the right side. This window is called the Solution Explorer. The Solution Explorer contains the js file and HTML files.
Coding
Label.html
- <!DOCTYPE html PUBLIC "-//W3C//DTD XHTML 1.0 Transitional//EN" "http://www.w3.org/TR/xhtml1/DTD/xhtml1-transitional.dtd">
- <html xmlns="http://www.w3.org/1999/xhtml">
- <head>
- <style type="text/css">
- #container {
- height: 361px;
- }
- </style>
- <title></title>
- </head>
- <body>
- <h3> Label in HTML5 </h3>
- <div id="container"></div>
- <script src="Kinetic_beta.js" type="text/javascript"></script>
- <script>
- var stage = new Kinetic.Stage({
- container: 'container',
- width: 478,
- height: 800
- });
- var layer = new Kinetic.Layer();
- var tooltip = new Kinetic.Label({
- x: 170,
- y: 75,
- opacity: 0.75,
- listening: false,
- text: {
- text: 'Tooltip pointing down',
- fontFamily: 'Calibri',
- fontSize: 18,
- padding: 5,
- fill: 'Black'
- },
- rect: {
- fill: '#CCCCFF',
- pointerDirection: 'down',
- pointerWidth: 10,
- pointerHeight: 10,
- lineJoin: 'round',
- shadowColor: 'black',
- shadowBlur: 10,
- shadowOffset: 10,
- shadowOpacity: 0.5
- }
- });
- var labelLeft = new Kinetic.Label({
- x: 195,
- y: 130,
- opacity: 0.75,
- listening: false,
- text: {
- text: 'Label pointing left',
- fontFamily: 'Calibri',
- fontSize: 18,
- padding: 5,
- fill: 'white'
- },
- rect: {
- fill: 'green',
- pointerDirection: 'left',
- pointerWidth: 20,
- pointerHeight: 28,
- lineJoin: 'round',
- }
- });
- var simpleLabel = new Kinetic.Label({
- x: 350,
- y: 50,
- opacity: 0.75,
- text: {
- text: 'Simple label',
- fontFamily: 'Calibri',
- fontSize: 18,
- padding: 5,
- fill: 'black'
- },
- rect: {
- fill: '#0099CC',
- }
- });
- // add the shape to the layer
- layer.add(tooltip).add(labelLeft).add(simpleLabel);
- // add the layer to the stage
- stage.add(layer);
- </script>
- </body>
- </html>
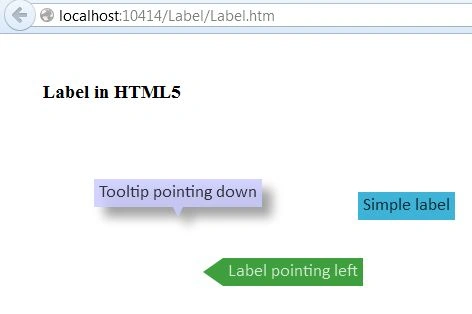
Output
For more information, download the attached sample application.
Join the conversation! Your thoughts help the community grow.